Lexus IS250 IS220d GSE20 ALE20 - BRAKE
REAR BRAKE - INSTALLATION
| 1. INSTALL REAR DISC BRAKE CYLINDER ASSEMBLY LH |

Install 2 new No. 1 caliper plates to the caliper support bracket.
Install the cylinder assembly rear together with the caliper support bracket with the 2 bolts.
- Torque:
- 54 N*m{ 551 kgf*cm, 40 ft.*lbf}
| 2. INSTALL NO. 1 REAR DISC BRAKE CYLINDER SUPPORT PIN |

Install the rear cylinder assembly with the cylinder slide pin.
- Torque:
- 25 N*m{ 250 kgf*cm, 18 ft.*lbf}
| 3. INSTALL ANTI-SQUEAL SHIM |

Apply disc brake grease to both sides of the 2 No. 1 anti-squeal shim.
Install the 4 anti-squeal shims to each of the 2 brake pads.
- HINT:
| 4. INSTALL REAR DISC BRAKE PAD WITH ANTI-SQUEAL SHIMS |

Install the 2 brake pads with the anti-squeal shims to the rear cylinder assembly.
Install the 2 pad guide pins, anti-squeal spring and pin hold clip as shown in the illustration.
- NOTICE:
- Make sure that the engaged parts of the anti-squeal spring are installed correctly.
| 5. CONNECT REAR LH FLEXIBLE HOSE |

Connect the flexible hose with the union bolt and a new gasket.
- Torque:
- 30 N*m{ 306 kgf*cm, 22 ft.*lbf}
- NOTICE:
- Install the flexible hose lock securely in the lock hole in the rear disc brake cylinder assembly.
| 6. FILL RESERVOIR WITH BRAKE FLUID |

Fill the reservoir with brake fluid.
- Fluid:
- SAE J1703 or FMVSS No. 116 DOT3
| 7. BLEED BRAKE LINE |
- NOTICE:
- Bleed the brake line at the wheel furthest from the master cylinder.

Connect the vinyl tube to the bleeder plug.
Depress the brake pedal several times, then loosen the bleeder plug with the pedal depressed (*3).

When fluid no longer comes out, tighten the bleeder plug, then release the brake pedal (*4).
Repeat (*3) and (*4) until all the air in the fluid is completely bled out.
Using SST, tighten the bleeder plug completely.
- SST
- 09023-00101
- Torque:
- 11 N*m{ 110 kgf*cm, 8 ft.*lbf}
Repeat the above procedures for each wheel to bleed the air from the brake line.
| 8. BLEED BRAKE ACTUATOR ASSEMBLY |
- NOTICE:
- After bleeding the air from the brake system, if the correct height or feel of the brake pedal cannot be obtained, bleed the air from the brake actuator assembly with the intelligent tester by following the procedures below.
Depress the brake pedal more than 20 times with the engine switch off.
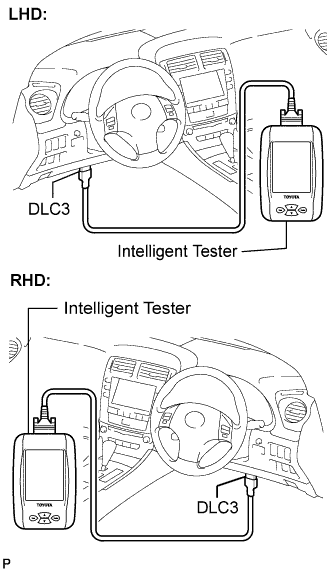
Connect the intelligent tester to the DLC3, then turn the engine switch on (IG).
- NOTICE:
- Do not start the engine.
Turn the intelligent tester power on and select "AIR BLEEDING" on the screen.
- NOTICE:
Bleed the air from the actuator according to "Step 1: Increase" on the intelligent tester display.
- NOTICE:
- Make sure that the master cylinder reservoir tank does not become empty of brake fluid.
Connect a vinyl tube to either one of the bleeder plugs.
Depress the brake pedal several times, then loosen the bleeder plug connected to the vinyl tube with the pedal depressed (*5).
When fluid no longer comes out, tighten the bleeder plug, then release the brake pedal (*6).
Repeat (*5) and (*6) until all the air in the fluid is completely bled.
Using SST, tighten the bleeder plug completely.
- SST
- 09023-00101
- Torque:
- 11 N*m{ 110 kgf*cm, 8 ft.*lbf}
Repeat the above procedures for the rest of the wheels to bleed the air from the brake lines.
Bleed the air from the suction line according to "Step 2: Inhalation" on the intelligent tester display.
- NOTICE:
Connect a vinyl tube to the bleeder plug at the right front wheel or the right rear wheel and loosen the bleeder plug.
Operate the brake actuator assembly to bleed the air using the intelligent tester (*7).
- NOTICE:

Check that the operation has stopped by referring to the intelligent tester display and tighten the bleeder plug (*8).
Repeat (*7) and (*8) until all the air in the fluid is completely bled out.
Using SST, tighten the bleeder plug completely.
- SST
- 09023-00101
- Torque:
- 11 N*m{ 110 kgf*cm, 8 ft.*lbf}
For the rest of the wheels, bleed the air in the same way as stated in the above procedures.
Bleed the air from the pressure reduction line according to "Step 3: Decrease" on the intelligent tester display.
- NOTICE:

Connect a vinyl tube to either one of the bleeder plugs.
Loosen the bleeder plug (*9).
Using the intelligent tester, operate the brake actuator assembly, completely depress the brake pedal and hold it.
- NOTICE:
Tighten the bleeder plug, then release the brake pedal (*10).
Repeat steps (*9) to (*10) until all the air in the fluid is completely bled out.
Using SST, tighten the bleeder plug completely.
- SST
- 09023-00101
- Torque:
- 11 N*m{ 110 kgf*cm, 8 ft.*lbf}
Repeat the above procedures for the rest of the brakes to bleed the air from the brake line.
Bleed the air from the brake line again according to "Step 4: Increase" on the intelligent tester display.
- NOTICE:
Connect a vinyl tube to either one of the bleeder plugs.
Depress the brake pedal several times, then loosen the bleeder plug connected to the vinyl tube with the pedal depressed (*11).
When fluid no longer comes out, tighten the bleeder plug, then release the brake pedal (*12).
Repeat (*11) and (*12) until all the air in the fluid is completely bled out.
Using SST, tighten the bleeder plug completely.
- SST
- 09023-00101
- Torque:
- 11 N*m{ 110 kgf*cm, 8 ft.*lbf}
Repeat the above procedures for each brake to bleed the air from the brake line.
Finish "AIR BLEEDING" on the intelligent tester and turn off the power.
Disconnect the intelligent tester from the DLC3.
Turn the engine switch off.
| 9. INSPECT FLUID LEVEL IN RESERVOIR |
Check the fluid level and add fluid if necessary.
- Fluid:
- SAE J1703 or FMVSS No. 116 DOT3
- HINT:
- If fluid leaks, tighten or replace the leaking part.
| 10. INSPECT FOR BRAKE FLUID LEAKAGE |
| 11. INSTALL REAR WHEEL |
- Torque:
- 103 N*m{ 1,050 kgf*cm, 76 ft.*lbf}