Lexus IS250 IS220d GSE20 ALE20 - WINDSHIELD / WINDOWGLASS
BACK WINDOW GLASS - REMOVAL
| 1. REMOVE REAR SEAT CUSHION ASSEMBLY |
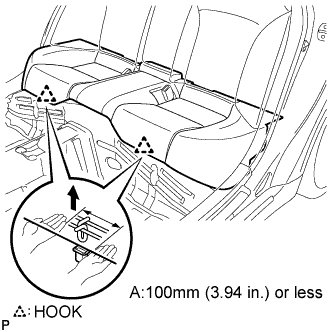
Detach the 2 front hooks of the seat cushion from the vehicle body.
- NOTICE:
- Follow the instructions below carefully as the cushion frame deforms easily.
Choose a hook to detach first. Place your hands near the hook as shown in the illustration. Then lift the seat cushion to detach the hook.
Repeat for the other hook.
Detach the 2 rear hooks of the seat cushion from the seatback.
Remove the seat cushion.
| 2. REMOVE REAR SEAT HEADREST ASSEMBLY |
| 3. REMOVE REAR SEAT CENTER HEADREST ASSEMBLY |
| 4. REMOVE REAR SEATBACK ASSEMBLY |

Using a screwdriver, detach the claws to open the cap of the 3 rear seat shoulder belt guides.

Using a screwdriver, detach the claw to open the cap of the 3 rear seat shoulder belt guides.

Remove the 4 bolts and rear seatback assembly.
| 5. REMOVE REAR DOOR SCUFF PLATE LH |

Put protective tape around the rear door scuff plate.
Using a moulding remover, disengage the 2 clips.

Disengage the 5 claws and remove the the rear door scuff plate LH.
| 6. REMOVE REAR DOOR SCUFF PLATE RH |
| 7. REMOVE REAR SEAT SIDE GARNISH LH |

Disengage the 5 claws and remove the rear seat side garnish LH.
| 8. REMOVE REAR SEAT SIDE GARNISH RH |
| 9. REMOVE ROOF SIDE INNER GARNISH LH |

Disengage the 4 clips and claw, and remove the roof side inner garnish LH.
| 10. REMOVE ROOF SIDE INNER GARNISH RH |
| 11. REMOVE HIGH MOUNTED STOP LIGHT SET |

Disengage the 4 claws and disconnect the high mounted stop light set as shown in the illustration.
Disconnect the connector and remove the high mounted stop light set.
| 12. REMOVE PACKAGE TRAY TRIM PANEL ASSEMBLY (w/o Rear Sunshade) |

Remove the bolt and disconnect the floor end of the rear seat 3 point type belt assembly LH.
- HINT:
- Use the same procedures for the RH side and the LH side.

Remove the bolt and disconnect the floor end of the rear seat inner with center belt assembly RH.

Using a moulding remover, disengage the 4 claws and remove the rear seat shoulder belt cover LH.
- HINT:
- Use the same procedures for the RH side and LH side.

Using a moulding remover, disengage the 4 claws and remove the rear seat shoulder belt cover center.

Disengage the 3 clips and raise the front portion of the package tray trim panel assembly.
Pass the 3 rear seat belt floor anchors through the package tray trim panel assembly.
Disconnect the connector from the center stop light assembly.
Disengage the 5 claws and remove the package tray trim panel assembly and the center stop light assembly as a unit.
| 13. REMOVE PACKAGE TRAY TRIM PANEL ASSEMBLY (w/ Rear Sunshade) |
Remove the bolt and separate the floor side of the rear seat 3 point type belt assembly LH.
- HINT:
- Use the same procedures for the RH side and the LH side.
Remove the bolt and separate the floor side of the rear seat inner with center belt assembly RH.

Disengage the 3 clips and raise the front portion of the package tray trim panel assembly.

Disengage the 2 claws and remove the rear seat shoulder belt covers.
- HINT:
- Use the same procedure for the other 2 rear seat shoulder belt covers.
Pass the 3 rear seat belt floor anchors through the holes in the package tray trim panel assembly.
Remove the package tray trim panel assembly.
| 14. REMOVE NO. 2 PACKAGE TRAY TRIM PANEL ASSEMBLY (w/ Rear Sunshade) |

Disengage the 3 clips and 5 claws, and remove the No. 2 package tray trim panel assembly.
| 15. REMOVE SPOT LIGHT ASSEMBLY |

Using a moulding remover, disengage the 2 clips.
Disconnect the connector. Remove the spot light assembly.
| 16. REMOVE COAT HOOK |

Remove the screw and coat hook.
- HINT:
- Use the same procedure to remove the hook on the other side.
| 17. REMOVE ASSIST GRIP SUB-ASSEMBLY |
Using a screwdriver, disengage the 4 claws and remove the 2 assist grip covers.

- HINT:
- Tape the screwdriver tip before use.
Disengage the 2 clips and remove the assist grip sub-assembly.
- HINT:
- Use the same procedure for the other 3 assist grips.
| 18. REMOVE ROOF HEADLINING ASSEMBLY (w/o Sliding Roof) |
It is not necessary to completely remove the roof headlining. Slightly lower the rear section of the roof headlining so that the back window glass can be removed .
| 19. REMOVE ROOF HEADLINING ASSEMBLY (w/ Sliding Roof) |
It is not necessary to completely remove the roof headlining. Slightly lower the rear section of the roof headlining so that the back window glass can be removed .
| 20. REMOVE AMPLIFIER ANTENNA ASSEMBLY |

Disconnect the connector.
Disengage the clamp and remove the 2 nuts.
Disengage the clip and remove the amplifier antenna assembly.
- NOTICE:
- If reusing the removed amplifier antenna assembly, do not touch the contact terminals.
| 21. REMOVE NO. 1 BACK WINDOW MOULDING |

Using a knife, cut off the moulding as shown in the illustration.
- NOTICE:
- Do not damage the vehicle body with the knife.
Remove the remaining moulding.
- HINT:
- When removing, make a partial cut, then pull and remove it by hand.
| 22. REMOVE BACK WINDOW GLASS |

Pass a piano wire between the vehicle body and glass from the interior.
Tie both wire ends to wooden blocks or similar objects.
- NOTICE:
- HINT:
- Apply protective tape to the outer surface to prevent the surface from being scratched.

Place matchmarks over the glass and vehicle body on the locations indicated in the illustration.
- HINT:
- Matchmarks do not need to be placed if the glass is not going to be reused.
Cut off the adhesive by pulling the piano wire around the glass.
Using a suction cup, remove the glass.
- NOTICE:
- Leave as much adhesive on the vehicle body as possible when removing the glass.
| 23. REMOVE NO. 2 BACK WINDOW GLASS STOPPER |
Using a scraper, remove the No. 2 windshield glass stoppers.
| 24. REMOVE NO. 1 BACK WINDOW GLASS STOPPER |

Remove the No. 1 windshield glass stoppers.
| 25. CLEAN BACK WINDOW GLASS |
Using a scraper, remove the damaged stoppers and adhesive sticking to the glass.

Clean the outer edges of the glass with non-residue type solvent.
- NOTICE: