Lexus IS250 IS220d GSE20 ALE20 4GR-FSE COOLING
WATER PUMP - REMOVAL
| 1. REMOVE COOL AIR INTAKE DUCT SEAL |
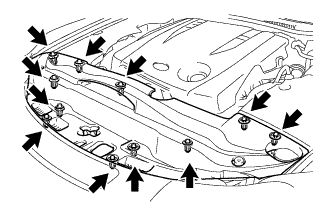
Remove the 11 clips and intake duct seal.
| 2. REMOVE V-BANK COVER SUB-ASSEMBLY |
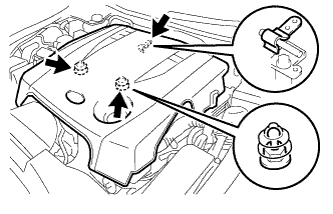
Raise the V-bank cover to disengage the clip on the rear of the cover. Raise the cover again to disengage the 2 clips on the front of the cover and remove the cover.
- NOTICE:
- Attempting to disengage both front and rear clips at the same time may cause the cover to break.
| 3. REMOVE NO. 1 INLET AIR CLEANER |
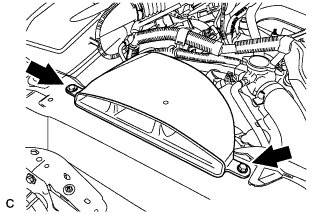
Remove the bolt, clip and inlet air cleaner.
| 4. DISCHARGE REFRIGERANT FROM REFRIGERATION SYSTEM |
Start up the engine.
Turn the A/C switch on.
Operate the cooler compressor at an engine speed of approximately 1,000 rpm for 5 to 6 minutes to circulate the refrigerant and collect the compressor oil remaining in each component into the cooler compressor.
Stop the engine.
Using SST, discharge the refrigerant gas.
- SST
- 07110-58060(07117-58060,07117-58070,07117-58080,07117-58090,07117-78050,07117-88060,07117-88070,07117-88080)
| 5. REMOVE V-RIBBED BELT |
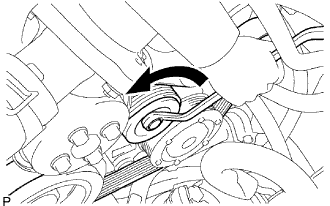
While releasing the belt tension by turning the belt tensioner counterclockwise, and remove the V-ribbed belt from the belt tensioner.
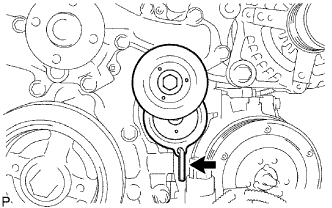
While turning the belt tensioner counterclockwise, align with its holes, and then insert the 5 mm bi-hexagon wrench into the holes to fix the belt tensioner.
| 6. REMOVE ENGINE UNDER COVER |
| 7. REMOVE REAR ENGINE UNDER COVER LH |
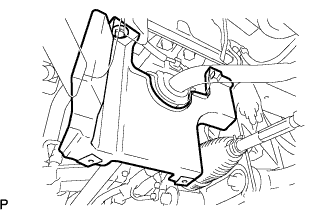
Remove the bolt and engine under cover LH.
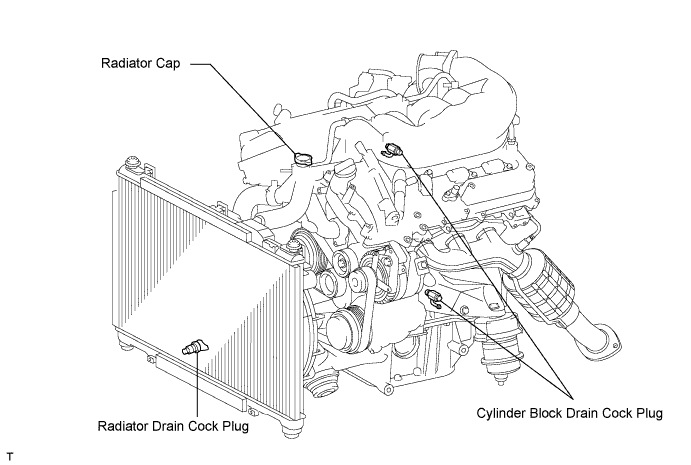
| 8. DRAIN ENGINE COOLANT |
- NOTICE:
- Do not remove the radiator cap while the engine and radiator are still hot. Pressurized, hot engine coolant and steam may be released and cause serious burns.
Remove the radiator cap and reservoir tank cap.
Loosen the radiator drain cock plug and 2 cylinder block drain cock plugs. Then drain the coolant.
- HINT:
- Collect the coolant in a container and dispose of it according to the regulations in your area.
| 9. DRAIN ENGINE OIL |
Remove the drain plug.
Install a new gasket and the drain plug.
- Torque:
- 40 N*m{ 408 kgf*cm, 30 ft.*lbf}
| 10. REMOVE NO. 1 COOLER REFRIGERANT SUCTION HOSE |
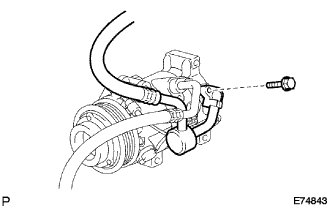
Remove the bolt and disconnect the No. 1 cooler refrigerant suction hose from the compressor.
Remove the O-ring from the cooler refrigerant suction hose.
- NOTICE:
- Seal the openings of the disconnected parts using vinyl tape to prevent moisture and foreign matter from entering.
| 11. DISCONNECT DISCHARGE HOSE SUB-ASSEMBLY |
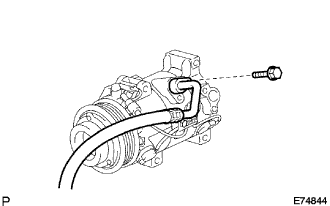
Remove the bolt and disconnect the discharge hose from the compressor.
Remove the O-ring from the discharge hose sub-assembly.
- NOTICE:
- Seal the openings of the disconnected parts using vinyl tape to prevent moisture and foreign matter from entering.
| 12. REMOVE COMPRESSOR AND MAGNETIC CLUTCH |
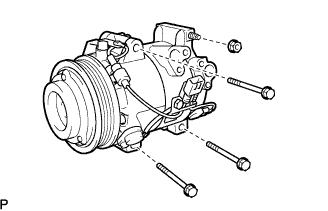
Disconnect the magnetic clutch connector.
Remove the 3 bolts and nut.
Remove the compressor and magnetic clutch.
| 13. REMOVE V-RIBBED BELT TENSIONER ASSEMBLY |
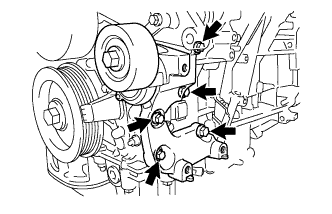
Remove the 5 bolts, then remove the V-ribbed belt tensioner assembly.)
| 14. DISCONNECT RADIATOR HOSE |
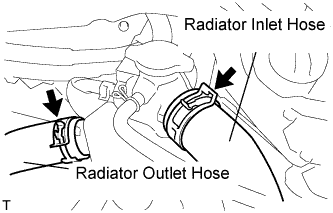
Disengage the 2 clamps and disconnect the radiator inlet hose and radiator outlet hose.
| 15. REMOVE NO. 1 ENGINE COVER |
Remove the 3 clips, then remove the No. 1 engine cover.
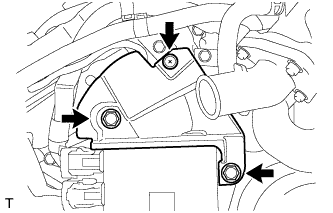
| 16. REMOVE INJECTOR DRIVER |
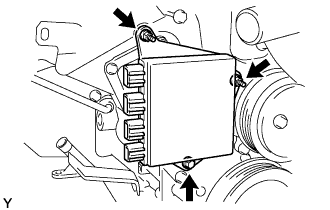
Remove the bolt, 2 nuts and injector driver.
| 17. REMOVE NO. 2 ENGINE COVER |
Remove the 3 clips and clamp, then remove the No. 2 engine cover.
| 18. REMOVE WATER PUMP PULLEY |
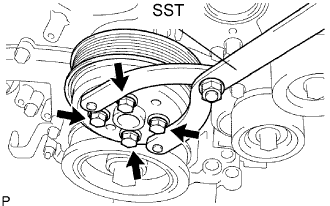
Using SST, hold the water pump pulley.
- SST
- 09960-10010(09962-01000,09963-00700)
Remove the 4 bolts and water pump pulley.
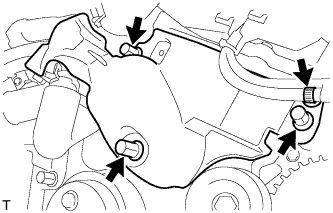
| 19. REMOVE WATER INLET |

Disconnect the 5 hoses.
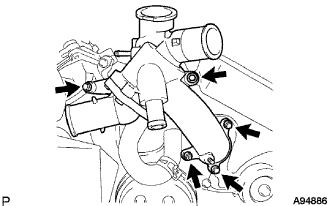
Remove the 4 bolts, nut and water inlet.
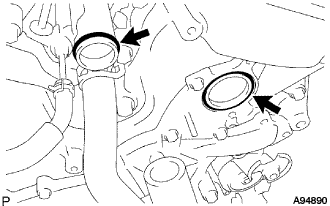
Remove the water inlet housing gasket and water outlet pipe O-ring.
| 20. REMOVE NO. 2 IDLER PULLEY SUB-ASSEMBLY |
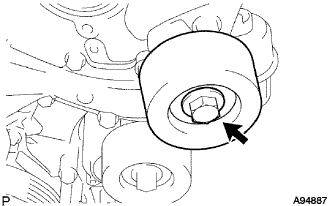
Remove the bolt, idler pulley cover plate No.2 and No.2 idler pulley sub-assembly.
| 21. REMOVE WATER PUMP ASSEMBLY |
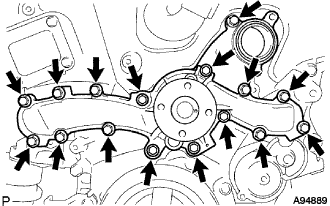
Remove the 16 bolts, water pump assembly and water pump gasket.