Lexus IS250 IS220d GSE20 ALE20 2AD-FHV LUBRICATION
OIL PUMP - INSTALLATION
| 1. INSTALL TIMING CHAIN OR BELT COVER SUB-ASSEMBLY |
Place the timing chain cover on wooden blocks.

Using SST, tap in a new oil seal to the timing chain or belt cover sub-assembly.
- SST
- 09223-50010
- Installation depth:
- 0 to 0.6 mm (0 to 0.024 in.)
- NOTICE:
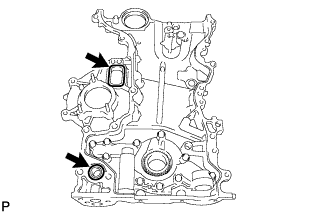
Install a new gasket and O-ring to the timing chain cover as shown in the illustration.
Apply seal packing in a continuous bead to the timing chain cover as shown in the following illustration:
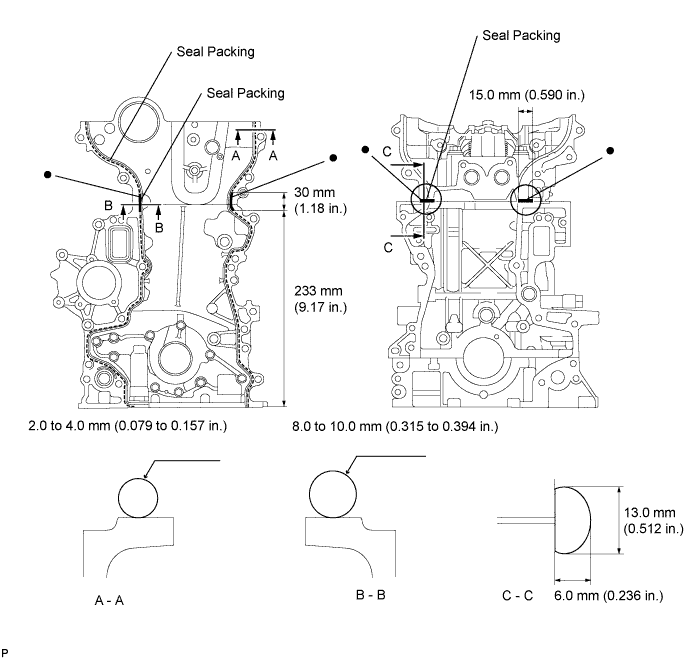
- Seal packing:
- Toyota Genuine Seal Packing Black, Three Bond 1207B or equivalent
- Seal width:
Position Specified Condition A - A 2.0 to 4.0 mm (0.079 to 0.157 in.) B - B 8.0 to 10.0 mm (0.315 to 0.394 in.) C - C Width: 13.0 mm (0.512 in.)
Height: 6.0 mm (0.236 in.)
- NOTICE:
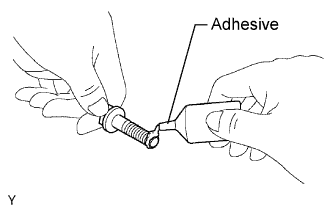
Apply adhesive to the 4 bolts.
- Adhesive:
- Toyota Genuine Adhesive 1324, Three Bond 1324 or equivalent
- HINT:
- Bolt length: 37.5 mm (1.476 in.)
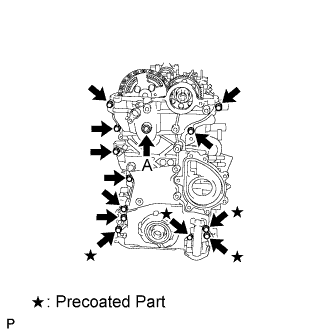
Temporarily install the timing chain cover with the 4 bolts.
Temporarily install a new seal washer and bolt A.
- HINT:
- Bolt length: 67.5 mm (2.657 in.)
Temporarily install the 8 bolts.
- HINT:
- Bolt length: 37.5 mm (1.476 in.)
Using several steps, install the 13 bolts.
- Torque:
- 32 N*m{ 321 kgf*cm, 23 ft.*lbf}Bolts except A
- 21 N*m{ 214 kgf*cm, 15 ft.*lbf}A bolt
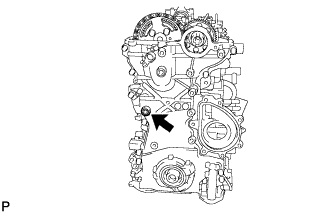
Using a 10 mm socket hexagon wrench, install the timing chain cover tight plug and a new gasket.
- Torque:
- 19 N*m{ 194 kgf*cm, 14 ft.*lbf}
| 2. INSTALL WATER PUMP ASSEMBLY |

Align the protrusions and install a new gasket onto the timing chain cover.
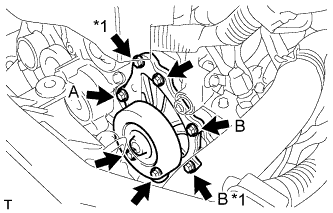
Apply adhesive to the bolt (A) shown in the illustration.
| Item | Length (mm) |
| Bolt (B) | 30 |
| Bolts except (B) | 45 |
Install the 2 bolts (*1), then tighten the other bolts.
- Torque:
- 32 N*m{ 326 kgf*cm, 24 ft.*lbf}
| 3. INSTALL CRANKSHAFT PULLEY |
Align the keyway of the pulley with the key located on the crankshaft, and then slide the pulley into place.
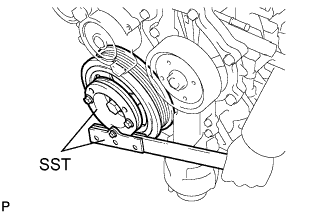
Using SST, install a new pulley bolt.
- SST
- 09213-58013
09330-00021
- Torque:
- 250 N*m{ 2,550 kgf*cm, 184 ft.*lbf}
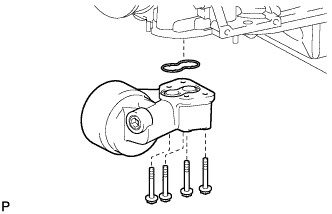
| 4. INSTALL OIL STRAINER SUB-ASSEMBLY |
Install a new O-ring and the oil strainer with the 4 bolts.
- Torque:
- 32 N*m{ 321 kgf*cm, 23 ft.*lbf}
| 5. INSTALL OIL FILTER BRACKET |
Install a new gasket and the oil filter bracket with the 4 bolts.
- Torque:
- 9.0 N*m{ 92 kgf*cm, 80 in.*lbf}
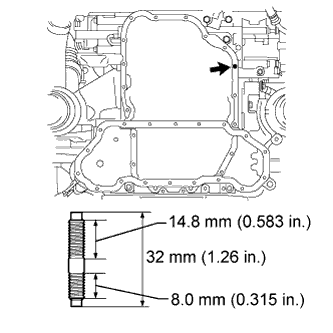
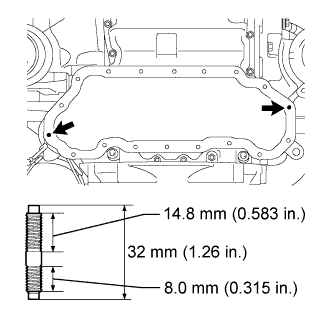
| 6. INSTALL OIL PAN SUB-ASSEMBLY |
If replacing a stud bolt, install the stud bolt.
- Torque:
- 5.0 N*m{ 51 kgf*cm, 44 in.*lbf}
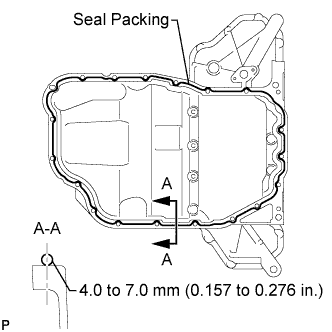
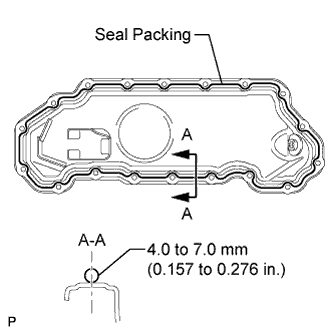
Apply seal packing in a continuous bead as shown in the illustration.
- Seal packing:
- Toyota Genuine Seal Packing Black, Three Bond 1207B or equivalent
- Seal width:
- 4.0 to 7.0 mm (0.157 to 0.276 in.)
- NOTICE:
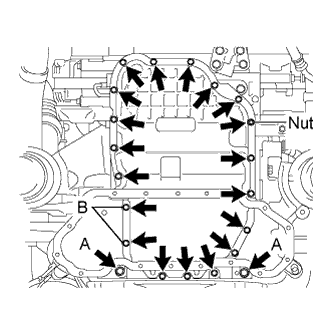
Temporarily install the oil pan with the 20 bolts and nut.
Uniformly tighten the 20 bolts and nut.
- Torque:
- Bolt A:
- 43 N*m{ 439 kgf*cm, 31 ft.*lbf}
- Except bolt A:
- 11 N*m{ 112 kgf*cm, 8 ft.*lbf}
- Nut:
- 11 N*m{ 112 kgf*cm, 8 ft.*lbf}
- NOTICE:
- Be sure to replace the bolts indicated by B with new ones or reuse them after applying adhesive 1324.
| 7. INSTALL NO. 2 OIL PAN SUB-ASSEMBLY |
If replacing the stud bolts, install the stud bolts.
- Torque:
- 5.0 N*m{ 51 kgf*cm, 44 in.*lbf}
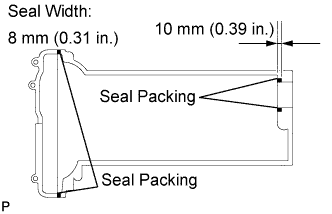
Apply seal packing in a continuous bead as shown in the illustration.
- Seal packing:
- Toyota Genuine Seal Packing Black, Three Bond 1207B or equivalent
- Seal width:
- 4.0 to 7.0 mm (0.157 to 0.276 in.)
- NOTICE:
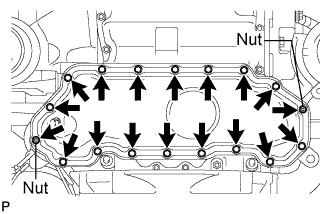
Temporarily install the oil pan with the 16 bolts and 2 nuts.
Uniformly tighten the 16 bolts and 2 nuts.
- Torque:
- 11 N*m{ 112 kgf*cm, 8 ft.*lbf}
Install a new gasket and the drain plug.
- Torque:
- 38 N*m{ 388 kgf*cm, 28 ft.*lbf}
| 8. INSTALL OIL FILLER CAP SUB-ASSEMBLY |
Install a new gasket.
Install the oil filler cap sub-assembly to the cylinder head cover sub-assembly.
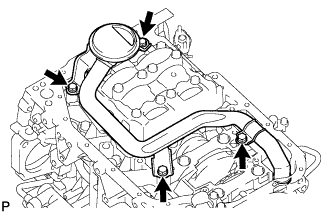
| 9. INSTALL CYLINDER HEAD COVER SUB-ASSEMBLY |
Clean the contact surfaces of the cylinder head cover, cylinder head assembly and timing chain cover assembly.
Fit a new cylinder head cover gasket and a new No. 2 gasket into the gasket groove on the cover.
Apply a continuous bead of seal gasket (diameter: 8 mm (0.31 in.)) to the contact surface between the cylinder head assembly and cylinder head cover assembly as shown in the illustration.
- Seal packing:
- Toyota Genuine Seal Packing Black, Three Bond 1207B or equivalent
- NOTICE:
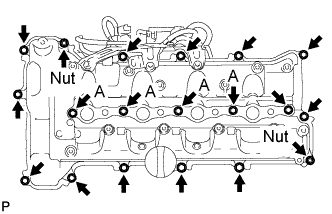
Install the cylinder head cover sub-assembly with the 13 bolts, 4 nozzle holder clamp seats, 2 washers and 2 nuts.
- Torque:
- for bolt A (Nozzle holder clamp seat):
- 16 N*m{ 167 kgf*cm, 12 ft.*lbf}
- for other bolts:
- 11 N*m{ 112 kgf*cm, 8 ft.*lbf}
- for nut:
- 11 N*m{ 112 kgf*cm, 8 ft.*lbf}
Install the 2 engine cover joints.
- Torque:
- 8.0 N*m{ 81 kgf*cm, 71 in.*lbf}
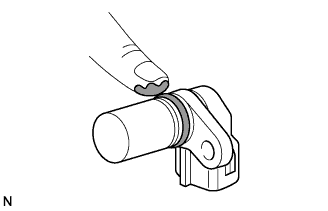
| 10. INSTALL CRANK POSITION SENSOR |
Apply a light coat of engine oil to the O-ring of the crankshaft position sensor.
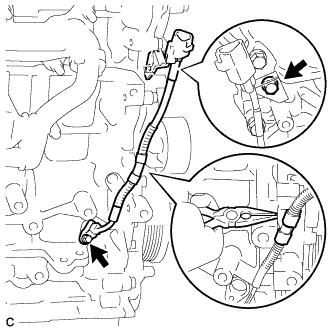
Install the crank position sensor with the 2 bolts and clamp.
- Torque:
- 8.8 N*m{ 90 kgf*cm, 78 in.*lbf}
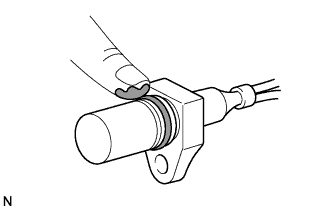
| 11. INSTALL CAM POSITION SENSOR |
Apply a light coat of engine oil to the O-ring of the camshaft position sensor.
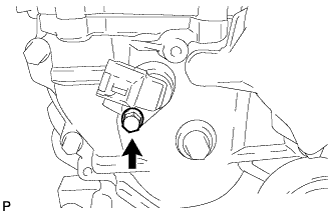
Install the cam position sensor with the bolt.
- Torque:
- 8.8 N*m{ 90 kgf*cm, 78 in.*lbf}
| 12. INSTALL INJECTOR ASSEMBLY |
- HINT:
| 13. INSTALL ENGINE STAND |
| 14. INSTALL ENGINE ASSEMBLY |
- HINT: