Lexus IS250 IS220d GSE20 ALE20 2AD-FHV FUEL
COMMON RAIL - INSTALLATION
| 1. INSTALL COMMON RAIL ASSEMBLY |
- NOTICE:
- In cases where the common rail is replaced, the fuel inlet pipe and injection pipe must also be replaced.

Temporarily install the common rail assembly with the 2 bolts.
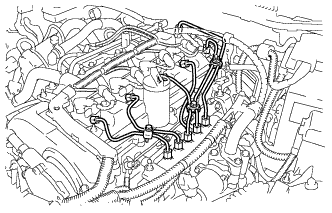
Temporarily install the 2 fuel inlet pipes.
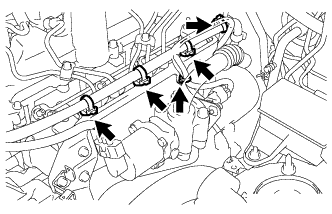
Temporarily install the No. 1, No. 2, No. 3 and No. 4 injection pipes.
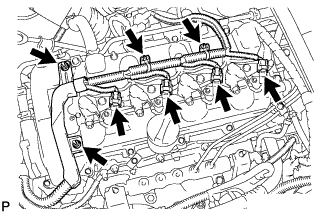
Tighten the common rail assembly with the 2 bolts.
- Torque:
- 21 N*m{ 210 kgf*cm, 15 ft.*lbf}
Remove the No. 1, No. 2, No. 3 and No. 4 injection pipes.
Remove the 2 fuel inlet pipes.
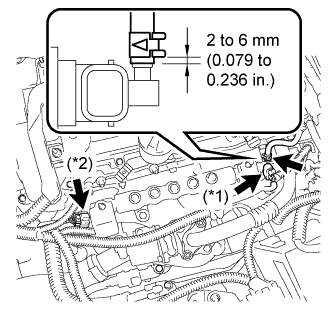
Connect the pressure discharge valve connector (*1).
Connect the fuel pressure sensor connector (*2).
Using pliers, slide the clip to connect the fuel hose as shown in the illustration.
| 2. INSTALL FUEL INLET PIPE SUB-ASSEMBLY |
- NOTICE:
- In cases where the common rail is replaced, the fuel inlet pipe must also be replaced.
- HINT:
| 3. CONNECT ENGINE WIRE |
Install the engine wire harness to the cylinder head cover.
Connect the 2 harness clamps and the 4 injector connectors.
Install the 2 nuts.
- Torque:
- 2.2 N*m{ 22 kgf*cm, 19 in.*lbf}
| 4. INSTALL NO. 4 INJECTION PIPE SUB-ASSEMBLY |
- NOTICE:
- In cases where the common rail is replaced, the injection pipes must also be replaced.
- HINT:
| 5. INSTALL NO. 3 INJECTION PIPE SUB-ASSEMBLY |
- HINT:
| 6. INSTALL NO. 2 INJECTION PIPE SUB-ASSEMBLY |
- HINT:
- Perform the same procedure as for the No. 3 injection pipe.
| 7. INSTALL NO. 1 INJECTION PIPE SUB-ASSEMBLY |
- HINT:
- Perform the same procedure as for the No. 3 injection pipe.
Tighten the 4 injection pipe clamps with the 2 bolts.
- Torque:
- 5.0 N*m{ 51 kgf*cm, 44 in.*lbf}
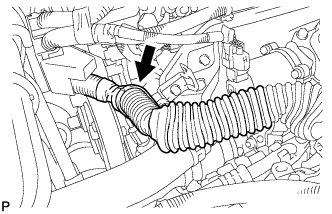
| 8. INSTALL NO. 1 INTAKE MANIFOLD INSULATOR |

Install the No. 1 intake manifold insulator.
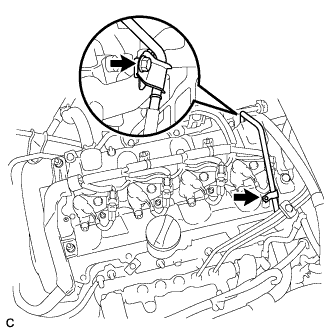
| 9. INSTALL WIRING HARNESS CLAMP BRACKET |
Install the wire harness clamp bracket with the 2 bolts.
Connect the 5 wire harness clamps.
Connect the wire harness clamp.
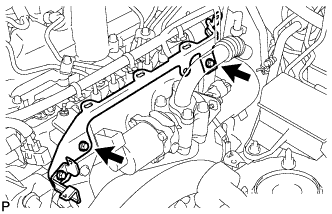
| 10. INSTALL NO. 1 FUEL PIPE |
Install the No. 1 fuel pipe with the 2 bolts.
Connect the 2 fuel hoses and 2 clips.
| 11. CONNECT CABLE TO NEGATIVE BATTERY TERMINAL |
| 12. CHECK FOR FUEL LEAKS |
PERFORM ACTIVE TEST
Connect the intelligent tester to the DLC3.
Turn the engine switch ON (IG).
Turn the intelligent tester ON.
Enter the following menus: Powertrain / ENGINE / Active Test.
Perform the Active Test.
| Intelligent Tester Display | Test Details | Control Range | Diagnostic Notes |
| Test the Fuel Leak | Pressurize common rail internal fuel pressure, and check for fuel leaks | Stop/Start | Fuel pressure inside common rail pressurized to specified value and engine speed increased to 2,000 rpm when "Start" is selected Above conditions to be maintained while "Start" is selected |
| 13. INSTALL NO. 1 ENGINE COVER |
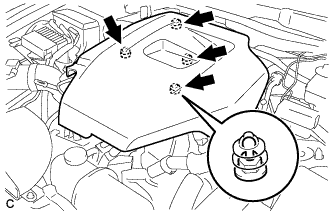
Install the No. 1 engine cover.
| 14. PERFORM INITIALIZATION |
Perform initialization procedure .
- HINT:
- Some vehicle systems require initialization after reconnecting the negative battery terminal.