Lexus IS250 IS220d GSE20 ALE20 2AD-FHV ENGINE MECHANICAL
ENGINE UNIT - REASSEMBLY
| 1. INSTALL STUD BOLT |
- NOTICE:
- If the stud bolt is deformed or the threads are damaged, replace it.
Using an E5 "torx" socket wrench, install the stud bolts A and C.
- Torque:
- 3.0 N*m{ 31 kgf*cm, 27 in.*lbf}
Apply thread sealant to the hole for the stud bolts B on the cylinder block. Install the stud bolts B.
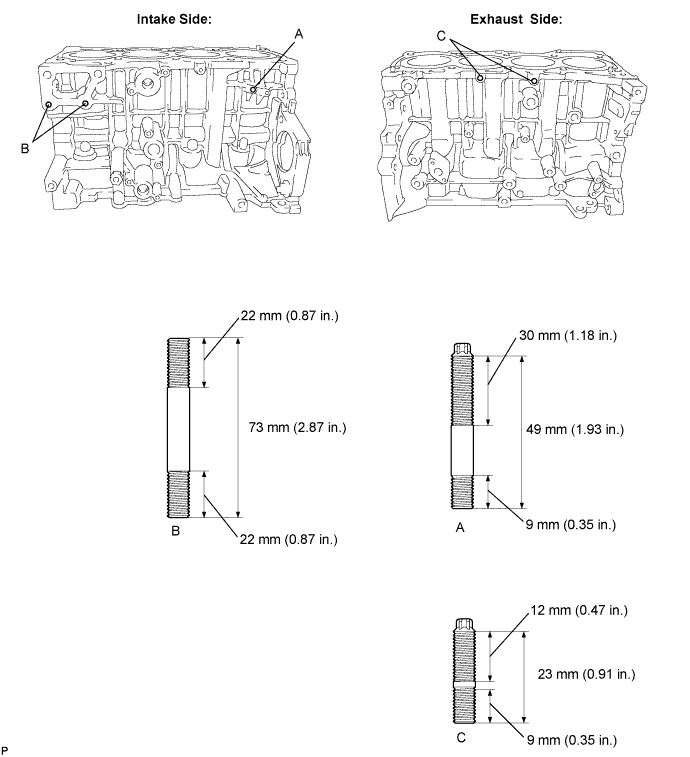
- Torque:
- 20 N*m{ 204 kgf*cm, 15 ft.*lbf}
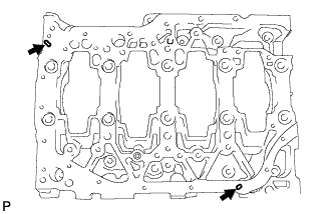
Apply thread sealant to the hole for the stud on the cylinder block. Install the 2 stud bolts to the crankshaft bearing cap.
- Torque:
- 5.0 N*m{ 51 kgf*cm, 44 in.*lbf}
| 2. INSTALL STRAIGHT PIN |
Using a plastic hammer, tap in new straight pins to the cylinder block.
Using a plastic hammer, tap in new ring pins to the crankshaft bearing cap sub-assembly.
| 3. INSTALL CYLINDER BLOCK WATER DRAIN COCK SUB-ASSEMBLY |
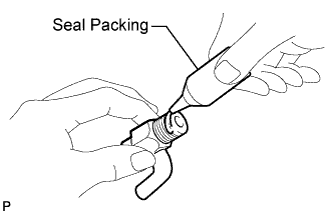
Apply thread sealant around the drain cock.
- Seal packing:
- Toyota Genuine Seal Packing Black 1282B, Three Bond 1282B or equivalent
Install the cylinder block water drain cock as shown in the illustration.
- Torque:
- 20 N*m{ 204 kgf*cm, 15 ft.*lbf}
- NOTICE:
- Do not rotate the drain cocks more than 1 revolution (360°) after tightening the drain cocks with the specified torque.
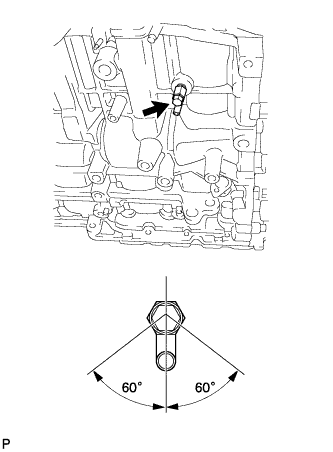
| 4. INSTALL NO. 1 CRANKSHAFT POSITION SENSOR PLATE |

Install the crankshaft position sensor plate by fitting the straight pin of the crankshaft into the hole on the crankshaft position sensor plate.
Using a "torx" socket wrench (T30), install the 3 bolts.
- Torque:
- 11 N*m{ 112 kgf*cm, 8 ft.*lbf}
- NOTICE:
- Confirm that the crankshaft position sensor plate is not slanted.
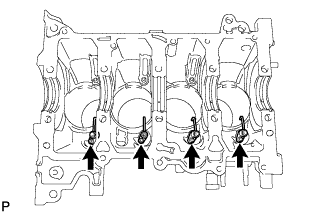
| 5. INSTALL OIL REFLECTOR PLATE |
Using a 5 mm hexagon wrench, install the oil reflector plates.
- Torque:
- 9.0 N*m{ 92 kgf*cm, 80 in.*lbf}
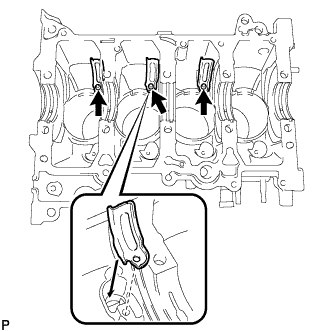
| 6. INSTALL NO. 1 OIL NOZZLE SUB-ASSEMBLY |
Using a 5 mm hexagon wrench, install the oil nozzles.
- Torque:
- 9.0 N*m{ 92 kgf*cm, 80 in.*lbf}
| 7. INSTALL PISTON WITH PIN SUB-ASSEMBLY |
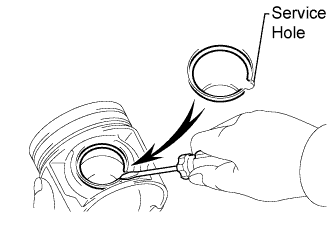
Assemble the piston and connecting rod.
Using a screwdriver, install a new snap ring to one end of the piston pin hole.
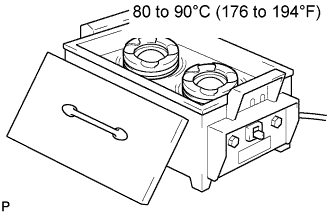
Gradually heat the piston to approximately 80 to 90°C (176 to 194°F).
Coat the piston pin with engine oil.
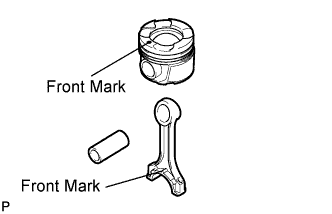
Align the front marks of the piston and connecting rod, and push in the piston pin with your thumb.
- HINT:
- The piston and pin are a matched set.

Check the fitting condition between the piston and piston pin by trying to move the piston back and forth on the piston pin.
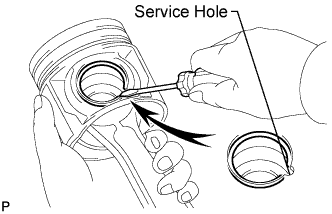
Using a screwdriver, install a new snap ring to the other end of the piston pin hole.
| 8. INSTALL PISTON RING SET |
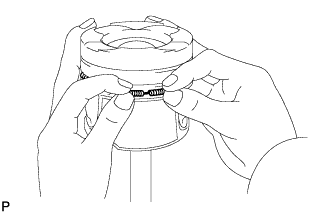
Install the oil ring expander by hand.
Using a piston ring expander, install the oil ring rail.
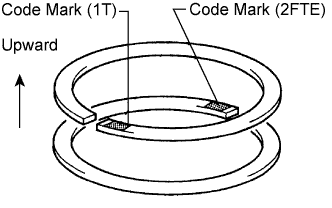
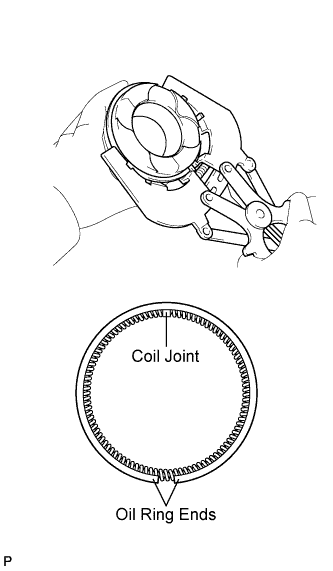
Using a piston ring expander, install the 2 compression rings so that the painted marks are positioned as shown in the illustration.
- HINT:
Position the piston rings so that the ring ends are as shown in the illustration.
- NOTICE:
- Do not align the ring ends.
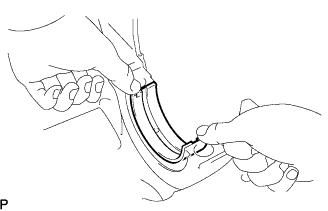
| 9. INSTALL NO. 2 CRANKSHAFT BEARING |
- NOTICE:
Clean the main journal and both surfaces of the bearing.
Align the bearing claw with the claw groove of the crankshaft bearing cap, and push in the 5 lower bearings.
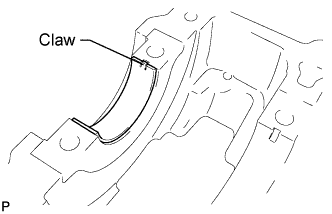
| 10. INSTALL CRANKSHAFT BEARING |
- NOTICE:
Clean the main journal and both surfaces of the bearing.
Align the bearing claw with the claw groove of the cylinder block, and push in the 5 upper bearings.
| 11. INSTALL CRANKSHAFT UPPER THRUST WASHER |
Apply engine oil to the crankshaft bearings, and then place the crankshaft on the cylinder block.
Install the 2 thrust washers to the No. 4 journal position of the cylinder block.
Push the crankshaft toward the front (rear) side.
Check the 2 thrust washers with the oil grooves facing outward.
| 12. INSTALL CRANKSHAFT |
Apply adhesive around the screw plug.
- Adhesive:
- Toyota Genuine Adhesive 1324, Three Bond 1324 or equivalent
Using a 6 mm hexagon wrench, tighten the screw plug.
- Torque:
- 25 N*m{ 255 kgf*cm, 18 ft.*lbf}
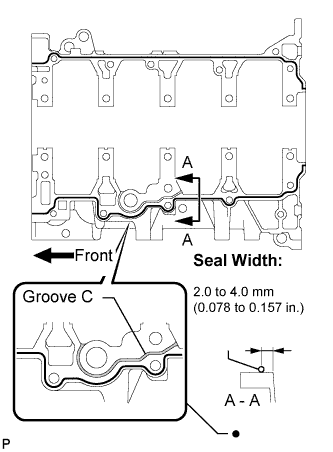
Apply seal packing in a continuous bead as shown in the illustration.
- Seal packing:
- Toyota Genuine Seal Packing Black, Three Bond 1207B or equivalent
- Seal width:
- 2.0 to 4.0 mm (0.078 to 0.157 in.)
- NOTICE:
Apply engine oil to the crankshaft No. 2 bearings, and then place the crankshaft bearing cap on the cylinder block.
Install the crankshaft bearing cap bolts.
- HINT:
- The main bearing cap bolts are tightened in 2 progressive steps.
Step 1
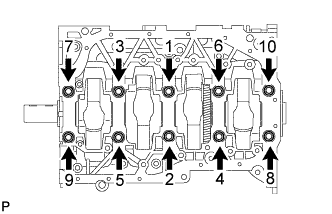
Install and uniformly tighten the 10 main bearing cap bolts in the sequence shown in the illustration.
- Torque:
- 60 N*m{ 612 kgf*cm, 44 ft.*lbf}
- HINT:
- If any of the main bearing cap bolts does not meet the torque specification, replace the main bearing cap bolt.
Step 2
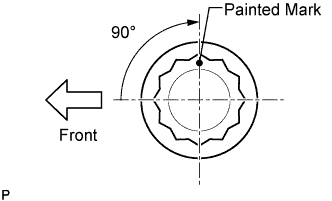
Mark the front of the bearing cap bolts with paint.
Retighten the bearing cap bolts by 90° as shown.
Check that the painted mark is now at a 90° angle to the front.
Check that the crankshaft turns smoothly.
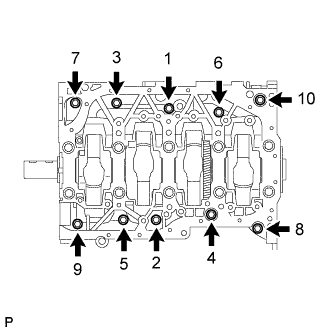
Install and uniformly tighten the 10 bolts, in several passes in the sequence shown in the illustration.
- Torque:
- 18 N*m{ 184 kgf*cm, 13 ft.*lbf}
| 13. INSTALL CONNECTING ROD BEARING |
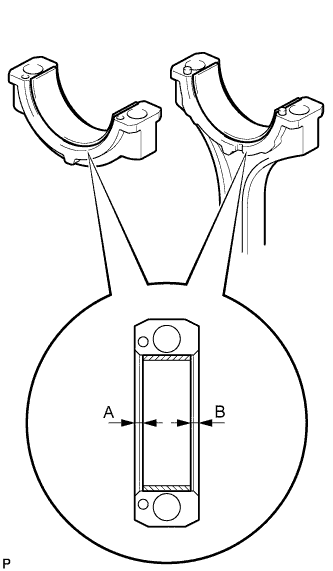
Install the bearings in the connecting rod and connecting rod cap.
Using vernier calipers, measure the distance between the edges of the bearing cap and bearing.
- Dimension (A to B):
- 0.7 mm (0.028 in.) or less
- NOTICE:
- Clean the backside of the bearing and the bearing surface of the connecting rod.
| 14. INSTALL PISTON SUB-ASSEMBLY WITH CONNECTING ROD |
Apply engine oil to the cylinder walls, the pistons, and the surfaces of the connecting rod bearings.
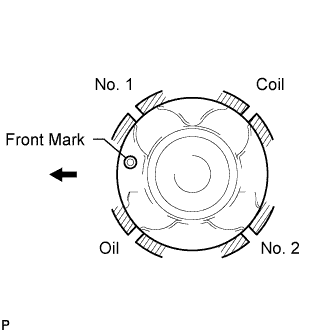
Position the piston rings so that the ring ends are as shown in the illustration.
- NOTICE:
- Do not align the ring ends.
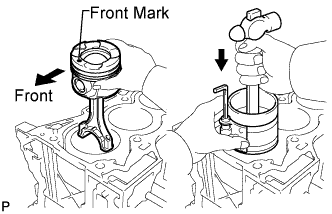
Using a piston ring compressor, push the correctly numbered piston and connecting rod assembly into the cylinder with the front mark of the piston facing forward.
- NOTICE:
- Make sure that the numbers on the connecting rod caps and the connecting rods are matched.
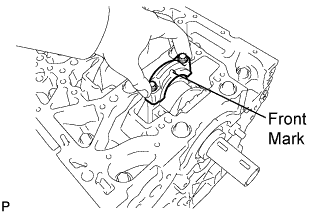
Check that the front mark of the connecting rod cap is facing forward.
Apply a light coat of engine oil to the threads and under the heads of the connecting rod cap bolts.
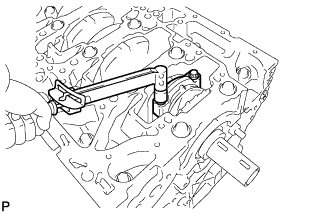
Install and alternately tighten the bolts of the connecting rod cap in several steps.
- Torque:
- 40 N*m{ 408 kgf*cm, 30 ft.*lbf}
Mark the front side of each connecting cap bolt with paint.
Retighten the cap bolts by 90° as shown.
Check that the painted mark is now at a 90° angle to the front.
Check that the crankshaft turns smoothly.
| 15. INSTALL ENGINE REAR OIL SEAL |
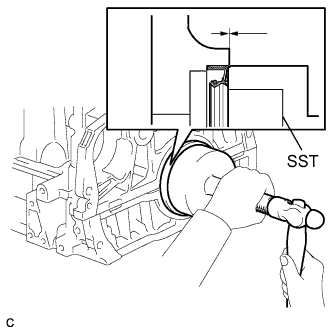
Using SST, tap in a new oil seal until its surface is flush with the oil seal retainer edge.
- SST
- 09223-56010
- NOTICE:
| 16. INSTALL INTAKE VALVE GUIDE BUSH |
Using a caliper gauge, measure the bush bore diameter of the cylinder head.
Select a new guide bush (STD or O/S 0.05).
- Bush bore diameter:
Bush size Bush bore diameter STD 10.985 to 11.006 mm (0.4325 to 0.4333 in.) O/S 0.05 11.035 to 11.056 mm (0.4344 to 0.4353 in.)
- HINT:
Gradually heat the cylinder head to approximately 80 to 100°C (176 to 212°F).
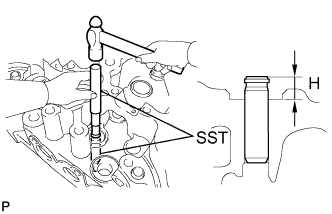
Using SST and a hammer, tap in a new guide bush to the specified protrusion height.
- Protrusion height (H):
- 9.0 to 9.4 mm (0.354 to 0.370 in.)
- SST
- 09201-10000
09950-70010
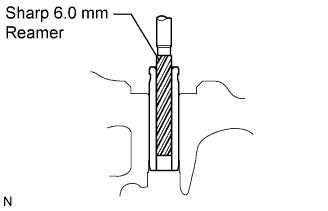
Using a sharp 6.0 mm reamer, ream the guide bush to obtain the standard clearance between the guide bush and valve stem.
| 17. INSTALL EXHAUST VALVE GUIDE BUSH |
Using a caliper gauge, measure the bush bore diameter of the cylinder head.
Select a new guide bush (STD or O/S 0.05).
- Bush bore diameter:
Bush size Bush bore diameter STD 10.985 to 11.006 mm (0.4325 to 0.4333 in.) O/S 0.05 11.035 to 11.056 mm (0.4344 to 0.4353 in.)
- HINT:
Gradually heat the cylinder head to approximately 80 to 100°C (176 to 212°F).
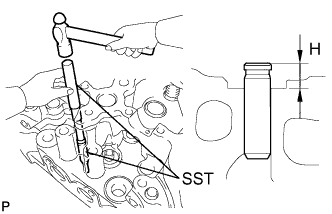
Using SST and a hammer, tap in a new guide bush to the specified protrusion height.
- SST
- 09201-10000
09950-70010
- Protrusion height (H):
- 9.0 to 9.4 mm (0.354 to 0.370 in.)
Using a sharp 6.0 mm reamer, ream the guide bush to obtain the standard clearance between the guide bush and valve stem.
| 18. INSTALL RING PIN |
- NOTICE:
- Replace the head pin as necessary.
Using a plastic hammer, tap in a new ring pin until the pin stops.
| 19. INSTALL STUD BOLT |
- NOTICE:
- If the stud bolt is deformed or the threads are damaged, replace it.
Using E8 "torx" socket wrenches, install the stud bolts.
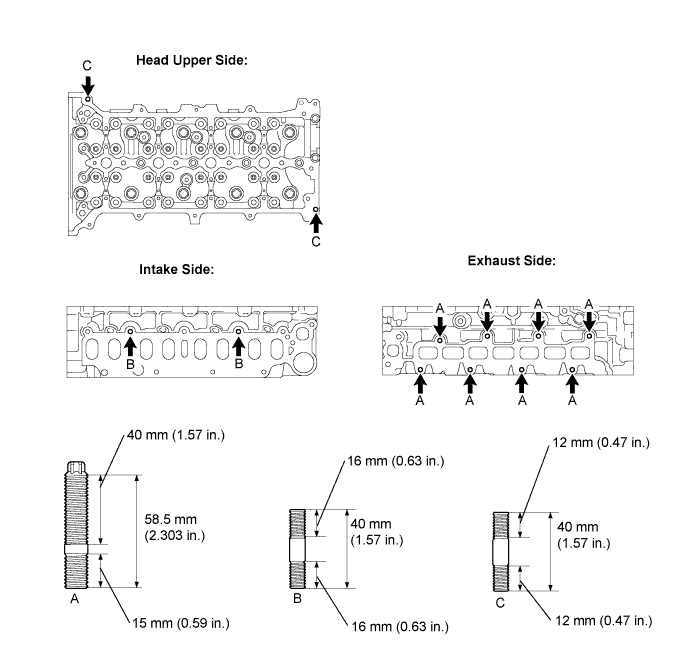
- Torque:
- for stud bolts A and B:
- 12 N*m{ 122 kgf*cm, 8.9 ft.*lbf}
- for stud bolt C:
- 5.0 N*m{ 51 kgf*cm, 44 in.*lbf}
| 20. INSTALL VALVE SPRING SEAT PLATE WASHER |
Install the valve spring seat plate washers to the cylinder head.
| 21. INSTALL VALVE STEM OIL SEAL |
Apply a light coat of engine oil to new oil seals.
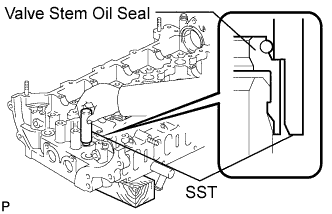
Using SST, push in the oil seals.
- SST
- 09201-41020
- NOTICE:
- Failure to use SST will cause the seal to be damaged or improperly seated.
| 22. INSTALL INTAKE VALVE |
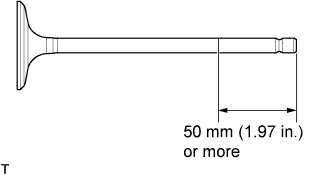
Apply plenty of engine oil to the tip area of the intake valve shown in the illustration.
Install the valve, compression spring and spring retainer to the cylinder head.
- NOTICE:
- Install the same parts in the same combination to the original locations.
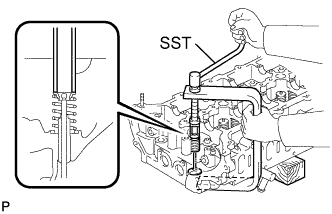
Using SST and wooden blocks, compress the spring and install the 2 retainer locks.
- SST
- 09202-70020
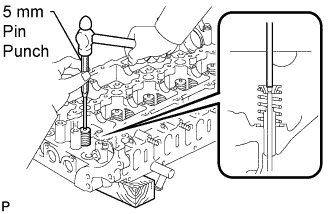
Using a 5 mm pin punch and plastic hammer, lightly tap the valve stem tip to ensure a proper fit.
- NOTICE:
- Do not damage the valve stem tip.
| 23. INSTALL EXHAUST VALVE |
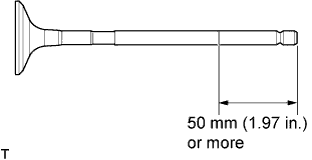
Apply plenty of engine oil to the tip area of the intake valve shown in the illustration.
Install the valve, compression spring and spring retainer to the cylinder head.
- NOTICE:
- Install the same parts in the same combination to the original locations.
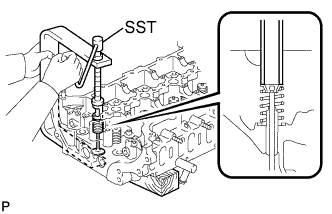
Using SST and wooden blocks, compress the spring and install the 2 retainer locks.
- SST
- 09202-70020
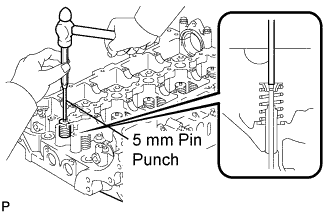
Using a 5 mm pin punch and plastic hammer, lightly tap the valve stem tip to ensure a proper fit.
- NOTICE:
- Do not damage the valve stem tip.
| 24. INSTALL VALVE LASH ADJUSTER ASSEMBLY |
Inspect the valve lash adjuster assembly before installing it .
Install the lash adjusters.
- NOTICE:
- Install the lash adjusters to each original position.
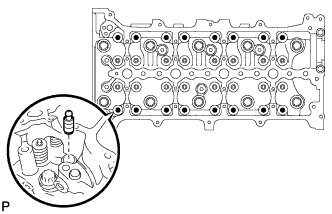
| 25. INSTALL CYLINDER HEAD SUB-ASSEMBLY |
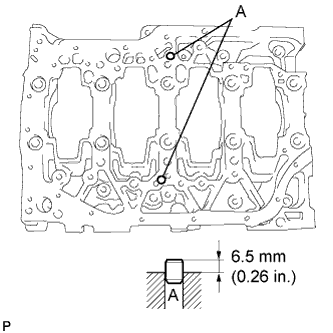
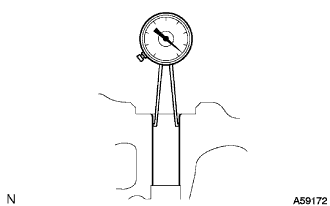
Check the piston protrusions for each cylinder.
Clean the cylinder block with solvent.
Set the piston of the cylinder to be measured to slightly before TDC.
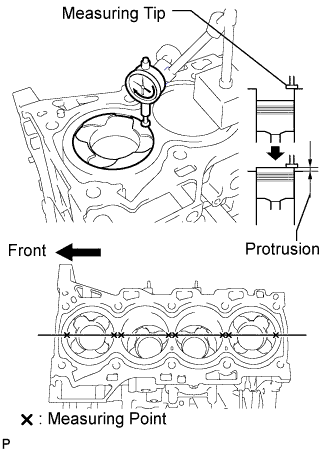
Place a dial indicator on the cylinder block, and set the measuring tip as shown in the illustration.
Set the dial indicator at 0 mm (0 in.).
- HINT:
- Make sure that the measuring tip is perpendicular to the cylinder block gasket surface and piston head when taking the measurements.
Find where the piston head protrudes most by slowly turning the crankshaft clockwise and counterclockwise.
Measure each cylinder at 2 places as shown in the illustration, making a total of 8 measurements.
For the piston protrusion value of each cylinder, use the average of the 2 measurements of each cylinder.
- HINT:
- When removing the piston and connecting rod assembly:
- If the protrusion is not as specified, remove the piston and connecting rod assembly and reinstall them.
- Piston protrusion:
- 0.300 to 0.560 mm (0.01181 to 0.02205 in.)
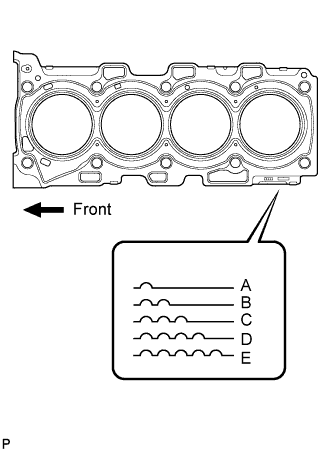
Select a new cylinder head gasket.
- HINT:
- Cylinder head gaskets are marked with A, B, C, D or E accordingly.
- New installed cylinder head gasket thickness:
Cutout mark Thickness A 1.00 to 1.10 mm (0.0394 to 0.0433 in.) B 1.05 to 1.15 mm (0.0413 to 0.0453 in.) C 1.10 to 1.20 mm (0.0433 to 0.0472 in.) D 1.15 to 1.25 mm (0.0453 to 0.0492 in.) E 1.20 to 1.30 mm (0.0472 to 0.0512 in.)
Select the largest piston protrusion value from the measurements made and then select a new appropriate gasket according to the table below:
- Table below:
Gasket size Piston protrusion A 0.300 to 0.355 mm (0.01181 to 0.01398 in.) B 0.355 to 0.405 mm (0.01398 to 0.0159 in.) C 0.405 to 0.455 mm (0.0159 to 0.01791 in.) D 0.455 to 0.505 mm (0.01791 to 0.01988 in.) E 0.505 to 0.560 mm (0.01988 to 0.02205 in.)
Using the crankshaft pulley bolt, set the No. 1 cylinder to 90° BTDC/compression.
Place the cylinder head gasket in position on the cylinder block.
Place the cylinder head on the cylinder block.
- NOTICE:
- Be careful of the installation direction.
Install the cylinder head bolts.
- HINT:
Apply a light coat of engine oil to the threads and under the heads of the cylinder head bolts.
Step 1
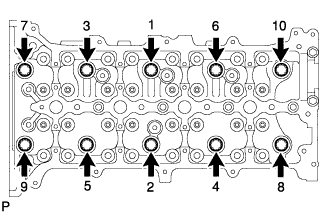
Install and uniformly tighten the 10 cylinder head bolts, in several steps in the sequence shown in the illustration.
- Torque:
- 50 N*m{ 510 kgf*cm, 37 ft.*lbf}
- HINT:
- If any one of the cylinder head bolts does not meet the torque specification, replace the cylinder head bolt.
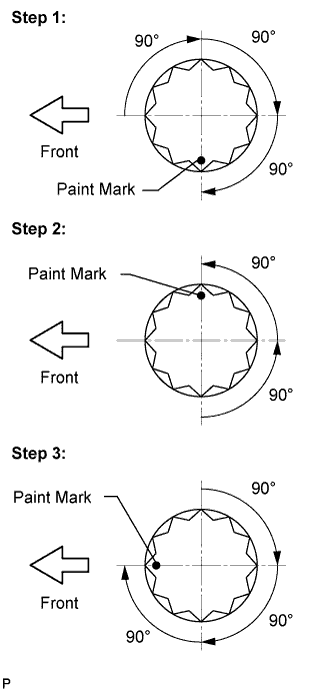
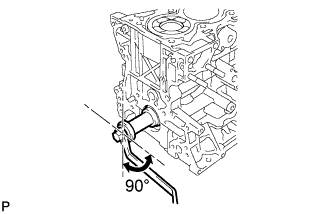
Mark the front of the cylinder head bolt with paint.
Retighten the cylinder head bolts by 90° in the sequence shown in the illustration.
Perform the above step two more times.
Check that the painted mark is positioned as shown in the illustration.
Step 2
Loosen the cylinder head bolts by 90° in the sequence shown in step 1.
Perform the above step again.
Check that the painted mark is positioned as shown in the illustration.
Step 3
Retighten the cylinder head bolts by 90° in the sequence shown in step 1.
Perform the above step two more times.
Check that the painted mark is positioned as shown in the illustration.
| 26. INSTALL NO. 1 VALVE ROCKER ARM SUB-ASSEMBLY |
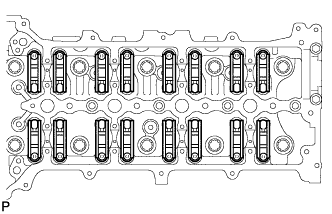
Set the 16 rocker arms to the lash adjusters.
- NOTICE:
- Before and after setting the camshaft and No. 2 camshaft, firmly set the rocker arms to the lash adjusters.
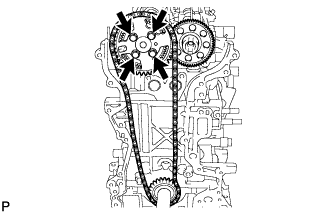
| 27. INSTALL NO. 2 CAMSHAFT |

Install the No. 2 bearing cap.
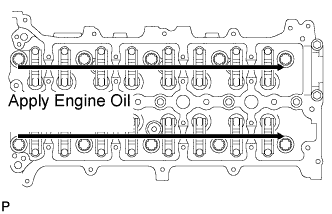
Apply clean engine oil to the cam of each camshaft, journals of the cylinder head assembly and valve rocker arm.
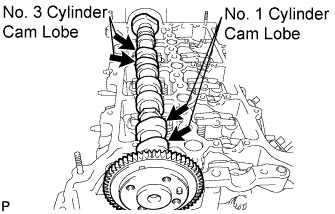
Place the No. 2 camshaft on the camshaft carrier as shown in the illustration so that the No. 1 and No. 3 cylinder cam lobes face upward.
| 28. INSTALL CAMSHAFT |
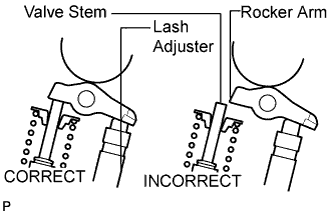
Before and after setting the camshaft and No. 2 camshaft, check that the rocker arm firmly contacts the lash adjuster.
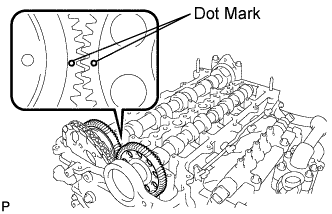
Align the camshaft and No. 2 camshaft timing marks (1 dot mark each).
Place the camshaft on the camshaft carrier.
Set the camshaft bearing caps as shown in the illustration.
- HINT:
- Make sure of the marks and numbers on the camshaft bearing caps and place them in each proper position and direction.
Set the oil delivery pipe, bolts and union bolts.
Temporarily tighten the 2 union bolts.
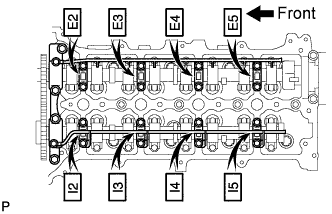
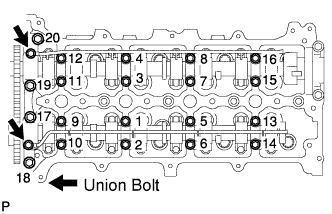
Uniformly tighten the bolts in the sequence shown in the illustration.
- Torque:
- 1 to 16:
- 10 N*m{ 102 kgf*cm, 7 ft.*lbf}
- 17 to 20:
- 25 N*m{ 255 kgf*cm, 18 ft.*lbf}
Tighten the 2 union bolts.
- Torque:
- 17 N*m{ 173 kgf*cm, 13 ft.*lbf}
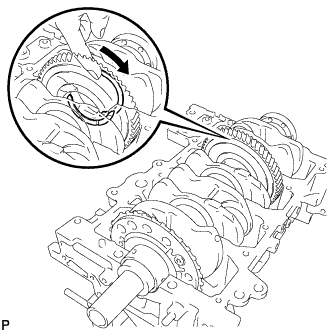
| 29. INSTALL CAMSHAFT TIMING SPROCKET |
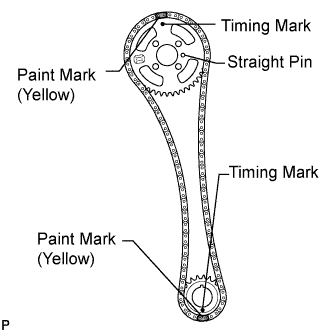
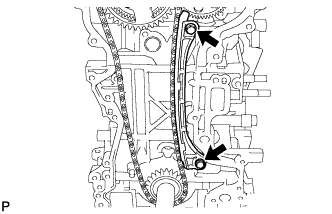
Install the crankshaft timing sprocket, camshaft timing sprocket and chain.
Install the camshaft timing sprocket by fitting the straight pin of the No. 2 camshaft into the hole on the camshaft timing sprocket.
Make sure that the timing mark of the timing sprocket and the paint mark of the timing chain align.
While holding the hexagon portion of the No. 2 camshaft, tighten the 4 bolts uniformly to install the camshaft timing sprocket to the No. 2 camshaft.
- Torque:
- 20 N*m{ 204 kgf*cm, 15 ft.*lbf}
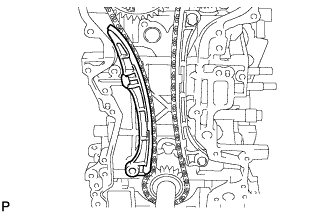
| 30. INSTALL NO. 1 CHAIN VIBRATION DAMPER |
Install the vibration damper with the 2 bolts.
- Torque:
- 21 N*m{ 214 kgf*cm, 15 ft.*lbf}
| 31. INSTALL CHAIN TENSIONER SLIPPER |
Install the tensioner slipper.
| 32. INSTALL NO. 1 CHAIN TENSIONER ASSEMBLY |
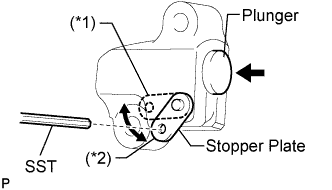
Move the stopper plate upward to release the lock, and push the plunger deep into the tensioner (*1).
Move the stopper plate downward to set the lock, and insert SST into the stopper plate hole (*2).
- SST
- 09240-00020(09242-00200)

Install the chain tensioner assembly with the 2 bolts.
- Torque:
- 9.0 N*m{ 92 kgf*cm, 80 in.*lbf}
Remove the SST.
| 33. INSTALL ENGINE BALANCER ASSEMBLY |
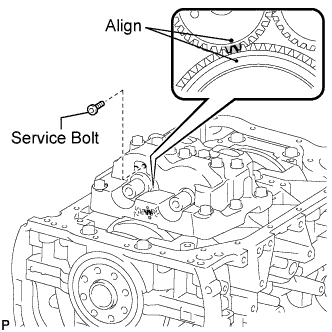
Align the timing marks of the drive and driven gears (1 dot mark each) by turning the crankshaft with a wrench.
Set the engine balancer assembly.
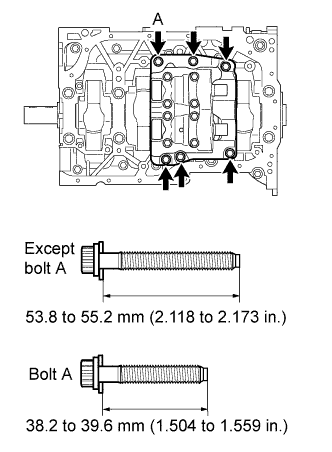
Install the engine balancer bolts.
- Bolt length:
Item Length Bolt A 38.2 to 39.6 mm (1.504 to 1.559 in.) Except bolt A 53.8 to 55.2 mm (2.118 to 2.173 in.)
- HINT:
- The engine balancer bolts are tightened in 2 progressive steps.
Step 1
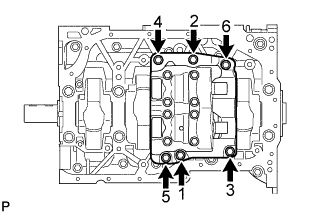
Install and uniformly tighten the 6 bolts, in several passes in the sequence shown in the illustration.
- Torque:
- 50 N*m{ 510 kgf*cm, 37 ft.*lbf}
Step 2
Mark the front of the engine balancer bolts with paint.
Retighten the engine balancer bolts by 90° as shown.
Check that the painted mark is now at a 90° angle to the front.
Remove the service bolt from the engine balancer.
| 34. INSTALL TIMING CHAIN CASE OIL SEAL |
Place the timing chain cover on wooden blocks.

Using SST, tap in a new oil seal until its surface is flush with the timing gear case edge.
- SST
- 09223-50010
- Installation depth:
- 0 to 0.6 mm (0 to 0.024 in.)
- NOTICE:
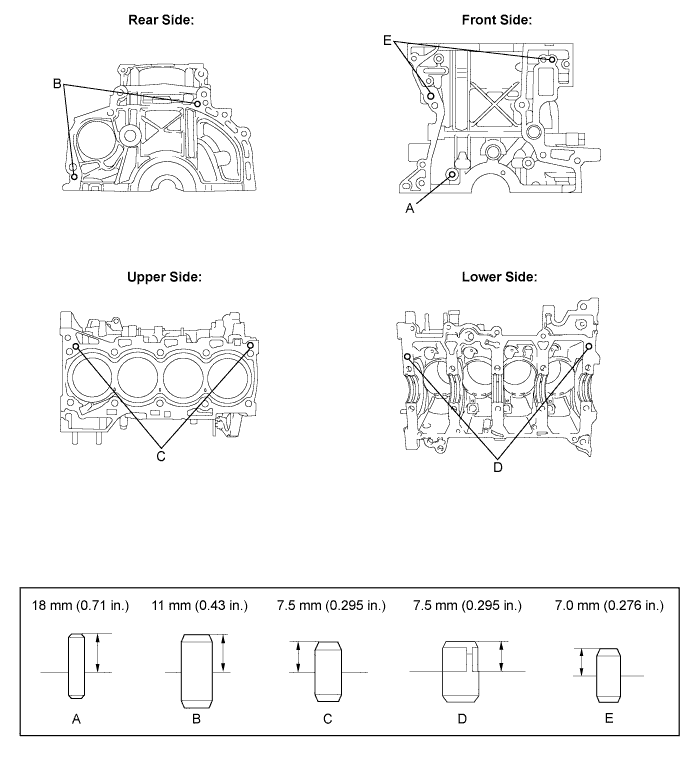
| 35. INSTALL TIMING CHAIN COVER SUB-ASSEMBLY |
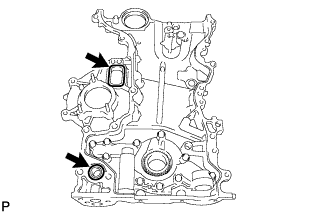
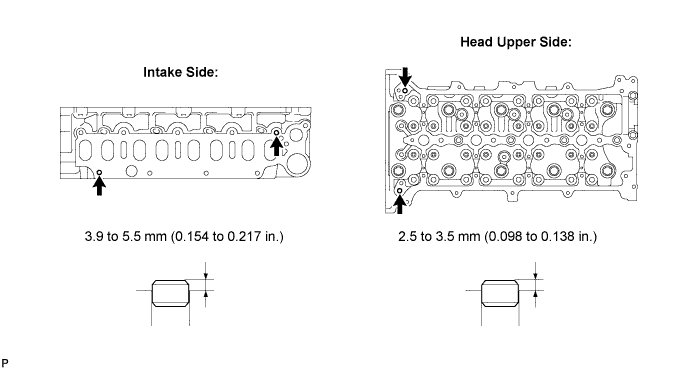
Install a new gasket and O-ring to the timing chain cover as shown in the illustration.
Apply seal packing in a continuous bead to the timing chain cover as shown in the following illustration:
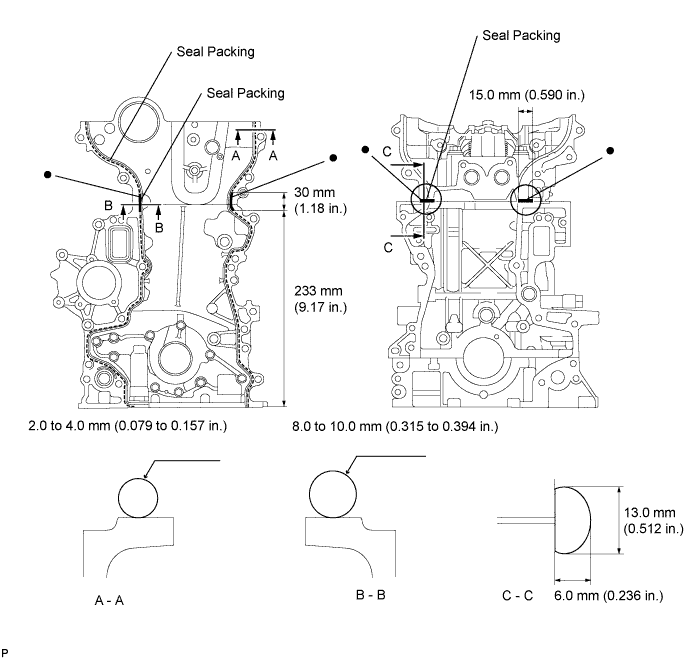
- Seal packing:
- Toyota Genuine Seal Packing Black, Three Bond 1207B or equivalent
- Seal width:
Position Specified Condition A - A 2.0 to 4.0 mm (0.079 to 0.157 in.) B - B 8.0 to 10.0 mm (0.315 to 0.394 in.) C - C Width: 13.0 mm (0.512 in.)
Height: 6.0 mm (0.236 in.)
- NOTICE:
Apply adhesive to the 4 bolts.
- Adhesive:
- Toyota Genuine Adhesive 1324, Three Bond 1324 or equivalent
- HINT:
- Bolt length: 37.5 mm (1.476 in.)
Temporarily install the timing chain cover with the 4 bolts.
Temporarily install a new seal washer and bolt A.
- HINT:
- Bolt length: 67.5 mm (2.657 in.)
Temporarily install the 8 bolts.
- HINT:
- Bolt length: 37.5 mm (1.476 in.)
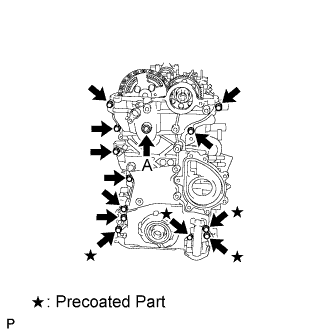
Using several steps, install the 13 bolts.
- Torque:
- Bolts other than A:
- 32 N*m{ 326 kgf*cm, 24 ft.*lbf}
- A bolt:
- 21 N*m{ 214 kgf*cm, 15 ft.*lbf}
Using a 10 mm socket hexagon wrench, install the timing chain cover tight plug and a new gasket.
- Torque:
- 19 N*m{ 194 kgf*cm, 14 ft.*lbf}
| 36. INSTALL WATER PUMP ASSEMBLY |

Align the protrusions and install a new gasket onto the timing chain cover.
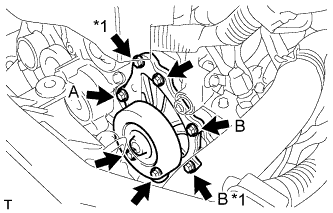
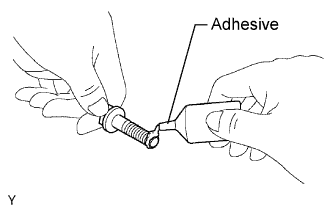
Apply adhesive to the bolt (A) shown in the illustration.
| Item | Length (mm) |
| Bolt (B) | 30 |
| Bolts except (B) | 45 |
Install the 2 bolts (*1), then tighten the other bolts.
- Torque:
- 32 N*m{ 326 kgf*cm, 24 ft.*lbf}
| 37. INSTALL CRANKSHAFT PULLEY |
Align the keyway of the pulley with the key located on the crankshaft, and then slide the pulley into place.
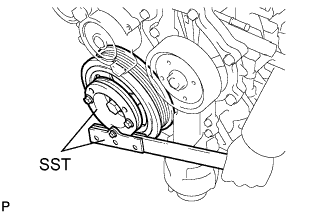
Using SST, install a new pulley bolt.
- SST
- 09213-58013
09330-00021
- Torque:
- 250 N*m{ 2,550 kgf*cm, 184 ft.*lbf}
| 38. INSTALL OIL STRAINER SUB-ASSEMBLY |
Install a new O-ring and the oil strainer with the 4 bolts.
- Torque:
- 32 N*m{ 321 kgf*cm, 23 ft.*lbf}
| 39. INSTALL OIL FILTER BRACKET |
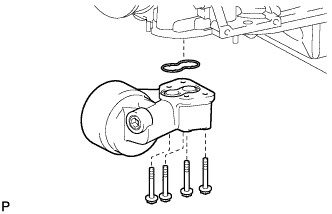
Install a new gasket and the oil filter bracket with the 4 bolts.
- Torque:
- 9.0 N*m{ 92 kgf*cm, 80 in.*lbf}
| 40. INSTALL OIL FILTER ELEMENT |
- HINT:
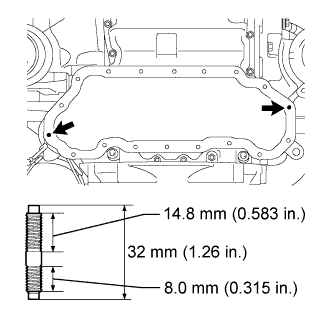
| 41. INSTALL OIL PAN SUB-ASSEMBLY |
If replacing a stud bolt, install the stud bolt.
- Torque:
- 5.0 N*m{ 51 kgf*cm, 44 in.*lbf}
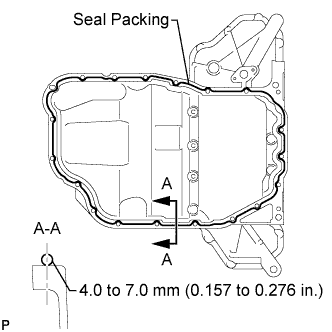
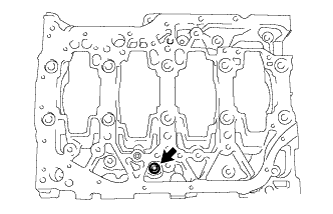
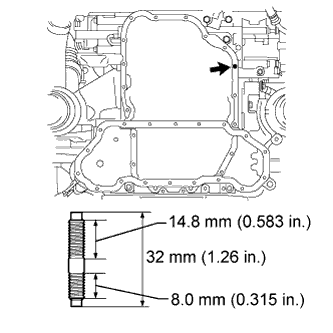
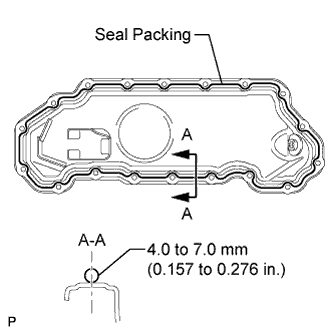
Apply seal packing in a continuous bead as shown in the illustration.
- Seal packing:
- Toyota Genuine Seal Packing Black, Three Bond 1207B or equivalent
- Seal width:
- 4.0 to 7.0 mm (0.157 to 0.276 in.)
- NOTICE:
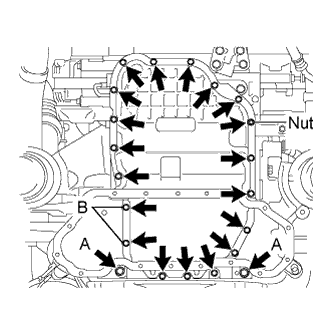
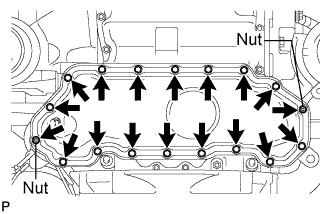
Temporarily install the oil pan with the 20 bolts and nut.
Uniformly tighten the 20 bolts and nut.
- Torque:
- Bolt A:
- 43 N*m{ 439 kgf*cm, 31 ft.*lbf}
- Except bolt A:
- 11 N*m{ 112 kgf*cm, 8 ft.*lbf}
- Nut:
- 11 N*m{ 112 kgf*cm, 8 ft.*lbf}
- NOTICE:
- Be sure to replace the bolts indicated by B with new ones or reuse them after applying adhesive 1324.
| 42. INSTALL NO. 2 OIL PAN SUB-ASSEMBLY |
If replacing the stud bolts, install the stud bolts.
- Torque:
- 5.0 N*m{ 51 kgf*cm, 44 in.*lbf}
Apply seal packing in a continuous bead as shown in the illustration.
- Seal packing:
- Toyota Genuine Seal Packing Black, Three Bond 1207B or equivalent
- Seal width:
- 4.0 to 7.0 mm (0.157 to 0.276 in.)
- NOTICE:
Temporarily install the oil pan with the 16 bolts and 2 nuts.
Uniformly tighten the 16 bolts and 2 nuts.
- Torque:
- 11 N*m{ 112 kgf*cm, 8 ft.*lbf}
Install a new gasket and the drain plug.
- Torque:
- 38 N*m{ 388 kgf*cm, 28 ft.*lbf}
| 43. INSTALL OIL FILLER CAP SUB-ASSEMBLY |
Install a new gasket.
Install the oil filler cap sub-assembly to the cylinder head cover sub-assembly.
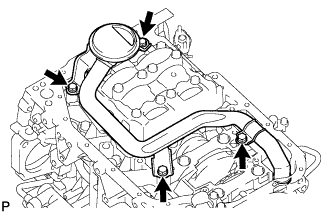
| 44. INSTALL CYLINDER HEAD COVER SUB-ASSEMBLY |
Clean the contact surfaces of the cylinder head cover, cylinder head assembly and timing chain cover assembly.
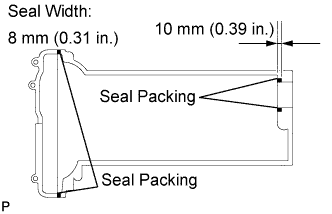
Fit a new cylinder head cover gasket and a new No. 2 gasket into the gasket groove on the cover.
Apply a continuous bead of seal gasket (diameter: 8 mm (0.31 in.)) to the contact surface between the cylinder head assembly and cylinder head cover assembly as shown in the illustration.
- Seal packing:
- Toyota Genuine Seal Packing Black, Three Bond 1207B or equivalent
- NOTICE:
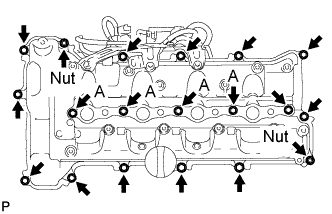
Install the cylinder head cover sub-assembly with the 13 bolts, 4 nozzle holder clamp seats, 2 washers and 2 nuts.
- Torque:
- for bolt A (Nozzle holder clamp seat):
- 16 N*m{ 167 kgf*cm, 12 ft.*lbf}
- for other bolts:
- 11 N*m{ 112 kgf*cm, 8 ft.*lbf}
- for nut:
- 11 N*m{ 112 kgf*cm, 8 ft.*lbf}
Install the 2 engine cover joints.
- Torque:
- 8.0 N*m{ 81 kgf*cm, 71 in.*lbf}
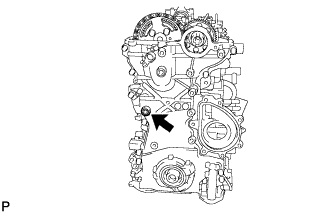
| 45. INSTALL CRANK POSITION SENSOR |
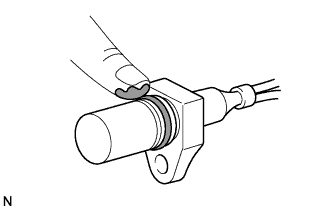
Apply a light coat of engine oil to the O-ring of the crankshaft position sensor.
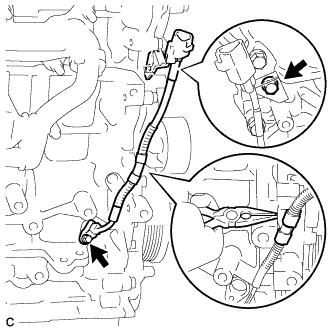
Install the crank position sensor with the 2 bolts and clamp.
- Torque:
- 8.8 N*m{ 90 kgf*cm, 78 in.*lbf}
| 46. INSTALL CAM POSITION SENSOR |
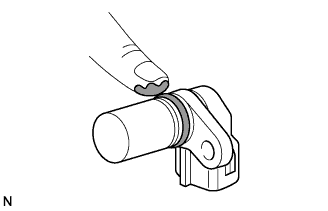
Apply a light coat of engine oil to the O-ring of the camshaft position sensor.
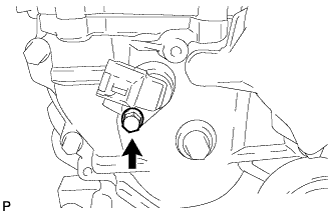
Install the cam position sensor with the bolt.
- Torque:
- 8.8 N*m{ 90 kgf*cm, 78 in.*lbf}