Back Door Glass (For Double Swing Out Type) -- Installation |
| 1. CLEAN BACK DOOR GLASS |
Using a scraper, remove the damaged clips, moulding and adhesive sticking to the glass.
Clean the outer circumference of the back door glass with non-residue solvent.
- NOTICE:
- Do not touch the glass surface after cleaning it.
- Be careful not to damage the glass.
- Even if using new glass, clean the glass with non-residue solvent.
| 2. INSTALL BACK WINDOW GLASS CLIP LH (for Outer) |
Apply Primer G to the back door glass LH where the clips will be installed.
- NOTICE:
- Allow the primer to dry for 3 minutes or more.
- Throw away any leftover primer.
- Do not apply too much primer.
- HINT:
- If the primer is applied to an area that is not specified, apply non-residue solvent to a clean cloth and wipe off the excess primer before it dries.
Remove the peeling paper from 2 new clips.
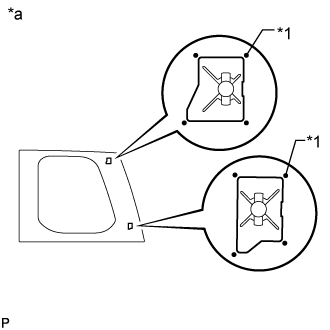
Install the 2 back window glass clips to the back door glass LH at the locations shown in the illustration.
Text in Illustration *1 Ceramic Notch *a Backside
 |
| 3. INSTALL BACK WINDOW GLASS CLIP LH (for Inner) |
Apply Primer G to the back door glass LH where the clips will be installed.
- NOTICE:
- Allow the primer to dry for 3 minutes or more.
- Throw away any leftover primer.
- Do not apply too much primer.
- HINT:
- If the primer is applied to an area that is not specified, apply non-residue solvent to a clean cloth and wipe off the excess primer before it dries.
Remove the peeling paper from 2 new clips.
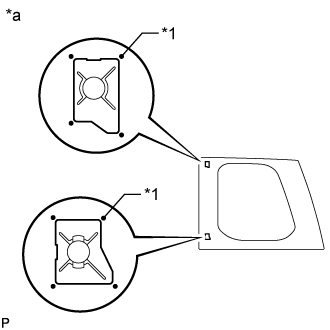
Install the 2 back window glass clips to the back door glass LH at the locations shown in the illustration.
Text in Illustration *1 Ceramic Notch *a Backside
 |
| 4. INSTALL NO. 1 BACK DOOR GLASS ADHESIVE DAM (for LH Side) |
Apply Primer G to the back door glass LH where the dams will be installed.
- NOTICE:
- Allow the primer to dry for 3 minutes or more.
- Throw away any leftover primer.
- Do not apply too much primer.
- HINT:
- If the primer is applied to an area that is not specified, apply non-residue solvent to a clean cloth and wipe off the excess primer before it dries.
Remove the peeling paper from 2 new dams.
Install the 2 No. 1 back door glass adhesive dams to the back door glass LH at the locations shown in the illustration.
Text in Illustration *1 Ceramic Notch *a Backside
 |
| 5. INSTALL BACK WINDOW OUTSIDE MOULDING (for LH Side) |
Apply Primer G to the back door glass LH where the back window outside moulding will be installed.
- NOTICE:
- Allow the primer to dry for 3 minutes or more.
- Throw away any leftover primer.
- Do not apply too much primer.
- Do not apply primer outside the ceramic area.
- HINT:
- If the primer is applied to an area that is not specified, apply non-residue solvent to a clean cloth and wipe off the excess primer before it dries.
- Standard:
Area Specified Condition a 10.1 mm (0.398 in.) b 3.0 mm (0.118 in.)
Text in Illustration *1 Primer G *a Backside *b Ceramic End Line
 |
Remove the peeling paper from a new moulding.
Install the back window outside moulding to the back door glass LH at the location shown in the illustration.

Text in Illustration *a Backside - - - Standard:
Area Specified Condition a 10.1 mm (0.398 in.) b 6.1 mm (0.240 in.) c 4.6 mm (0.181 in.)
| 6. INSTALL BACK DOOR GLASS ADHESIVE DAM (for LH Side) |
Apply Primer G to the back door glass LH where the back door glass adhesive dam will be installed.
- NOTICE:
- Allow the primer to dry for 3 minutes or more.
- Throw away any leftover primer.
- Do not apply too much primer.
- Do not apply primer outside the ceramic area.
- HINT:
- If the primer is applied to an area that is not specified, apply non-residue solvent to a clean cloth and wipe off the excess primer before it dries.
- Standard:
Area Specified Condition a 11.0 mm (0.433 in.) b 3.0 mm (0.118 in.)
Text in Illustration *1 Primer G *a Backside *b Ceramic End Line
 |
Remove the peeling paper from a new dam.
Install the back door glass adhesive dam to the back door glass LH at the location shown in the illustration.

Text in Illustration *a Backside - - - Standard:
Area Specified Condition a 5.8 mm (0.228 in.) b 7.0 mm (0.276 in.) c 6.8 mm (0.268 in.)
| 7. INSTALL BACK DOOR GLASS LH |
Position the glass.
Using suction cups, place the glass in the correct position.
Check that the entire contact surface of the back door glass rim is perfectly even.
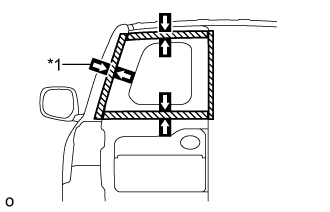
Place matchmarks on the back door glass and back door at the locations indicated in the illustration.
- HINT:
- Placing matchmarks is only necessary when installing new back door glass. When reinstalling the used back door glass, matchmarks should already be present.
- When reusing the glass, check and correct the matchmark positions.
- NOTICE:
- Check that the stoppers are attached to the back door correctly.
Using suction cups, remove the back door glass.
Text in Illustration *1 Matchmark
 |
Using a brush or sponge, apply Primer M to the exposed part of the back door.
- NOTICE:
- Allow the primer to dry for 3 minutes or more.
- Do not apply primer to the adhesive.
- Throw away any leftover primer.
- Do not apply too much primer.
Text in Illustration *1 Primer M *2 Adhesive *a CORRECT *b INCORRECT
 |
Using a brush or sponge, apply Primer G to the contact surface of the back door glass.
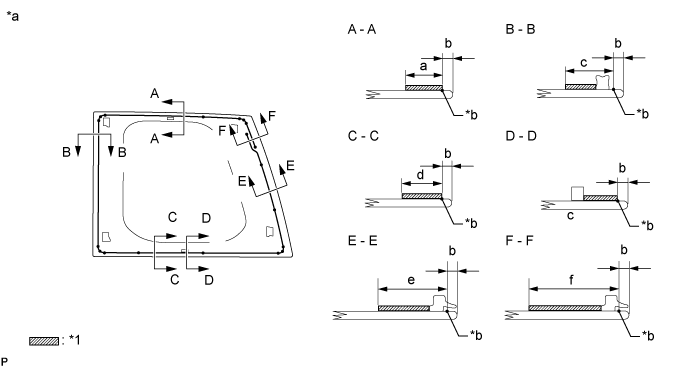
Text in Illustration *1 Primer G - - *a Backside *b Ceramic End Line - Standard:
Area Specified Condition a 15.3 mm (0.602 in.) b 3.0 mm (0.118 in.) c 20.0 mm (0.787 in.) d 17.0 mm (0.669 in.) e 29.0 mm (1.14 in.) f 37.0 mm (1.46 in.)
- HINT:
- If primer is applied to an area that is not specified, wipe off the primer with a non-residue solvent before it dries.
- NOTICE:
- Allow the primer to dry for 3 minutes or more.
- Throw away any leftover primer.
- Do not apply too much primer.
- Do not apply primer outside the ceramic area.
Apply adhesive to the back door glass LH.
- Adhesive:
- Toyota Genuine Windshield Glass Adhesive or equivalent
Cut off the tip of a cartridge nozzle as shown in the illustration below.
- HINT:
- After cutting off the tip, use all adhesive within the time written in the table below.
- Usage Time Frame:
Temperature Usage Time Frame 35°C (95°F) 15 minutes 20°C (68°F) 1 hour 40 minutes 5°C (41°F) 8 hours
Load a sealer gun with the cartridge.
Apply adhesive to the back door glass LH as shown in the illustration.

Text in Illustration *1 Adhesive *2 Adhesive Center Line *3 Ceramic Notch - - *a Backside - - - Standard:
Area Specified Condition a 12.0 mm (0.472 in.) b 8.0 mm (0.315 in.) c 11.3 mm (0.445 in.) d 16.0 mm (0.630 in.) e 13.0 mm (0.512 in.) f 25.0 mm (0.984 in.)
Install the back door glass LH to the vehicle body.
Hold the back door glass securely in place with tape or equivalent until the adhesive has hardened.
- NOTICE:
- Allow the primer coating to dry for 3 minutes or more.
- Check that the clips are attached to the vehicle body correctly.
- Check the clearance between the vehicle body and glass.
Lightly press the outer surface of the back door glass to ensure that the back door glass is securely attached to the vehicle body.
Using a scraper, remove any excess or protruding adhesive.
- HINT:
- Apply adhesive to any areas where the amount of adhesive is inadequate.
- NOTICE:
- Do not drive the vehicle within the time written in the table below.
- Minimum Time:
Temperature Minimum Time Prior to Driving Vehicle 35°C (95°F) 1 hour 30 minutes 20°C (68°F) 5 hours 5°C (41°F) 24 hours
Text in Illustration *1 Adhesive Connect the connectors.

| 8. CLEAN BACK DOOR GLASS RH |
- HINT:
- Use the same procedure described for the LH side.
| 9. INSTALL BACK WINDOW GLASS CLIP RH (for Outer) |
Apply Primer G to the back door glass RH where the clips will be installed.
- NOTICE:
- Allow the primer to dry for 3 minutes or more.
- Throw away any leftover primer.
- Do not apply too much primer.
- HINT:
- If the primer is applied to an area that is not specified, apply non-residue solvent to a clean cloth and wipe off the excess primer before it dries.
 |
Remove the peeling paper from 2 new clips.
Install the 2 back window glass clips to the back door glass RH at the locations shown in the illustration.
Text in Illustration *1 Ceramic Notch *a Backside
| 10. INSTALL BACK WINDOW GLASS CLIP RH (for Inner) |
Apply Primer G to the back door glass RH where the clips will be installed.
- NOTICE:
- Allow the primer to dry for 3 minutes or more.
- Throw away any leftover primer.
- Do not apply too much primer.
- HINT:
- If the primer is applied to an area that is not specified, apply non-residue solvent to a clean cloth and wipe off the excess primer before it dries.
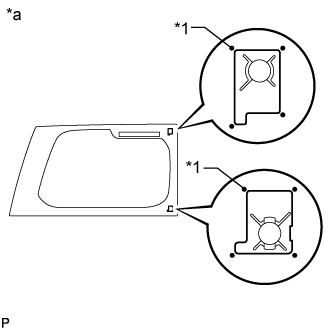
Remove the peeling paper from 2 new clips.
Install the 2 back window glass clips to the back door glass RH at the locations shown in the illustration.
Text in Illustration *1 Ceramic Notch *a Backside
 |
| 11. INSTALL NO. 1 BACK DOOR GLASS ADHESIVE DAM (for RH Side) |
Apply Primer G to the back door glass RH where the dams will be installed.
- NOTICE:
- Allow the primer to dry for 3 minutes or more.
- Throw away any leftover primer.
- Do not apply too much primer.
- HINT:
- If the primer is applied to an area that is not specified, apply non-residue solvent to a clean cloth and wipe off the excess primer before it dries.
Remove the peeling paper from 3 new dams.
Install the 3 No. 1 back door glass adhesive dams to the back door glass RH at the locations shown in the illustration.
Text in Illustration *1 Ceramic Notch *a Backside
 |
| 12. INSTALL BACK WINDOW OUTSIDE MOULDING (for RH Side) |
Apply Primer G to the back door glass RH where the back window outside moulding will be installed.
- NOTICE:
- Allow the primer to dry for 3 minutes or more.
- Throw away any leftover primer.
- Do not apply too much primer.
- Do not apply primer outside the ceramic area.
- HINT:
- If the primer is applied to an area that is not specified, apply non-residue solvent to a clean cloth and wipe off the excess primer before it dries.
- Standard:
Area Specified Condition a 10.1 mm (0.398 in.) b 3.0 mm (0.118 in.)
Text in Illustration *1 Primer G *a Backside *b Ceramic End Line
 |
Remove the peeling paper from a new moulding.
Install the back window outside moulding to the back door glass RH at the location shown in the illustration.

Text in Illustration *a Backside - - - Standard:
Area Specified Condition a 10.1 mm (0.398 in.) b 5.7 mm (0.224 in.) c 4.6 mm (0.181 in.)
| 13. INSTALL BACK DOOR GLASS ADHESIVE DAM (for RH Side) |
Apply Primer G to the back door glass RH where the back window outside moulding will be installed.
- NOTICE:
- Allow the primer to dry for 3 minutes or more.
- Throw away any leftover primer.
- Do not apply too much primer.
- Do not apply primer outside the ceramic area.
- HINT:
- If the primer is applied to an area that is not specified, apply non-residue solvent to a clean cloth and wipe off the excess primer before it dries.
- Standard:
Area Specified Condition a 11.0 mm (0.433 in.) b 3.0 mm (0.118 in.)
Text in Illustration *1 Primer G *a Backside *b Ceramic End Line
 |
Remove the peeling paper from a new moulding.
Install the back window outside moulding to the back door glass RH at the location shown in the illustration.

Text in Illustration *a Backside *b R End - Standard:
Area Specified Condition a 2.8 mm (0.110 in.) b 6.8 mm (0.268 in.)
| 14. INSTALL BACK DOOR GLASS RH |
Position the glass.
Using suction cups, place the glass in the correct position.
Check that the entire contact surface of the back door glass rim is perfectly even.
Place matchmarks on the back door glass and back door at the locations indicated in the illustration.
- HINT:
- Placing matchmarks is only necessary when installing new back door glass. When reinstalling the used back door glass, matchmarks should already be present.
- When reusing the glass, check and correct the matchmark positions.
- NOTICE:
- Check that the stoppers are attached to the back door correctly.
Using suction cups, remove the back door glass.
Text in Illustration *1 Matchmark
 |
Using a brush or sponge, apply Primer M to the exposed part of the back door.
- NOTICE:
- Allow the primer to dry for 3 minutes or more.
- Do not apply primer to the adhesive.
- Throw away any leftover primer.
- Do not apply too much primer.
Text in Illustration *1 Primer M *2 Adhesive *a CORRECT *b INCORRECT
 |
Using a brush or sponge, apply Primer G to the contact surface of the back door glass.
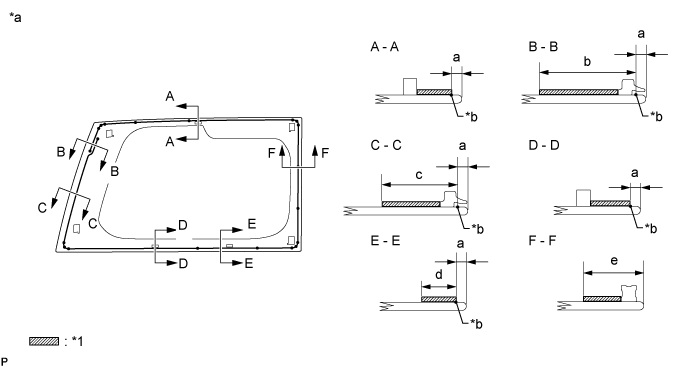
Text in Illustration *1 Primer G - - *a Backside *b Ceramic End Line - Standard:
Area Specified Condition a 3.0 mm (0.118 in.) b 37.0 mm (1.46 in.) c 29.0 mm (1.14 in.) d 17.0 mm (0.670 in.) e 20.0 mm (0.787 in.)
- HINT:
- If primer is applied to an area that is not specified, wipe off the primer with a non-residue solvent before it dries.
- NOTICE:
- Allow the primer to dry for 3 minutes or more.
- Throw away any leftover primer.
- Do not apply too much primer.
- Do not apply primer outside the ceramic area.
Apply adhesive to the back door glass RH.
- Adhesive:
- Toyota Genuine Windshield Glass Adhesive or equivalent
Cut off the tip of a cartridge nozzle as shown in the illustration below.
- HINT:
- After cutting off the tip, use all adhesive within the time written in the table below.
- Usage Time Frame:
Temperature Usage Time Frame 35°C (95°F) 15 minutes 20°C (68°F) 1 hour 40 minutes 5°C (41°F) 8 hours
Load a sealer gun with the cartridge.
Apply adhesive to the back door glass RH as shown in the illustration.

Text in Illustration *1 Adhesive *2 Adhesive Center Line *3 Ceramic Notch - - *a Backside - - - Standard:
Area Specified Condition a 12.0 mm (0.472 in.) b 8.0 mm (0.315 in.) c 11.3 mm (0.445 in.) d 25.0 mm (0.984 in.) e 13.0 mm (0.512 in.)
Install the back door glass RH to the vehicle body.
Hold the back door glass securely in place with tape or equivalent until the adhesive has hardened.
- NOTICE:
- Allow the primer coating to dry for 3 minutes or more.
- Check that the clips are attached to the vehicle body correctly.
- Check the clearance between the vehicle body and glass.
Lightly press the outer surface of the back door glass to ensure that the back door glass is securely attached to the vehicle body.
Using a scraper, remove any excess or protruding adhesive.
- HINT:
- Apply adhesive to any areas where the amount of adhesive is inadequate.
- NOTICE:
- Do not drive the vehicle within the time written in the table below.
- Minimum Time:
Temperature Minimum Time Prior to Driving Vehicle 35°C (95°F) 1 hour 30 minutes 20°C (68°F) 5 hours 5°C (41°F) 24 hours
Text in Illustration *1 Adhesive Connect the connectors.

| 15. CHECK FOR LEAK AND REPAIR |
Conduct a leak test after the adhesive has completely hardened.
Seal any leaks with auto glass sealer.
| 16. INSTALL BACK DOOR TRIM PANEL ASSEMBLY LH (for LH Side) |
Attach the 10 clips to install the back door trim panel.
| 17. INSTALL DOOR INSIDE HANDLE BEZEL LH (for LH Side) |
Connect the 2 links to the back door inside handle.
Attach the guide in the direction indicated by the arrow in the illustration to install the back door inside handle.
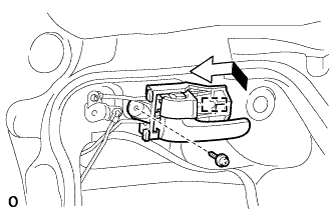 |
Install the screw.
| 18. INSTALL ASSIST GRIP LH (for LH Side) |
Install the assist grip with the 2 bolts.
Attach the 2 claws to close the 2 covers.
| 19. INSTALL BACK DOOR CENTER WEATHERSTRIP (for RH Side) |
- HINT:
- When installing the back door center weatherstrip, heat the back door panel using a heat light.
- Standard:
Item Temperature Back Door Panel 40 to 60°C (104 to 140°F)
- NOTICE:
- Do not heat the back door panel excessively.
Clean the back door panel surface.
Using a heat light, heat the back door panel surface.
Remove the double-sided tape from the back door panel surface.
Wipe off any tape adhesive residue with cleaner.
Install a new back door center weatherstrip.
Remove the peeling paper from the face of the back door center weatherstrip.
- HINT:
- After removing the peeling paper, keep the exposed adhesive free from foreign matter.
Attach the 5 clips to install the back door center weatherstrip.
- HINT:
- Press the back door center weatherstrip firmly to install it.
| 20. INSTALL REAR WIPER ARM AND BLADE ASSEMBLY (w/ Rear Wiper) |
Clean the wiper arm serrations.
Text in Illustration *1 Wiper Arm Serrations *2 Wire Brush *3 Wiper Pivot Serrations
 |
Clean the wiper pivot serrations with a wire brush.
Operate the rear wiper, and stop the rear wiper motor at the automatic stop position.
Align the tips of the blade with the marks as shown in the illustration.
Text in Illustration *1 Mark for Blade Position
 |
Install the rear wiper arm and blade assembly with the nut.
- Torque:
- 5.5 N*m{56 kgf*cm, 49 in.*lbf}
Close the wiper arm head cap.
| 21. INSTALL BACK DOOR TRIM PANEL ASSEMBLY RH (for RH Side) |
Attach the 13 clips to install the back door trim panel.
| 22. INSTALL BACK DOOR TRIM COVER RH (for RH Side) |
Attach the 2 claws and clamp.
Attach the 5 clips and 2 claws to install the back door trim cover.
| 23. INSTALL ASSIST GRIP RH (for RH Side) |
Install the assist grip with the 2 bolts.
Attach the 2 claws to close the 2 covers.
| 24. INSTALL SPARE WHEEL CARRIER SUB-ASSEMBLY (w/ Tire Carrier) |
Clean the threaded surfaces on the vehicle body with a non-residue solvent.
Apply adhesive to the threads of bolt A and B.
- Adhesive:
- Toyota Genuine Adhesive 1324, Three Bond 1324 or equivalent
Install the spare wheel carrier with the 9 bolts.
- Torque:
- Bolt A:
- 29 N*m{196 kgf*cm, 21 ft.*lbf}
- Bolt B:
- 15 N*m{148 kgf*cm, 11 ft.*lbf}
Text in Illustration *1 Bolt A *2 Bolt B
 |
Install the spare tire with the 3 bolts.
- Torque:
- 90 N*m{918 kgf*cm, 66 ft.*lbf}
| 25. INSTALL SPARE WHEEL COVER SUB-ASSEMBLY (w/ Tire Carrier) |
Attach the clip to install the spare wheel cover.
Install the 2 nuts.
| 26. INSTALL SPARE WHEEL CARRIER HINGE BRACKET (w/ Tire Carrier) |
Attach the 2 claws to install the spare wheel carrier hinge bracket.
| 27. INSTALL SPARE TIRE (w/ Tire Carrier) |