Rear No. 1 Seat Inner Belt Assembly (For 60/40 Split Seat Type 60 Side) Installation
Seat Belt. Land Cruiser. Urj200, 202 Grj200 Vdj200
CONNECT NO. 1 SEAT 3 POINT TYPE BELT ASSEMBLY LH
INSTALL REAR NO. 1 SEAT INNER BELT ASSEMBLY LH
INSTALL REAR SEAT UNDER TRAY COVER LH
INSTALL REAR SEAT CUSHION COVER RH
INSTALL REAR UNDER SIDE COVER LH
INSTALL REAR SEATBACK STAY COVER LH
INSTALL SEAT BELT ANCHOR COVER CAP
INSTALL REAR NO. 1 SEAT HINGE SUB-ASSEMBLY RH
INSTALL REAR NO. 1 SEAT HINGE SUB-ASSEMBLY LH
INSTALL REAR NO. 2 SEAT PROTECTOR
INSTALL REAR NO. 2 SEAT LEG SIDE COVER
INSTALL UPPER SEAT TRACK RAIL COVER RH
INSTALL UPPER SEAT TRACK RAIL COVER LH
INSTALL REAR NO. 1 SEAT RECLINING COVER RH
INSTALL REAR NO. 1 SEAT RECLINING COVER LH
INSTALL RECLINING ADJUSTER RELEASE HANDLE LH
INSTALL SEAT ADJUSTER BOLT COVER
INSTALL REAR NO. 1 SEAT ASSEMBLY LH
Rear No. 1 Seat Inner Belt Assembly (For 60/40 Split Seat Type 60 Side) -- Installation |
- HINT:
- Use the same procedures for the LHD and RHD.
- The procedures listed below are for the LHD.
- A bolt without a torque specification is shown in the standard bolt chart (Click here).
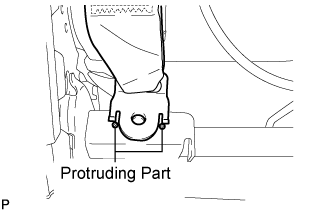
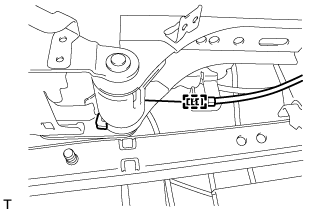
| 1. CONNECT NO. 1 SEAT 3 POINT TYPE BELT ASSEMBLY LH |
Connect the belt anchor.
- NOTICE:
- Do not overlap the anchor part of the seat belt and protruding parts of the vehicle body.
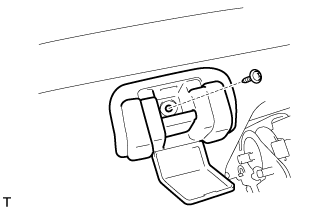
| 2. INSTALL REAR NO. 1 SEAT INNER BELT ASSEMBLY LH |
Install the belt with the bolt.
- Torque:
- 42 N*m{428 kgf*cm, 31 ft.*lbf}
- NOTICE:
- Do not overlap the anchor part of the seat belt and protruding parts of the vehicle body.
- HINT:
- The No. 1 seat 3 point type belt anchor is fixed with the same bolt as the rear No. 1 seat inner belt LH. Therefore, connect it when installing the rear No. 1 seat inner belt LH.
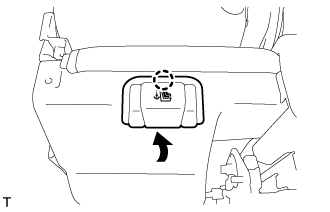
| 3. INSTALL REAR SEAT UNDER TRAY COVER LH |
Attach the 4 claws to install the cover.
Install the 2 screws.
| 4. INSTALL REAR SEAT CUSHION COVER RH |
Attach the 2 claws to install the cover.
Install the 4 screws.
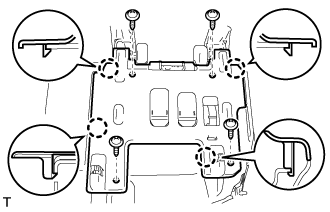
| 5. INSTALL REAR UNDER SIDE COVER LH |
Attach the 2 claws and 2 clips to install the cover.
Install the 5 screws.
Attach the 10 claws.
| 6. INSTALL REAR SEATBACK STAY COVER LH |
Attach the 2 claws to install the cover.
Install the screw.
| 7. INSTALL SEAT BELT ANCHOR COVER CAP |
Install the anchor cover cap with the screw.
Attach the claw to close the cap.
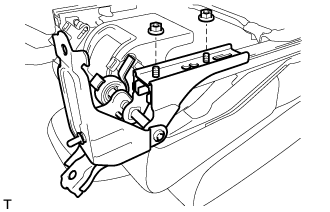
| 8. INSTALL REAR NO. 1 SEAT HINGE SUB-ASSEMBLY RH |
Install the hinge with the 2 nuts.
- Torque:
- 42 N*m{428 kgf*cm, 31 ft.*lbf}
| 9. INSTALL REAR NO. 1 SEAT HINGE SUB-ASSEMBLY LH |
Attach the cable clamp to connect the cable.
Install the hinge with the 2 nuts.
- Torque:
- 42 N*m{428 kgf*cm, 31 ft.*lbf}
w/ Rear Seat Side Airbag:
Attach the wire harness clamp.
w/ Seat Heater System:
Attach the wire harness clamp.
| 10. INSTALL REAR NO. 2 SEAT PROTECTOR |
Install the wire harness, and attach 2 claws to close the protector.
Attach the claw to install the protector to the seat hinge.
Install the clip.
w/ Rear Seat Side Airbag:
Attach the claw to install the wire harness connector.
w/ Seat Heater System:
Attach the claw to install the wire harness connector.
| 11. INSTALL REAR NO. 2 SEAT LEG SIDE COVER |
Pass the fold seat stopper band through the seat leg side cover and attach it to the seat cushion frame with the bolt.
Attach the 4 claws to install the seat leg side cover.
Install the 4 screws.
| 12. INSTALL UPPER SEAT TRACK RAIL COVER RH |
Attach the 2 claws to install the cover.
| 13. INSTALL UPPER SEAT TRACK RAIL COVER LH |
Attach the 2 claws to install the cover.
| 14. INSTALL REAR NO. 1 SEAT RECLINING COVER RH |
Attach the 4 claws to install the cover.
Install the 2 screws.
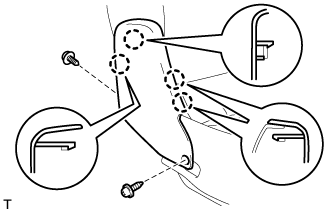
| 15. INSTALL REAR NO. 1 SEAT RECLINING COVER LH |
Attach the 3 claws in the order shown in the illustration to install the cover.
Install the 2 screws.
| 16. INSTALL RECLINING ADJUSTER RELEASE HANDLE LH |
Install the release handle with the screw.
| 17. INSTALL SEAT ADJUSTER BOLT COVER |
Attach the 2 claws to install the cover.
| 18. INSTALL REAR NO. 1 SEAT ASSEMBLY LH |
Install the rear No. 1 seat assembly (Click here).