Audio Visual Telematics. Land Cruiser. Urj200, 202 Grj200 Vdj200
Audio Video. Land Cruiser. Urj200, 202 Grj200 Vdj200
Multi-Media Interface Ecu -- Installation |
- HINT:
- A bolt without a torque specification is shown in the standard bolt chart (Click here).
| 1. INSTALL NO. 1 MULTI-MEDIA INTERFACE BRACKET |
Install the bracket with the 2 bolts.
| 2. INSTALL NO. 2 MULTI-MEDIA INTERFACE BRACKET |
Install the bracket with the 2 bolts.
| 3. INSTALL MULTI-MEDIA INTERFACE ECU |
Install the multi-media interface ECU with the 2 bolts.
Connect the connectors.
| 4. INSTALL FRONT FLOOR CARPET ASSEMBLY |
Install the carpet that was pulled back to remove the selector. For further details, refer to the installation procedure (Click here).
| 5. INSTALL FRONT DOOR SCUFF PLATE RH |
- HINT:
- Use the same procedures described for the LH side.
| 6. INSTALL COWL SIDE TRIM BOARD RH |
 |
Attach the 2 clips to install the cowl side trim board.
Install the cap nut.
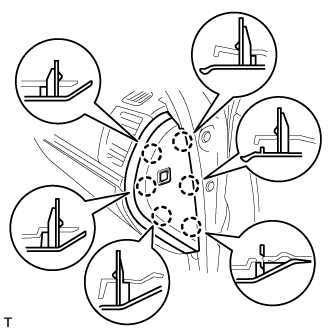
| 7. INSTALL INSTRUMENT SIDE PANEL RH (w/o Airbag Cut Off Switch) |
 |
Attach the 6 claws to install the instrument side panel.
| 8. INSTALL INSTRUMENT SIDE PANEL RH (w/ Airbag Cut Off Switch) |
 |
Connect the connector.
Attach the 6 claws to install the instrument side panel.
| 9. INSTALL FRONT SEAT ASSEMBLY RH (for Manual Seat) |
Install the front seat assembly RH (Click here).
| 10. INSTALL FRONT SEAT ASSEMBLY RH (for Power Seat) |
Install the front seat assembly RH (Click here).
| 11. CONNECT CABLE TO NEGATIVE BATTERY TERMINAL |
- NOTICE:
- When disconnecting the cable, some systems need to be initialized after the cable is reconnected (Click here).
| 12. CHECK SRS WARNING LIGHT |
Check the SRS warning light (Click here).