Power Outlet Socket Removal
REMOVE NO. 2 INSTRUMENT PANEL FINISH PANEL CUSHION
REMOVE LOWER INSTRUMENT PANEL PAD SUB-ASSEMBLY LH
REMOVE NO. 1 INSTRUMENT PANEL FINISH PANEL CUSHION
REMOVE LOWER INSTRUMENT PANEL PAD SUB-ASSEMBLY RH
REMOVE LOWER CENTER INSTRUMENT CLUSTER FINISH PANEL SUB-ASSEMBLY
REMOVE POWER OUTLET SOCKET ASSEMBLY
REMOVE POWER OUTLET SOCKET COVER NO.2
Power Outlet Socket -- Removal |
- HINT:
- Use the same procedures for LHD and RHD vehicles.
- The procedures listed below are for LHD vehicles.
| 1. REMOVE NO. 2 INSTRUMENT PANEL FINISH PANEL CUSHION |
Put protective tape around the No. 2 instrument panel finish panel cushion.
Text in Illustration*1
| Protective Tape
|
Using a moulding remover, detach the 7 claws and remove the No. 2 instrument panel finish panel cushion.
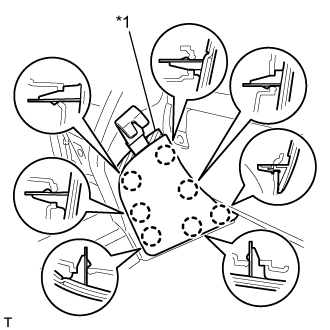
| 2. REMOVE LOWER INSTRUMENT PANEL PAD SUB-ASSEMBLY LH |
Remove the clip and screw.
Detach the 8 claws.
Disconnect the connectors, detach the 2 clamps and remove the lower instrument panel pad sub-assembly.
| 3. REMOVE NO. 1 INSTRUMENT PANEL FINISH PANEL CUSHION |
Put protective tape around the No. 1 instrument panel finish panel cushion.
Text in Illustration*1
| Protective Tape
|
Using a moulding remover, detach the 7 claws and remove the No. 1 instrument panel finish panel cushion.
| 4. REMOVE LOWER INSTRUMENT PANEL PAD SUB-ASSEMBLY RH |
Remove the clip and screw.
Detach the 7 claws and remove the lower instrument panel pad sub-assembly.
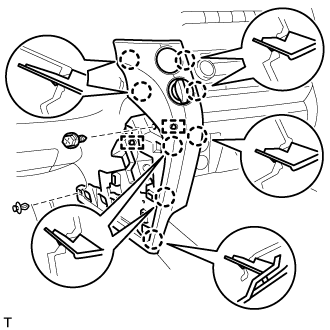
| 5. REMOVE LOWER CENTER INSTRUMENT CLUSTER FINISH PANEL SUB-ASSEMBLY |
Detach the 7 claws.
Disconnect the connectors and remove the lower center instrument cluster finish panel sub-assembly.
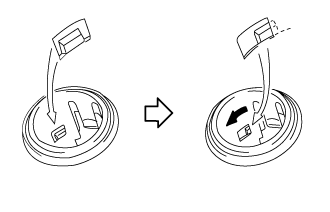
| 6. REMOVE POWER OUTLET SOCKET ASSEMBLY |
Rotate the socket to disengage the notch.
Pull out the socket halfway and rotate the socket until its protrusion is aligned with the groove of the cover. Then remove the power outlet socket.
| 7. REMOVE POWER OUTLET SOCKET COVER NO.2 |
Detach the 2 claws and remove the cover.