Name Plate (W/O Tire Carrier) -- Installation |
- HINT:
- When installing the emblem and name plate, heat the vehicle body, emblem and name plate using a heat light.
- Standard Heating Temperature:
Item Temperature Vehicle Body 40 to 60°C (104 to 140°F) Emblem 20 to 30°C (68 to 86°F) Name Plate 20 to 30°C (68 to 86°F)
- NOTICE:
- Do not heat the vehicle body, emblem and name plate excessively.
| 1. INSTALL SYMBOL EMBLEM |
Clean the vehicle body surface.
Text in Illustration *1 Boss Using a heat light, heat the vehicle body surface.
Remove the double-sided tape from the vehicle body.
Wipe off any tape adhesive residue with cleaner.
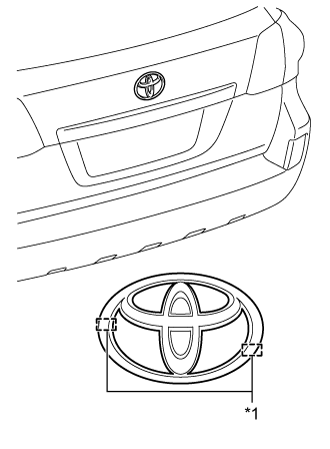 |
Install a new emblem.
Using a heat light, heat the vehicle body and a new emblem.
Remove the peeling paper from the face of the emblem.
- HINT:
- After removing the peeling paper, keep the exposed adhesive free from foreign matter.
Align the boss positions and install the emblem.
- HINT:
- Press the emblem firmly to install it.
| 2. INSTALL REAR NO. 3 BODY NAME PLATE |
Clean the vehicle body surface.
Using a heat light, heat the vehicle body surface.
Remove the double-sided tape from the vehicle body.
Wipe off any tape adhesive residue with cleaner.
Install a new rear body name plate.
Using a heat light, heat the vehicle body and a new rear body name plate.
Remove the peeling paper from the face of the rear body name plate.
- HINT:
- After removing the peeling paper, keep the exposed adhesive free from foreign matter.
for Type A:
Install the rear body name plate in the position shown in the illustration.- HINT:
- Press the rear body name plate firmly to install it.

Text in Illustration *A for Type A - - *a 267.5 mm (10.2 in.) *b 31.5 mm (1.24 in.) for Type B:
Install the rear body name plate in the position shown in the illustration.- HINT:
- Press the rear body name plate firmly to install it.

Text in Illustration *A for Type B - - *a 266 mm (10.5 in.) *b 32 mm (1.26 in.) for Type C:
Install the rear body name plate in the position shown in the illustration.- HINT:
- Press the rear body name plate firmly to install it.
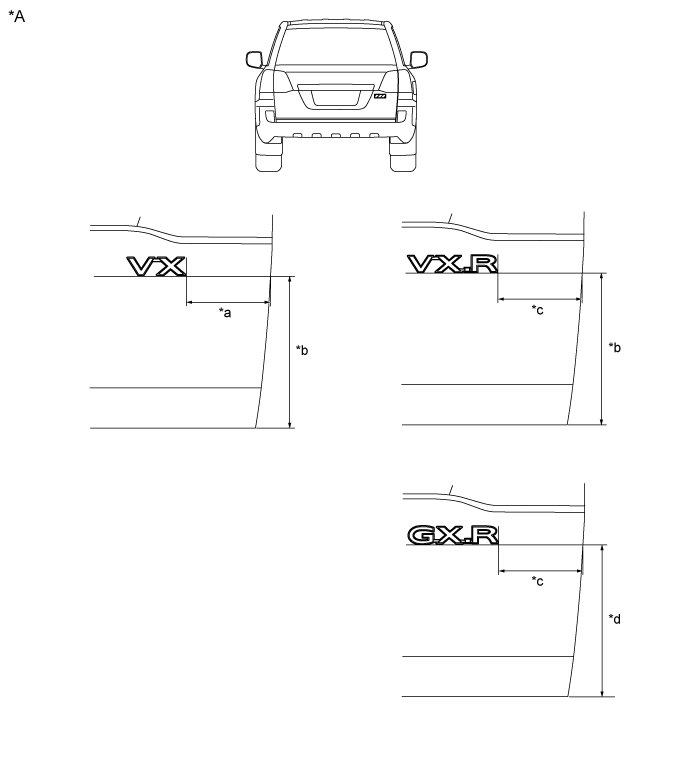
Text in Illustration *A for Type C - - *a 160.5 mm (6.32 in.) *b 271 mm (10.7 in.) *c 148 mm (5.83 in.) *d 269 mm (10.6 in.)
| 3. INSTALL NO. 5 BACK DOOR NAME PLATE |
Clean the vehicle body surface.
Using a heat light, heat the vehicle body surface.
Remove the double-sided tape from the vehicle body.
Wipe off any tape adhesive residue with cleaner.
Install a new back door name plate.
Using a heat light, heat the vehicle body and a new back door name plate.
Remove the peeling paper from the face of the back door name plate.
- HINT:
- After removing the peeling paper, keep the exposed adhesive free from foreign matter.
for Type A:
Install the back door name plate in the position shown in the illustration.- HINT:
- Press the rear body name plate firmly to install it.

Text in Illustration *A for Type A - - *a 32.5 mm (1.28 in.) *b 266 mm (10.4 in.) *c 240.8 mm (9.48 in.) - - for Type B:
Install the back door name plate in the position shown in the illustration.- HINT:
- Press the rear body name plate firmly to install it.
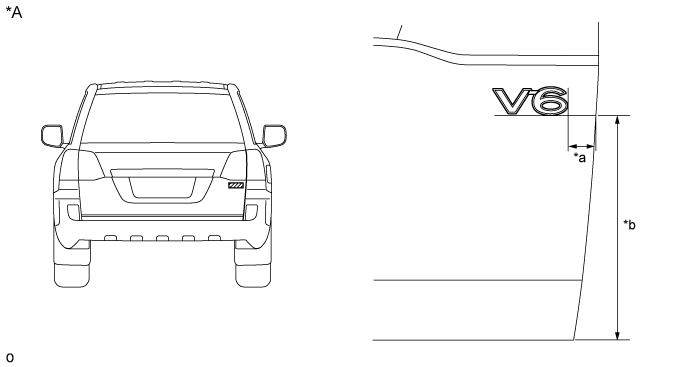
Text in Illustration *A for Type B - - *a 32.5 mm (1.28 in.) *b 266 mm (10.4 in.) for Type C:
Install the back door name plate in the position shown in the illustration.- HINT:
- Press the rear body name plate firmly to install it.

Text in Illustration *A for Type C - - *a 32.5 mm (1.28 in.) *b 266 mm (10.4 in.)
| 4. INSTALL BACK DOOR NAME PLATE |
Clean the vehicle body surface.
Using a heat light, heat the vehicle body surface.
Remove the double-sided tape from the vehicle body.
Wipe off any tape adhesive residue with cleaner.
Install a new rear body name plate.
Using a heat light, heat the vehicle body and a new rear body name plate.
Remove the peeling paper from the face of the rear body name plate.
- HINT:
- After removing the peeling paper, keep the exposed adhesive free from foreign matter.
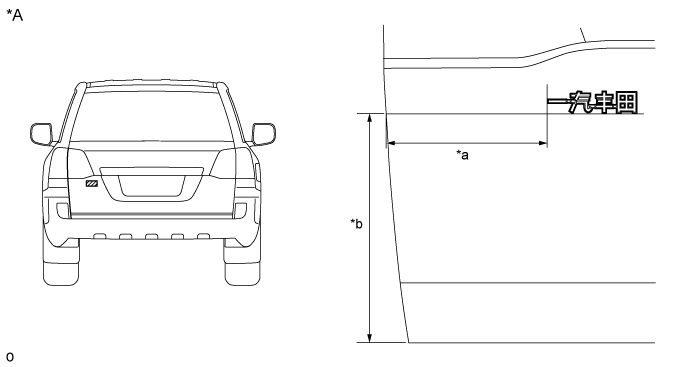
Install the rear body name plate in the position shown in the illustration.
- HINT:
- Press the rear body name plate firmly to install it.

Text in Illustration *A for Type C - - *a 33 mm (1.30 in.) *b 274 mm (10.8 in.)
| 5. INSTALL NO. 6 LUGGAGE COMPARTMENT DOOR NAME PLATE |
Clean the vehicle body surface.
Using a heat light, heat the vehicle body surface.
Remove the double-sided tape from the vehicle body.
Wipe off any tape adhesive residue with cleaner.
Install a new rear body name plate.
Using a heat light, heat the vehicle body and a new rear body name plate.
Remove the peeling paper from the face of the rear body name plate.
- HINT:
- After removing the peeling paper, keep the exposed adhesive free from foreign matter.
Install the rear body name plate in the position shown in the illustration.
- HINT:
- Press the rear body name plate firmly to install it.
Text in Illustration *A for Type C - - *a 188.5 mm (7.42 in.) *b 274 mm (10.8 in.)