Front Bumper (W/ Winch) -- Reassembly |
| 1. INSTALL WINCH CONTROL WIRE |
Install the winch control wire with the 2 nuts.
| 2. INSTALL FRONT BUMPER NO. 2 PROTECTOR |
- HINT:
- When installing the front bumper No. 2 protector, heat the rear bumper cover using a heat light.
- Standard:
Item Temperature Front Bumper Cover 20 to 30°C (68 to 86°F)
- NOTICE:
- Do not heat the front bumper cover excessively.
When using a new front bumper cover:
Clean the surface of a new front bumper cover.
Using a heat light, heat the front bumper cover surface.
When reusing the front bumper cover:
Using a heat light, heat the front bumper cover surface.
Remove the double-sided tape from the front bumper cover.
Wipe off any tape adhesive residue with cleaner.
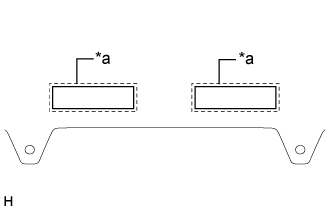
Install 2 new front bumper No. 2 protectors.
Remove the peeling paper from the face of 2 new front bumper No. 2 protectors.
- HINT:
- After removing the peeling paper, keep the exposed adhesive free from foreign matter.
Align the front bumper No. 2 protector with the mark-off line of the rear bumper cover and install it as shown in the illustration.
- HINT:
- Press the front bumper No. 2 protector firmly to install it.
Text in Illustration *a Mark-off Line
 |
| 3. INSTALL FRONT BUMPER PAD |
- HINT:
- When installing the front bumper pad, heat the rear bumper cover using a heat light.
- Standard:
Item Temperature Front Bumper Cover 20 to 30°C (68 to 86°F)
- NOTICE:
- Do not heat the front bumper cover excessively.
When using a new front bumper cover:
Clean the surface of a new front bumper cover.
Using a heat light, heat the front bumper cover surface.
When reusing the front bumper cover:
Using a heat light, heat the front bumper cover surface.
Remove the double-sided tape from the front bumper cover.
Wipe off any tape adhesive residue with cleaner.
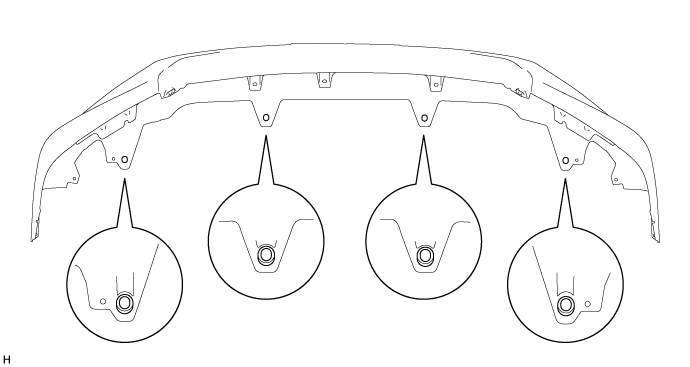
Install 4 new front bumper pad.

Remove the peeling paper from the face of 4 new front bumper pad.
- HINT:
- After removing the peeling paper, keep the exposed adhesive free from foreign matter.
Install the front bumper pad as shown in the illustration.
- HINT:
- Press the front bumper pad firmly to install it.
| 4. INSTALL FOG LIGHT MOUNTING BRACKET LH (w/ Fog Light) |
Attach the 3 claws to install the fog light mounting bracket LH.
| 5. INSTALL FOG LIGHT MOUNTING BRACKET RH (w/ Fog Light) |
- HINT:
- Use the same procedure described for the LH side.
| 6. INSTALL FRONT BUMPER HOLE COVER LH (w/ Fog Light) |
Attach the 4 claws to the front bumper hole cover LH.
Install the screw.
Attach the 2 guides to the fog light bracket LH.
Install the 3 screws.
| 7. INSTALL FRONT BUMPER HOLE COVER RH (w/ Fog Light) |
- HINT:
- Use the same procedure described for the LH side.
| 8. INSTALL LOWER RADIATOR GRILLE SUB-ASSEMBLY LH |
Attach the 10 claws to install the lower radiator grille sub-assembly LH.
Install the 3 clips.
| 9. INSTALL LOWER RADIATOR GRILLE SUB-ASSEMBLY RH |
- HINT:
- Use the same procedure described for the LH side.
| 10. INSTALL FRONT LICENSE PLATE BRACKET |
Install the front license plate bracket with the 2 nuts.
| 11. INSTALL NO. 4 ENGINE ROOM WIRE (w/ Fog Light) |
Attach the 10 clamps to install the No. 4 engine room wire.
| 12. INSTALL FOG LIGHT ASSEMBLY LH (w/ Fog Light) |
Attach the 2 guides to install the fog light assembly LH.
Install the 2 screws.
Connect the connector.
| 13. INSTALL FOG LIGHT ASSEMBLY RH (w/ Fog Light) |
- HINT:
- Use the same procedure described for the LH side.
| 14. INSTALL FRONT BUMPER INNER BRACKET (w/ Fog Light) |
Attach the 3 claws and install the front bumper inner bracket.
| 15. INSTALL RADIATOR GRILLE SUB-ASSEMBLY |
Attach the 10 claws to install the radiator grille assembly.