Cylinder Head -- Repair |
| 1. REPAIR INTAKE VALVE SEAT |
- NOTICE:
- Repair the seat while checking the seating position.
- Keep the lip free of foreign matter.
- Take off the cutter gradually to make the intake valve seat smooth.
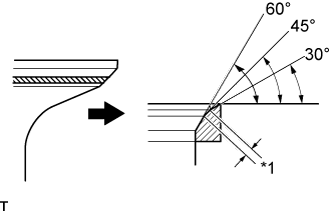
Using a 45° cutter, resurface the valve seat so that the valve seat width is more than the specification.
 |
Using 30° and 60° cutters, correct the valve seat so that the valve contacts the entire circumference of the seat. The contact should be in the center of the valve seat, and the valve seat width should be maintained within the specified range around the entire circumference of the seat.
- Standard width:
- 1.1 to 1.5 mm (0.0433 to 0.0591 in.)
Text in Illustration *1 Width
 |
Hand-lap the valve and valve seat with an abrasive compound.
Check the valve seating position.
| 2. REPAIR EXHAUST VALVE SEAT |
- NOTICE:
- Repair the seat while checking the seating position.
- Keep the lip free of foreign matter.
- Take off the cutter gradually to make the exhaust valve seat smooth.
Using a 45° cutter, resurface the valve seat so that the valve seat width is more than the specification.
 |
Using 30° and 60° cutters, correct the valve seat so that the valve contacts the entire circumference of the seat. The contact should be in the center of the valve seat, and the valve seat width should be maintained within the specified range around the entire circumference of the seat.
- Standard width:
- 1.1 to 1.5 mm (0.0433 to 0.0591 in.)
Text in Illustration *1 Width
 |
Hand-lap the valve and valve seat with an abrasive compound.
Check the valve seating position.