Rear Crankshaft Oil Seal Removal
PRECAUTION
DISCONNECT CABLE FROM NEGATIVE BATTERY TERMINAL
REMOVE AUTOMATIC TRANSMISSION ASSEMBLY
REMOVE DRIVE PLATE AND RING GEAR SUB-ASSEMBLY
REMOVE REAR CRANKSHAFT OIL SEAL
Rear Crankshaft Oil Seal -- Removal |
- NOTICE:
- After turning the engine switch off, waiting time may be required before disconnecting the cable from the battery terminal. Therefore, make sure to read the disconnecting the cable from the battery terminal notice before proceeding with work (Click here).
| 2. DISCONNECT CABLE FROM NEGATIVE BATTERY TERMINAL |
- NOTICE:
- When disconnecting the cable, some systems need to be initialized after the cable is reconnected (Click here).
| 3. REMOVE AUTOMATIC TRANSMISSION ASSEMBLY |
(Click here)
| 4. REMOVE DRIVE PLATE AND RING GEAR SUB-ASSEMBLY |
Using SST, hold the crankshaft.
- SST
- 09213-70011
09330-00021
Remove the 10 bolts, rear drive plate spacer, drive plate and crankshaft angle sensor rotor.
| 5. REMOVE REAR CRANKSHAFT OIL SEAL |
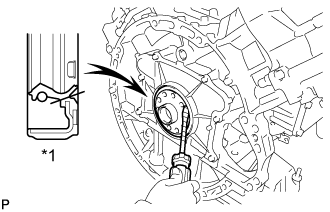
Using a knife, cut off the lip of the oil seal.
Using a screwdriver, pry out the oil seal.
Text in Illustration*1
| Cut Position
|
- HINT:
- Tape the screwdriver tip before use.
- NOTICE:
- Do not damage the surface of the oil seal press fit hole and crankshaft.


