Valve Body Assembly -- Removal |
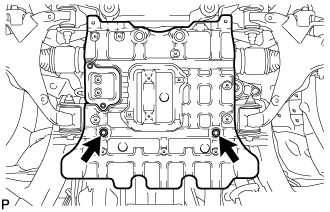
| 1. REMOVE NO. 2 ENGINE UNDER COVER |
Remove the 2 bolts and No. 2 engine under cover.
 |
| 2. REMOVE OIL PAN PROTECTOR ASSEMBLY |
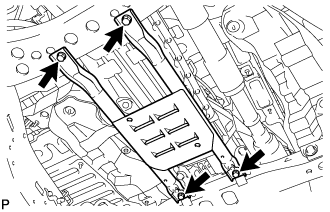 |
Remove the 4 bolts and oil pan protector assembly.
| 3. DRAIN AUTOMATIC TRANSMISSION FLUID |
Using a 5 mm hexagon socket wrench, remove the overflow plug and gasket from the automatic transmission assembly and drain the automatic transmission fluid.
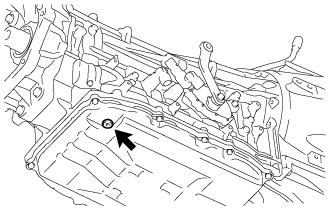 |
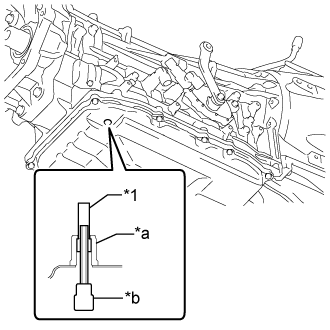
Using a 5 mm hexagon socket wrench, remove the transmission oil pan tube from the automatic transmission assembly and drain the automatic transmission fluid.
Text in Illustration *1 Transmission Oil Pan Tube *a Overflow Plug Hole *b 5 mm Hexagon Socket Wrench
 |
Using a 5 mm hexagon socket wrench, install the transmission oil pan tube to the automatic transmission assembly.
- Torque:
- 0.8 N*m{8 kgf*cm, 7 in.*lbf}
Using a 5 mm hexagon socket wrench, temporarily install the gasket and overflow plug to the automatic transmission assembly.
- Torque:
- 16 N*m{163 kgf*cm, 12 ft.*lbf}
| 4. REMOVE AUTOMATIC TRANSMISSION OIL PAN SUB-ASSEMBLY |
Remove the 11 bolts, automatic transmission oil pan sub-assembly and automatic transmission oil pan gasket.
- NOTICE:
- Some fluid will remain in the automatic transmission oil pan sub-assembly. Remove all the pan bolts, and carefully remove the automatic transmission oil pan sub-assembly.
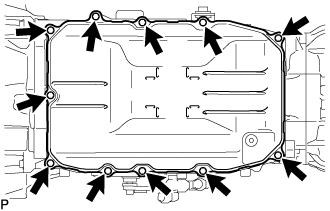 |
Remove the 4 transmission oil cleaner magnets from the automatic transmission oil pan sub-assembly.
Examine the particles in the automatic transmission oil pan sub-assembly.
Collect any steel chips with the removed transmission oil cleaner magnets. Carefully look at the foreign objects and particles in the automatic transmission oil pan sub-assembly and on the transmission oil cleaner magnets to guess the type of wear which might be found in the transmission.
Result:
Steel (magnetic): bearing, gear and clutch plate wear
Brass (non-magnetic): bush wear
| 5. REMOVE VALVE BODY OIL STRAINER ASSEMBLY |
Remove the 4 bolts and valve body oil strainer assembly from the transmission valve body assembly.
- NOTICE:
- Be careful as some fluid will come out of the valve body oil strainer assembly.
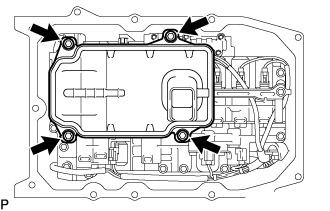 |
Remove the O-ring from the valve body oil strainer assembly.
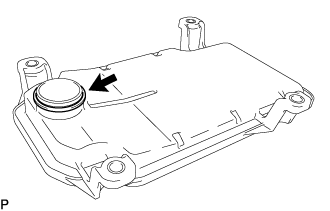 |
| 6. REMOVE TRANSMISSION VALVE BODY ASSEMBLY |
Remove the bolt, lock plate and ATF temperature sensor.
Text in Illustration *1 Lock Plate *2 ATF Temperature Sensor *3 Transmission Revolution Sensor (NT) Connector *a Protective Tape
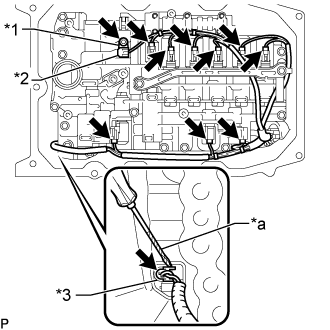 |
Using a screwdriver, disconnect the transmission revolution sensor (NT) connector.
- HINT:
- Tape the screwdriver tip before use.
Disconnect the 9 connectors from the solenoid valves.
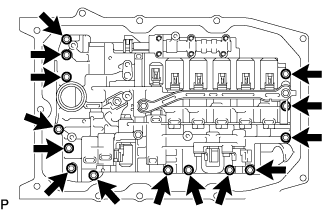
Remove the 14 bolts and transmission valve body assembly.
 |