Audio Visual Telematics. Land Cruiser. Urj200, 202 Grj200 Vdj200
Audio Video. Land Cruiser. Urj200, 202 Grj200 Vdj200
INSTALL DOOR OPENING SWITCH SUB-ASSEMBLY (for Face to Face Seat Type)
INSTALL NO. 2 BACK DOOR SERVICE HOLE COVER (for Face to Face Seat Type)
Back Door Speaker -- Installation |
| 1. INSTALL REAR HEADER SPEAKER ASSEMBLY |
Connect the connector.
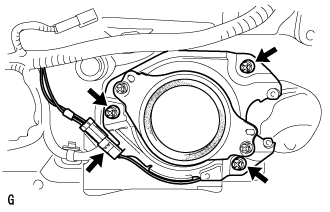 |
Install the rear header speaker assembly with the 3 screws.
| 2. INSTALL BACK DOOR TRIM PANEL ASSEMBLY |
Attach the 14 clips to install the back door garnish.
| 3. INSTALL DOOR OPENING SWITCH SUB-ASSEMBLY (for Face to Face Seat Type) |
Attach the 2 claws to install the door opening switch sub-assembly.
| 4. INSTALL NO. 2 BACK DOOR SERVICE HOLE COVER (for Face to Face Seat Type) |
Connect the connector.
Attach the 4 claws to install the No. 2 back door service hole cover.
| 5. INSTALL ASSIST GRIP (for Face to Face Seat Type) |
Install the assist grip with the 2 screws.
| 6. INSTALL BACK DOOR SIDE GARNISH RH |
w/o Power Back Door:
- HINT:
- Use the same procedure described for the LH side.
w/ Power Back Door:
Attach the clip and 4 claws to install the back door side garnish RH.
| 7. INSTALL BACK DOOR SIDE GARNISH LH |
Attach the 3 clips and 2 claws to install the back door side garnish LH.
| 8. INSTALL CENTER BACK DOOR GARNISH |
Attach the 5 clips and 4 claws to install the center back door garnish.
| 9. CONNECT CABLE TO NEGATIVE BATTERY TERMINAL |
- NOTICE:
- When disconnecting the cable, some systems need to be initialized after the cable is reconnected (Click here).