Roof Headlining (For Hatchback 5 Door) Removal
REMOVE DECK BOARD ASSEMBLY
REMOVE REAR SEAT ASSEMBLY (for 60/40 Split Seat Type RH Side)
REMOVE REAR SEAT ASSEMBLY (for 60/40 Split Seat Type LH Side)
REMOVE REAR SEAT ASSEMBLY (for Fold Down Seat Type)
REMOVE FRONT DOOR SCUFF PLATE RH
REMOVE FRONT DOOR SCUFF PLATE LH
REMOVE COWL SIDE TRIM BOARD RH
REMOVE COWL SIDE TRIM BOARD LH
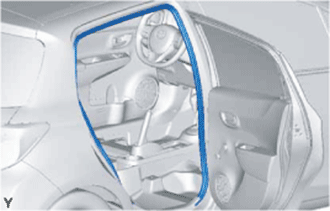
REMOVE FRONT DOOR OPENING TRIM WEATHERSTRIP RH
REMOVE FRONT DOOR OPENING TRIM WEATHERSTRIP LH
REMOVE REAR DOOR SCUFF PLATE RH
REMOVE REAR DOOR SCUFF PLATE LH
REMOVE REAR DOOR OPENING TRIM WEATHERSTRIP RH
REMOVE REAR DOOR OPENING TRIM WEATHERSTRIP LH
SEPARATE FRONT SEAT OUTER BELT ASSEMBLY RH
SEPARATE FRONT SEAT OUTER BELT ASSEMBLY LH
REMOVE CENTER PILLAR LOWER GARNISH RH
REMOVE CENTER PILLAR LOWER GARNISH LH
REMOVE CENTER PILLAR UPPER GARNISH RH
REMOVE CENTER PILLAR UPPER GARNISH LH
REMOVE FRONT PILLAR GARNISH RH (w/ Curtain Shield Airbag)
REMOVE FRONT PILLAR GARNISH LH (w/ Curtain Shield Airbag)
REMOVE FRONT PILLAR GARNISH RH (w/o Curtain Shield Airbag)
REMOVE FRONT PILLAR GARNISH LH (w/o Curtain Shield Airbag)
REMOVE NO. 2 ROOM LIGHT ASSEMBLY
REMOVE JACK HANDLE
REMOVE REAR FLOOR FINISH PLATE
SEPARATE REAR SEAT 3 POINT TYPE OUTER BELT ASSEMBLY RH
SEPARATE REAR SEAT 3 POINT TYPE OUTER BELT ASSEMBLY LH
REMOVE DECK TRIM SIDE PANEL ASSEMBLY RH
REMOVE DECK TRIM SIDE PANEL ASSEMBLY LH
REMOVE ROOF SIDE INNER GARNISH RH
REMOVE ROOF SIDE INNER GARNISH LH
REMOVE VISOR ASSEMBLY RH
REMOVE VISOR ASSEMBLY LH
REMOVE VISOR HOLDER
REMOVE ASSIST GRIP ASSEMBLY
REMOVE ROOF HEADLINING SERVICE HOLE COVER (w/ Cover)
REMOVE MAP LIGHT ASSEMBLY
SEPARATE REAR CENTER SEAT OUTER BELT ASSEMBLY
REMOVE ROOF HEADLINING ASSEMBLY
Roof Headlining (For Hatchback 5 Door) -- Removal |
| 1. REMOVE DECK BOARD ASSEMBLY |
Remove the deck board.
| 2. REMOVE REAR SEAT ASSEMBLY (for 60/40 Split Seat Type RH Side) |
(YARIS_NCP93 RM0000026GL010X.html)
| 3. REMOVE REAR SEAT ASSEMBLY (for 60/40 Split Seat Type LH Side) |
(YARIS_NCP93 RM0000026GD010X.html)
| 4. REMOVE REAR SEAT ASSEMBLY (for Fold Down Seat Type) |
(YARIS_NCP93 RM000001GM000YX.html)
| 5. REMOVE FRONT DOOR SCUFF PLATE RH |
Disengage the 8 claws and remove the front door scuff plate.
| 6. REMOVE FRONT DOOR SCUFF PLATE LH |
- HINT:
- Use the same procedure as for the RH side.
| 7. REMOVE COWL SIDE TRIM BOARD RH |
Remove the clip.
Disengage the clip and remove the cowl side trim board.
| 8. REMOVE COWL SIDE TRIM BOARD LH |
- HINT:
- Use the same procedure as for the RH side.
| 9. REMOVE FRONT DOOR OPENING TRIM WEATHERSTRIP RH |
Remove the front door opening trim weatherstrip.
| 10. REMOVE FRONT DOOR OPENING TRIM WEATHERSTRIP LH |
- HINT:
- Use the same procedure as for the RH side.
| 11. REMOVE REAR DOOR SCUFF PLATE RH |
Disengage the 5 claws and guide and remove the rear door scuff plate.
| 12. REMOVE REAR DOOR SCUFF PLATE LH |
- HINT:
- Use the same procedure as for the RH side.
| 13. REMOVE REAR DOOR OPENING TRIM WEATHERSTRIP RH |
Remove the rear door opening trim weatherstrip.
| 14. REMOVE REAR DOOR OPENING TRIM WEATHERSTRIP LH |
- HINT:
- Use the same procedure as for the RH side.
| 15. SEPARATE FRONT SEAT OUTER BELT ASSEMBLY RH |
Disengage the 2 claws and remove the anchor cover.
Remove the bolt and separate the front seat outer belt.
| 16. SEPARATE FRONT SEAT OUTER BELT ASSEMBLY LH |
- HINT:
- Use the same procedure as for the RH side.
| 17. REMOVE CENTER PILLAR LOWER GARNISH RH |
Disengage the 2 clips and the 2 claws.
Disengage the 2 guides and remove the center pillar lower garnish.
| 18. REMOVE CENTER PILLAR LOWER GARNISH LH |
- HINT:
- Use the same procedure as for the RH side.
| 19. REMOVE CENTER PILLAR UPPER GARNISH RH |
Remove the 2 screws and disengage the clip.
Pass the front seat outer belt through the slit in the center pillar upper garnish and remove the center pillar upper garnish.
| 20. REMOVE CENTER PILLAR UPPER GARNISH LH |
- HINT:
- Use the same procedure as for the RH side.
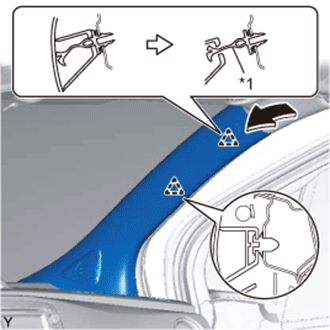
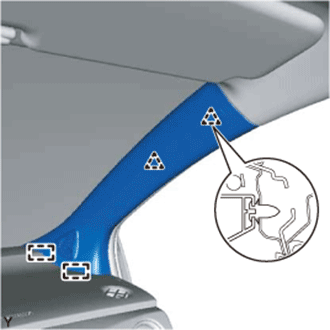
| 21. REMOVE FRONT PILLAR GARNISH RH (w/ Curtain Shield Airbag) |
Disengage the front pillar garnish clip and the clip.
Text in Illustration*1
| Front Pillar Garnish Clip
|
- HINT:
- The front pillar garnish clip should remain between the front pillar garnish and the pillar.
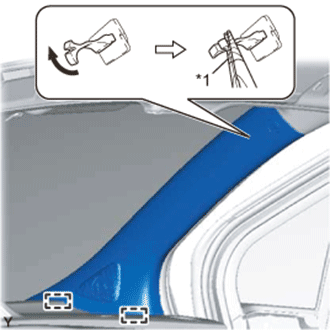
Using needle nose pliers, turn the front pillar garnish clip 90° and disengage it from the front pillar garnish.
Text in Illustration*1
| Protective Tape
|
- NOTICE:
- As a pillar garnish clip is reusable, do not remove it from the pillar as long as it is not damaged.
- Replace the front pillar garnish clips with new ones if they are removed from the vehicle.
- HINT:
- Tape the needle-nosed pliers tip before use.
Disengage the 2 guides and remove the front pillar garnish.
for 6 speakers:
Disconnect the connector.
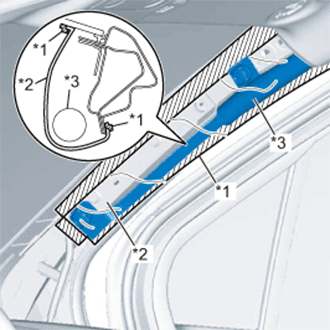
Protect the curtain shield airbag assembly.
Text in Illustration*1
| Adhesive Tape
|
*2
| Protective Cover
|
*3
| Curtain Shield Airbag Assembly
|
Cover the airbag with a cloth or piece of nylon and secure the ends of the cover with tape as shown in the illustration.
- NOTICE:
- Cover the curtain shield airbag with a protective cover as soon as the front pillar garnish is removed.
| 22. REMOVE FRONT PILLAR GARNISH LH (w/ Curtain Shield Airbag) |
- HINT:
- Use the same procedure as for the RH side.
| 23. REMOVE FRONT PILLAR GARNISH RH (w/o Curtain Shield Airbag) |
Disengage the 2 clips and the 2 guides and remove the front pillar garnish.
for 6 speakers:
Disconnect the connector.
| 24. REMOVE FRONT PILLAR GARNISH LH (w/o Curtain Shield Airbag) |
- HINT:
- Use the same procedure as for the RH side.
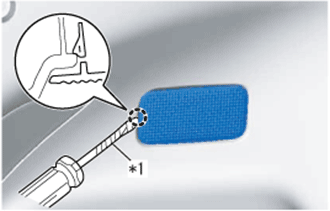
| 25. REMOVE NO. 2 ROOM LIGHT ASSEMBLY |
Using a screwdriver with its tip wrapped in protective tape, disengage the claw.
Text in Illustration*1
| Protective Tape
|
Disconnect the connector and remove the No. 2 room light assembly.
| 27. REMOVE REAR FLOOR FINISH PLATE |
Disengage the 4 claws and 4 guides and remove the rear floor finish plate.
| 28. SEPARATE REAR SEAT 3 POINT TYPE OUTER BELT ASSEMBLY RH |
Remove the bolt.
Disengage the 2 claws and separate the rear seat 3 point type outer belt.
| 29. SEPARATE REAR SEAT 3 POINT TYPE OUTER BELT ASSEMBLY LH |
- HINT:
- Use the same procedure as for the RH side.
| 30. REMOVE DECK TRIM SIDE PANEL ASSEMBLY RH |
Remove the 3 screws.
Disengage the 4 claws and the guide.
Disengage the 3 clips and remove the deck trim side panel.
| 31. REMOVE DECK TRIM SIDE PANEL ASSEMBLY LH |
- HINT:
- Use the same procedure as for the RH side.
| 32. REMOVE ROOF SIDE INNER GARNISH RH |
Disengage the 4 clips.
Pass the rear seat 3 point type outer belt through the slit in the roof side inner garnish and remove the roof side inner garnish.
| 33. REMOVE ROOF SIDE INNER GARNISH LH |
- HINT:
- Use the same procedure as for the RH side.
| 34. REMOVE VISOR ASSEMBLY RH |
Remove the visor shaft from the visor holder.
Remove the 2 screws and the visor.
| 35. REMOVE VISOR ASSEMBLY LH |
- HINT:
- Use the same procedure as for the RH side.
Turn the visor holder clockwise 45° and disengage the 2 claws to remove the visor holder.
- HINT:
- Use the same procedure for the LH side and RH side.
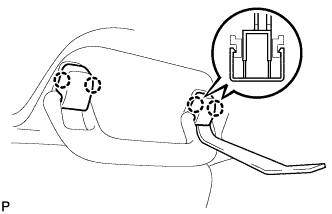
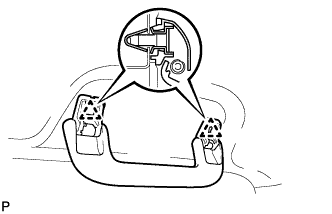
| 37. REMOVE ASSIST GRIP ASSEMBLY |
- HINT:
- Use the same procedure to remove all assist grips.
Using a moulding remover, disengage the 4 claws and remove the 2 assist grip covers.
Disengage the 2 clips and remove the assist grip.
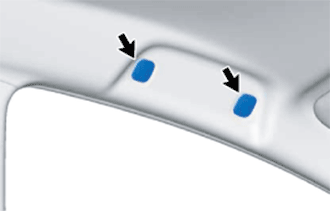
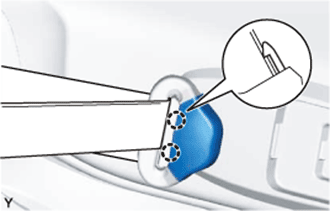
| 38. REMOVE ROOF HEADLINING SERVICE HOLE COVER (w/ Cover) |
- HINT:
- Use the same procedure to remove all roof headlining service hole covers.
Using a clip remover, remove the 2 roof headlining service hole covers.
| 39. REMOVE MAP LIGHT ASSEMBLY |
Using a moulding remover, disengage the 4 claws.
Disconnect the connector and remove the map light assembly.
| 40. SEPARATE REAR CENTER SEAT OUTER BELT ASSEMBLY |
Disengage the 2 claws and open the slip joint cover.
Remove the bolt and separate the rear center seat outer belt.
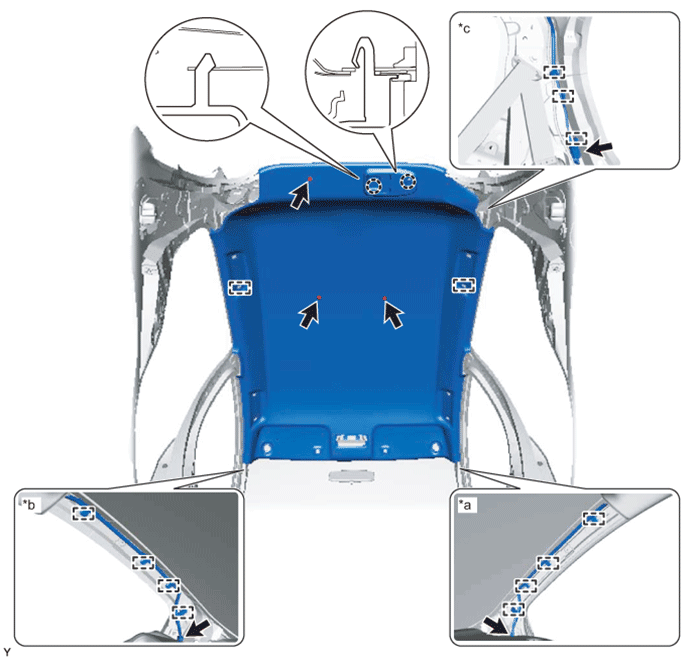
| 41. REMOVE ROOF HEADLINING ASSEMBLY |
Text in Illustration*a
| Front Pillar RH Side
| *b
| Front Pillar LH Side
|
*c
| Rear Pillar RH Side
| -
| -
|
for front pillar RH side:
Disconnect the connector.
Using a clip remover, disengage the 4 clamps.
for front pillar LH side:
Disconnect the connector.
Using a clip remover, disengage the 4 clamps.
for rear pillar RH side:
Disconnect the connector.
Using a clip remover, disengage the 3 clamps.
Disengage the 2 claws.
Using a clip remover, remove the 3 clips.
Disengage the 2 hooks.
Remove the roof headlining from the vehicle through the back door as shown in the illustration.
- NOTICE:
- Do not damage the roof headlining assembly or body interior.