INSTALL REAR SEAT ASSEMBLY (for 60/40 Split Seat Type RH Side)
INSTALL REAR SEAT ASSEMBLY (for 60/40 Split Seat Type LH Side)
Roof Headlining (For Hatchback 3 Door) -- Installation |
| 1. INSTALL ROOF HEADLINING ASSEMBLY |
Pull the roof headlining back into the vehicle through the back door.
- NOTICE:
- Do not damage the roof headlining assembly or body interior.
 |
Engage the 2 hooks and install the roof headlining.
Install the 3 clips.
Engage the 2 claws.
for front pillar RH side:
Install the 4 clamps.
Connect the connector.
for front pillar LH side:
Install the 4 clamps.
Connect the connector.
for rear pillar RH side:
Install the 3 clamps.
Connect the connector.
| 2. INSTALL REAR CENTER SEAT OUTER BELT ASSEMBLY |
Install the rear center seat outer belt with the bolt.
- Torque:
- 41 N*m{420 kgf*cm, 30 ft.*lbf}
Engage the 2 claws and close the slip joint cover.
| 3. INSTALL MAP LIGHT ASSEMBLY |
Connect the connector.
Engage the 4 claws to install the map light assembly.
 |
| 4. INSTALL ASSIST GRIP ASSEMBLY |
- HINT:
- Use the same procedure to install all assist grips.
Engage the 2 clips and install the assist grip.
Engage the 4 claws and install the 2 assist grip covers.
 |
| 5. INSTALL ROOF HEADLINING SERVICE HOLE COVER (w/ Cover) |
- HINT:
- Use the same procedure to install all roof headlining service hole covers.
Install the 2 roof headlining service hole covers.
| 6. INSTALL VISOR HOLDER |
Engage the 2 claws and turn the visor holder counterclockwise 45° to install it.
- HINT:
- Use the same procedure for the RH side and LH side.
 |
| 7. INSTALL VISOR ASSEMBLY RH |
Install the visor with the 2 screws.
Install the visor shaft into the visor holder.
| 8. INSTALL VISOR ASSEMBLY LH |
- HINT:
- Use the same procedure as for the RH side.
| 9. INSTALL REAR ROOF SIDE RAIL GARNISH RH |
Engage the 4 clips and install the roof side rail garnish.
| 10. INSTALL REAR ROOF SIDE RAIL GARNISH LH |
- HINT:
- Use the same procedure as for the RH side.
| 11. INSTALL ROOF SIDE INNER GARNISH RH |
Pass the rear seat 3 point type outer belt through the slit in the roof side inner garnish.
Engage the 5 clips and install the roof side inner garnish.
| 12. INSTALL ROOF SIDE INNER GARNISH LH |
- HINT:
- Use the same procedure as for the RH side.
| 13. INSTALL DECK TRIM SIDE PANEL ASSEMBLY RH |
Engage the 3 clips and the 3 claws and install the deck trim side panel.
Install the 3 screws.
| 14. INSTALL DECK TRIM SIDE PANEL ASSEMBLY LH |
- HINT:
- Use the same procedure as for the RH side.
| 15. INSTALL REAR SEAT 3 POINT TYPE OUTER BELT ASSEMBLY RH |
Engage the 2 claws and install the rear seat 3 point type outer belt.
Tighten the bolt.
- Torque:
- 41 N*m{420 kgf*cm, 30 ft.*lbf}
| 16. INSTALL REAR SEAT 3 POINT TYPE OUTER BELT ASSEMBLY LH |
- HINT:
- Use the same procedure as for the RH side.
| 17. INSTALL REAR FLOOR FINISH PLATE |
Engage the 4 guides and the 4 claws to install the rear floor finish plate.
| 18. INSTALL JACK HANDLE |
| 19. INSTALL NO. 2 ROOM LIGHT ASSEMBLY |
Connect the connector.
Engage the claw to install the No. 2 room light assembly.
 |
| 20. INSTALL FRONT PILLAR GARNISH RH (w/ Curtain Shield Airbag) |
Remove the piece of cloth or nylon.
for 6 speakers:
Connect the connector.
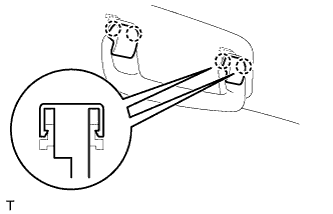
Make sure that the front pillar garnish clip is not damaged.
Text in Illustration *1 Protective Tape - NOTICE:
- If there is any damage, replace the garnish clip with a new one.
- When a garnish clip is being replaced, make sure to install it in the direction shown in the illustration.
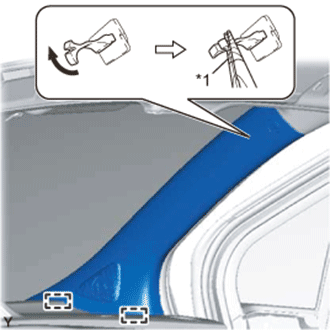 |
Engage the 2 guides.
Turn the end of the front pillar garnish clip 90° with needle-nosed pliers and install it to the front pillar garnish.
- HINT:
- Tape the needle-nosed pliers tip before use.
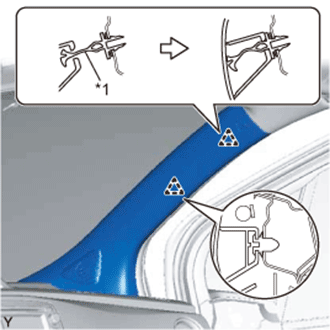
Engage the clip and the front pillar garnish clip to install the front pillar garnish.
Text in Illustration *1 Front Pillar Garnish Clip
 |
| 21. INSTALL FRONT PILLAR GARNISH LH (w/ Curtain Shield Airbag) |
- HINT:
- Use the same procedure as for the RH side.
| 22. INSTALL FRONT PILLAR GARNISH RH (w/o Curtain Shield Airbag) |
for 6 speakers:
Connect the connector.
Engage the 2 guides and the 2 clips and install the front pillar garnish.
| 23. INSTALL FRONT PILLAR GARNISH LH (w/o Curtain Shield Airbag) |
- HINT:
- Use the same procedure as for the RH side.
| 24. INSTALL CENTER PILLAR UPPER GARNISH RH |
Pass the front seat outer belt through the slit in the center pillar upper garnish.
Engage the clip and install the center pillar upper garnish with 2 screws.
| 25. INSTALL CENTER PILLAR UPPER GARNISH LH |
- HINT:
- Use the same procedure as for the RH side.
| 26. INSTALL FRONT QUARTER TRIM PANEL ASSEMBLY RH |
Engage the 8 clips and the 10 claws.
Engage the 3 guides and install the quarter trim panel.
| 27. INSTALL FRONT QUARTER TRIM PANEL ASSEMBLY LH |
- HINT:
- Use the same procedure as for the RH side.
| 28. INSTALL FRONT SEAT OUTER BELT ASSEMBLY RH |
Install the floor end of the front seat outer belt with the bolt.
- Torque:
- 41 N*m{420 kgf*cm, 30 ft.*lbf}
Engage the 2 claws and install the anchor cover.
| 29. INSTALL FRONT SEAT OUTER BELT ASSEMBLY LH |
- HINT:
- Use the same procedure as for the RH side.
| 30. INSTALL FRONT DOOR OPENING TRIM WEATHERSTRIP RH |
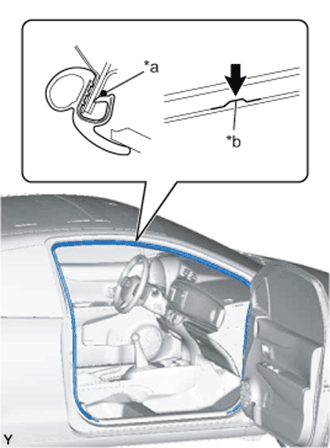
Align the paint mark on the front door opening trim weatherstrip with the flange position on the vehicle body and install the weatherstrip.
Text in Illustration *a Paint Mark *b Flange Position - Paint Mark:
Area Color RH Side Yellow LH Side White
- NOTICE:
- After installation, check that the corners fit correctly.
 |
| 31. INSTALL FRONT DOOR OPENING TRIM WEATHERSTRIP LH |
- HINT:
- Use the same procedure as for the RH side.
| 32. INSTALL COWL SIDE TRIM BOARD RH |
Engage the clip.
Install the cowl side trim board with clip.
| 33. INSTALL COWL SIDE TRIM BOARD LH |
- HINT:
- Use the same procedure as for the RH side.
| 34. INSTALL FRONT DOOR SCUFF PLATE RH |
Engage the 8 claws and install the front door scuff plate.
| 35. INSTALL FRONT DOOR SCUFF PLATE LH |
- HINT:
- Use the same procedure as for the RH side.
| 36. INSTALL REAR SEAT ASSEMBLY (for 60/40 Split Seat Type RH Side) |
| 37. INSTALL REAR SEAT ASSEMBLY (for 60/40 Split Seat Type LH Side) |
| 38. INSTALL REAR SEAT ASSEMBLY (for Fold Down Seat Type) |
| 39. INSTALL DECK BOARD ASSEMBLY |
Install the deck board.