Front Door Speaker (For Hatchback) -- Removal |
- HINT:
- Use the same procedure for both the RH and LH sides.
- The procedure described below is for the RH side.
| 1. REMOVE FRONT DOOR WINDOW REGULATOR HANDLE ASSEMBLY (w/o Power Window) |
Insert a clip remover between the plate and front door trim board.
 |
Turn the handle with the clip remover inserted, as shown in the illustration.
Remove the front door window regulator handle and clip.
Remove the window regulator handle plate.
| 2. REMOVE FRONT ARMREST BASE PANEL UPPER (w/ Power Window) |
Using a moulding remover, disengage the 9 claws and 4 guides.
 |
Disconnect the connector and remove the front armrest base upper panel.
| 3. REMOVE FRONT ARMREST BASE PANEL UPPER (w/o Power Window) |
Using a moulding remover, disengage the 6 claws and 3 guides.
Disconnect the connector.
- HINT:
- If the armrest base upper panel is equipped with door lock switch, disconnect the connector.
 |
| 4. REMOVE FRONT DOOR TRIM BOARD SUB-ASSEMBLY (for 5 Door) |
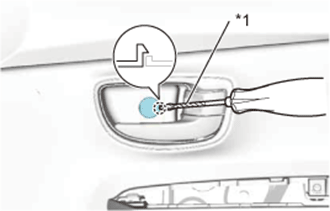
Using a screwdriver with its tip wrapped in protective tape, disengage the claw and open the cover.
Text in Illustration *1 Protective Tape
 |
Remove the 3 screws.
 |
Disengage the 7 clips.
 |
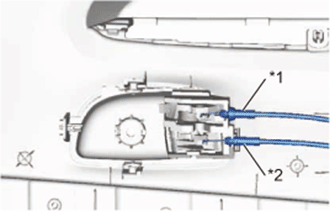
Disconnect the front door lock remote control cable and the front door inside locking cable and remove the front door trim board.
Text in Illustration *1 Front Door Lock Remote Control Cable Assembly *2 Front Door Inside Locking Cable Assembly
 |
| 5. REMOVE FRONT DOOR TRIM BOARD SUB-ASSEMBLY (for 3 Door) |
Using a screwdriver with its tip wrapped in protective tape, disengage the claw and open the cover.
Text in Illustration *1 Protective Tape
|
Remove the 3 screws.
|
Disengage the 8 clips.
 |
Disconnect the front door lock remote control cable and the front door inside locking cable and remove the front door trim board.
Text in Illustration *1 Front Door Lock Remote Control Cable Assembly *2 Front Door Inside Locking Cable Assembly
|
| 6. REMOVE FRONT NO. 1 SPEAKER ASSEMBLY |
Disconnect the connector.
 |
Drill out the 3 rivet heads using a drill with a bit diameter of less than 4 mm (0.16 in.), and remove the front No. 1 speaker assembly from the front door panel.
 |
Operate the drill around the rivet head circumference and cut out the flange.
- CAUTION:
- Be careful. The cut rivet is very hot.
- NOTICE:
- Do not drill the rivet at an angle as this will cause damage to the drill and drill hole. Line up the drill and rivet, and carefully drill the rivet head straight out.
After drilling out the flange, continue drilling to push out the shards on the drill.
Using a vacuum cleaner, remove the rivet fragments and shavings from the inside of the door.