Upper Instrument Panel (For Hatchback) -- Installation |
| 1. INSTALL UPPER INSTRUMENT PANEL SUB-ASSEMBLY |
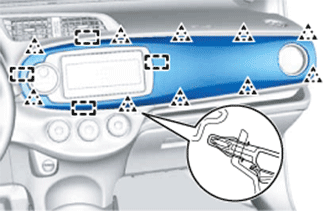
Engage the 5 guides at the front of the upper instrument panel.
- NOTICE:
- Be careful not to damage the upper instrument panel and steering wheel when installing it.
Engage the 8 clips at the rear of the upper instrument panel.
Install the <B> bolt.
- Torque:
- 20 N*m{204 kgf*cm, 15 ft.*lbf}
Install the upper instrument panel with the 2 clips.
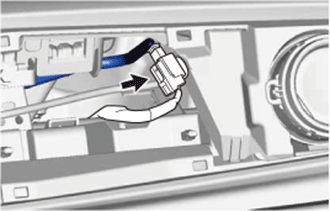
Connect the passenger airbag connector.
 |
| 2. INSTALL COMBINATION METER ASSEMBLY |
Connect the 2 connectors.
Engage the 2 guides and 2 clips.
Install the combination meter assembly with the 2 screws.
| 3. INSTALL NO. 1 INSTRUMENT CLUSTER FINISH PANEL |
Engage the 5 clips and install the instrument cluster finish panel.
| 4. INSTALL INSTRUMENT CLUSTER FINISH CENTER PANEL SUB-ASSEMBLY |
Connect the connector.
Engage the 7 clips and install the instrument cluster finish center panel.
| 5. INSTALL NO. 4 INSTRUMENT PANEL REGISTER ASSEMBLY (for Front Passenger Side) |
Engage the 3 claws and install the instrument panel register.
| 6. INSTALL INSTRUMENT CLUSTER FINISH PANEL GARNISH ASSEMBLY |
Engage the 4 guides and 10 clips and install the instrument cluster finish panel garnish.
 |
| 7. INSTALL FRONT PILLAR GARNISH RH (w/ Curtain Shield Airbag) |
Remove the piece of cloth or nylon.
for 6 speakers:
Connect the connector.
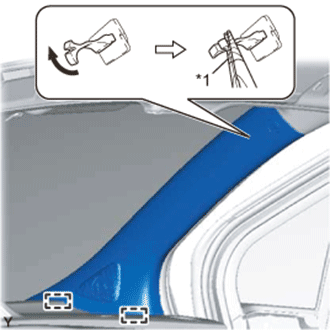
Make sure that the front pillar garnish clip is not damaged.
Text in Illustration *1 Protective Tape - NOTICE:
- If there is any damage, replace the garnish clip with a new one.
- When a garnish clip is being replaced, make sure to install it in the direction shown in the illustration.
 |
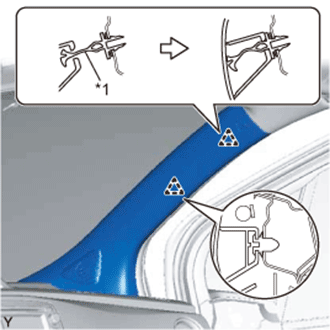
Engage the 2 guides.
Turn the end of the front pillar garnish clip 90° with needle-nosed pliers and install it to the front pillar garnish.
- HINT:
- Tape the needle-nosed pliers tip before use.
Engage the clip and the front pillar garnish clip to install the front pillar garnish.
Text in Illustration *1 Front Pillar Garnish Clip
 |
| 8. INSTALL FRONT PILLAR GARNISH LH (w/ Curtain Shield Airbag) |
- HINT:
- Use the same procedure as for the RH side.
| 9. INSTALL FRONT PILLAR GARNISH RH (w/o Curtain Shield Airbag) |
for 6 speakers:
Connect the connector.
Engage the 2 guides and the 2 clips and install the front pillar garnish.
| 10. INSTALL FRONT PILLAR GARNISH LH (w/o Curtain Shield Airbag) |
- HINT:
- Use the same procedure as for the RH side.
| 11. INSTALL FRONT DOOR OPENING TRIM WEATHERSTRIP RH |
Install the front door opening trim weatherstrip.
| 12. INSTALL FRONT DOOR OPENING TRIM WEATHERSTRIP LH |
Install the front door opening trim weatherstrip.
| 13. INSTALL COWL SIDE TRIM BOARD RH |
Engage the clip.
Install the cowl side trim board with clip.
| 14. INSTALL COWL SIDE TRIM BOARD LH |
- HINT:
- Use the same procedure as for the RH side.
| 15. INSTALL FRONT DOOR SCUFF PLATE RH (for 5 Door) |
Engage the 8 claws and install the front door scuff plate.
| 16. INSTALL FRONT DOOR SCUFF PLATE LH (for 5 Door) |
- HINT:
- Use the same procedure as for the RH side.
| 17. INSTALL FRONT DOOR SCUFF PLATE RH (for 3 Door) |
Engage the 8 claws and install the front door scuff plate.
| 18. INSTALL FRONT DOOR SCUFF PLATE LH (for 3 Door) |
- HINT:
- Use the same procedure as for the RH side.
| 19. CONNECT CABLE TO NEGATIVE BATTERY TERMINAL |
- Torque:
- 5.4 N*m{55 kgf*cm, 48 in.*lbf}
| 20. INSPECT SRS WARNING LIGHT |