Name Plate (For Sedan) -- Installation |
| 1. INSTALL SYMBOL EMBLEM |
Clean the attachment surface.
Using an infrared light, heat the double-sided adhesive tape remaining on the luggage compartment door panel.
- HINT:
- Heat at 40 to 60°C (104 to 140°F) for 1 to 2 minutes.
Using a shop rag or piece of cloth, rub the remaining double-sided adhesive tape off the back door panel while it is hot from the infrared light.
- NOTICE:
- Installing the symbol while any double-sided adhesive tape remains on the luggage compartment door panel may cause adhesion failure. Therefore, completely remove the double-sided adhesive tape.
Using a non-residue solvent, clean the attachment surface.
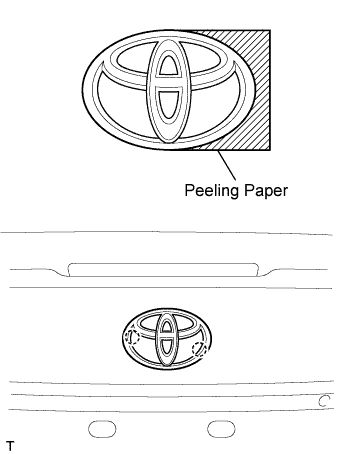 |
Align the 2 pins and install a new symbol emblem.
- NOTICE:
- Install the symbol emblem in an environment where the ambient temperature is over 20°C (68°F). If it is below 20°C (68°F), using an infrared light, heat the luggage compartment door panel and the symbol emblem up to 20 to 30°C (68 to 86°F) and install the symbol emblem.
| 2. INSTALL NO. 2 LUGGAGE COMPARTMENT DOOR NAME PLATE |
Clean the attachment surface.
Using an infrared light, heat the double-sided adhesive tape remaining on the luggage compartment door panel.
- HINT:
- Heat at 40 to 60°C (104 to 140°F) for 1 to 2 minutes.
Using a shop rag or piece of cloth, rub the remaining double-sided adhesive tape off the luggage compartment door panel while it is hot from the infrared light.
- NOTICE:
- Installing the No. 2 luggage compartment door name plate while any double-sided adhesive tape remains on the luggage compartment door panel may cause adhesion failure. Therefore, completely remove the double-sided adhesive tape.
Using a non-residue solvent, clean the attachment surface.
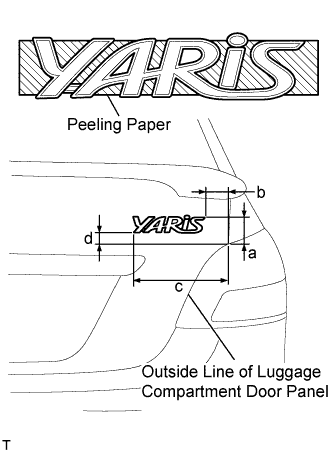 |
Install a new No. 2 luggage compartment door name plate as shown in the illustration.
- Installation position:
Mark Measurement (along surface) a 39.4 mm (1.551 in.) b 44.7 mm (1.760 in.) c 162.4 mm (6.394 in.) d 17.8 mm (0.701 in.)
- NOTICE:
- Install the No. 2 luggage compartment door name plate in an environment where the ambient temperature is over 20°C (68°F). If it is below 20°C (68°F), using an infrared light, heat the luggage compartment door panel and the No. 2 luggage compartment door name plate up to 20 to 30°C (68 to 86°F) and install the No. 2 luggage compartment door name plate.
| 3. INSTALL NO. 6 LUGGAGE COMPARTMENT DOOR NAME PLATE |
Clean the attachment surface.
Using an infrared light, heat the double-sided adhesive tape remaining on the luggage compartment door panel.
- HINT:
- Heat at 40 to 60°C (104 to 140°F) for 1 to 2 minutes.
Using a shop rag or piece of cloth, rub the remaining double-sided adhesive tape off the luggage compartment door panel while it is hot from the infrared light.
- NOTICE:
- Installing the No. 6 luggage compartment door name plate while any double-sided adhesive tape remains on the luggage compartment door panel may cause adhesion failure. Therefore, completely remove the double-sided adhesive tape.
Using a non-residue solvent, clean the attachment surface.
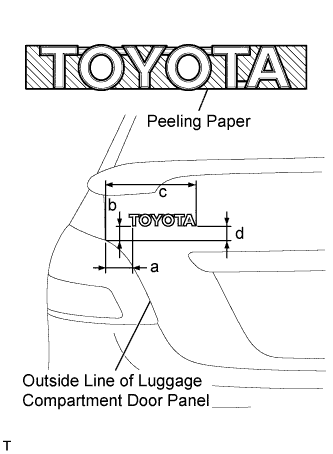 |
Install a new No. 6 luggage compartment door name plate as shown in the illustration.
- Installation position:
Mark Measurement (along surface) a 52.8 mm (2.079 in.) b 17.1 mm (0.673 in.) c 162.3 mm (0.390 in.) d 20 mm (0.787 in.)
- NOTICE:
- Install the No. 6 luggage compartment door name plate in an environment where the ambient temperature is over 20°C (68°F). If it is below 20°C (68°F), using an infrared light, heat the luggage compartment door panel and the No. 6 luggage compartment door name plate up to 20 to 30°C (68 to 86°F) and install the No. 6 luggage compartment door name plate.
| 4. INSTALL RADIATOR GRILLE EMBLEM |
Engage the 4 claws and install the radiator grille emblem.
 |
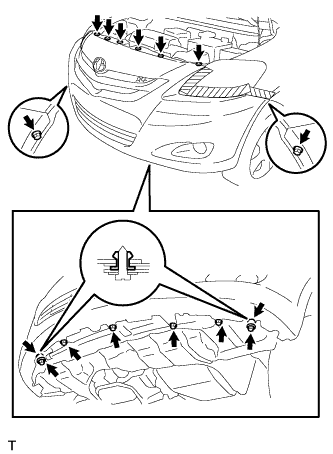
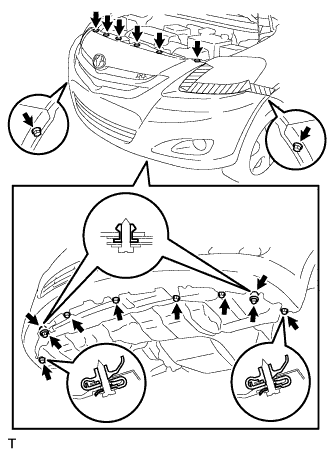
| 5. INSTALL FRONT BUMPER COVER |
w/ Fog Light:
Connect the 2 fog light connectors.
Engage the 6 claws and install the front bumper cover.
 |
w/o Fog Light:
Engage the 6 claws and install the front bumper cover.
 |
w/ Front Spoiler:
Install the 6 clips.
Install the 2 screw grommets.
Tighten the 5 screws and the 3 bolts.
 |
w/o Front Spoiler:
Install the 6 clips.
Install the 2 screw grommets.
Tighten the 7 screw and the 3 bolts.
 |
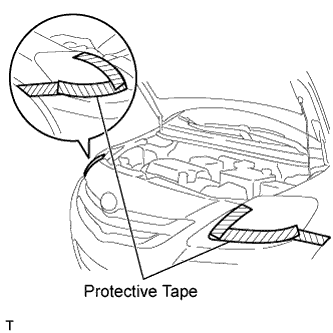
Remove the protective tape.
 |
| 6. INSTALL FRONT SPOILER COVER (w/ Small Front Spoiler) |
Install the front spoiler cover with the 2 screws and the 10 bolts.
 |
| 7. CONNECT CABLE TO NEGATIVE BATTERY TERMINAL (w/ Fog Light) |
- Torque:
- 5.4 N*m{55 kgf*cm, 48 in.*lbf}