Fuel Injector (For Sedan) Installation
INSTALL FUEL INJECTOR ASSEMBLY
INSTALL INJECTOR VIBRATION INSULATOR
INSTALL DELIVERY PIPE NO. 1 SPACER
INSTALL FUEL DELIVERY PIPE SUB-ASSEMBLY
CONNECT FUEL TUBE SUB-ASSEMBLY
INSTALL CYLINDER HEAD COVER SUB-ASSEMBLY
CONNECT FUEL VAPOR FEED HOSE ASSEMBLY
CONNECT VENTILATION HOSE
INSTALL IGNITION COIL NO. 1
CONNECT CABLE TO NEGATIVE BATTERY TERMINAL
CHECK FOR FUEL LEAKAGE
CHECK FOR ENGINE OIL LEAKAGE
INSTALL CYLINDER HEAD COVER NO. 2
Fuel Injector (For Sedan) -- Installation |
| 1. INSTALL FUEL INJECTOR ASSEMBLY |
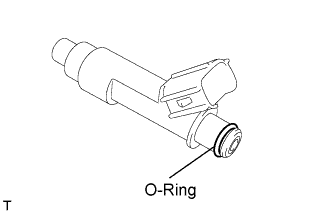
Apply a light coat of gasoline or spindle oil to new O-rings, then install one onto each fuel injector.
Apply a light coat of gasoline or spindle oil to the contact surfaces of the fuel delivery pipe and the O-ring of the fuel injector.
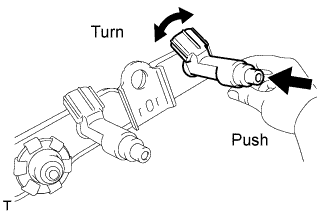
While turning the fuel injector left and right, install it onto the fuel delivery pipe.
- NOTICE:
- Do not twist the O-ring.
- After installing the fuel injectors, check that they turn smoothly. If not, replace the O-ring with a new one.
| 2. INSTALL INJECTOR VIBRATION INSULATOR |
Install 4 new injector vibration insulators onto the cylinder head.
| 3. INSTALL DELIVERY PIPE NO. 1 SPACER |
Install the 2 No. 1 delivery pipe spacers onto the cylinder head.
- NOTICE:
- Install the delivery pipe No. 1 spacer in the correct direction.
| 4. INSTALL FUEL DELIVERY PIPE SUB-ASSEMBLY |
Install the fuel delivery pipe sub-assembly with the 4 fuel injectors, then provisionally install the 3 bolts.
- NOTICE:
- Do not drop the fuel injectors when installing the fuel delivery pipe sub-assembly.
- Check that the fuel injectors rotate smoothly after installing the fuel delivery pipe sub-assembly.
Tighten the 3 bolts to the specified torque.
- Torque:
- 19 N*m{194 kgf*cm, 14 ft.*lbf} for bolt A
- 9.0 N*m{92 kgf*cm, 80 in.*lbf} for bolt B
| 5. CONNECT FUEL TUBE SUB-ASSEMBLY |
Insert the fuel tube connector into the fuel delivery pipe until a click sound can be heard.
- NOTICE:
- Check that there are no scratches or foreign matter around the disconnected parts of the fuel tube connector and pipe before performing this work.
- After connecting the fuel tube, check that the fuel tube connector and pipe are securely connected by pulling them.
Install the fuel pipe clamp.
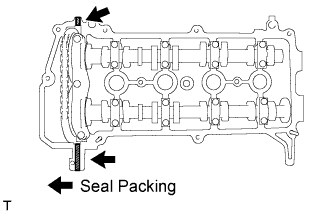
| 6. INSTALL CYLINDER HEAD COVER SUB-ASSEMBLY |
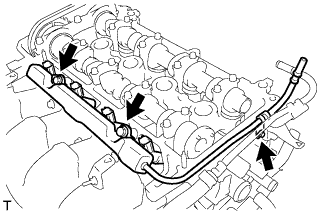
Install a new gasket to the cylinder head cover sub-assembly.
Apply seal packing to the cylinder head as shown in the illustration.
- Seal Packing:
- Toyota Genuine Seal Packing Black, Three Bond 1207B or Equivalent
- NOTICE:
- Remove any oil from the contact surface.
- Install the cylinder head cover sub-assembly within 3 minutes of applying the seal packing.
- Do not start the engine for at least 2 hours after the installation.
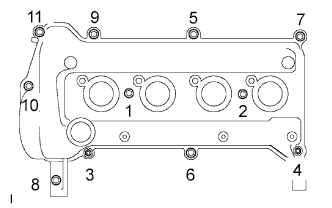
Install the cylinder head cover sub-assembly with the 9 bolts, 2 nuts and 2 seal washers.
Tighten the 9 bolts and 2 nuts in the sequence shown in the illustration.
- Torque:
- 10 N*m{102 kgf*cm, 7.0 ft.*lbf}
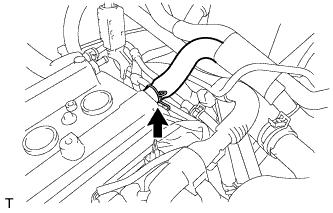
Install the wire harness bracket with the bolt.
- Torque:
- 13 N*m{133 kgf*cm, 9.6 ft.*lbf}
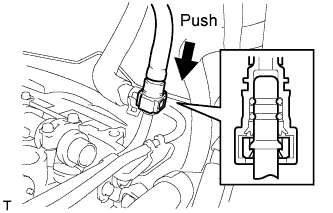
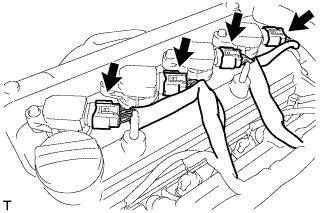
Connect the connector and wire harness clamp shown in the illustration and connect the engine wire harness.
Connect the fuel injector connectors.
| 7. CONNECT FUEL VAPOR FEED HOSE ASSEMBLY |
Connect fuel vapor feed hose assembly.
| 8. CONNECT VENTILATION HOSE |
Connect the ventilation hose.
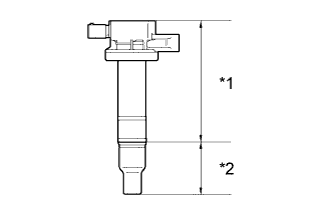
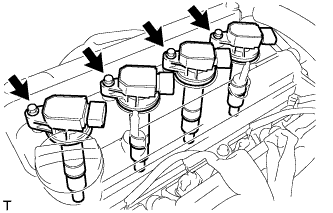
| 9. INSTALL IGNITION COIL NO. 1 |
Install the 4 ignition coils with the 4 bolts.
- Torque:
- 9.0 N*m{92 kgf*cm, 80 in.*lbf}
- NOTICE:
- If the body or cap of the ignition coil is dropped or subjected to a strong impact, replace the ignition coil with a new one.
Text in Illustration*1
| Body
|
*2
| Cap
|
Connect the 4 ignition coil connectors.
| 10. CONNECT CABLE TO NEGATIVE BATTERY TERMINAL |
- Torque:
- 5.4 N*m{55 kgf*cm, 48 in.*lbf}
| 11. CHECK FOR FUEL LEAKAGE |
When using the Techstream.
Connect the Techstream to the DLC3.
Turn the ignition switch to ON and turn the tester ON.
- NOTICE:
- Do not start the engine.
Select the following menu items: Powertrain / Engine and ECT / Active Test / Control the Fuel Pump / Speed.
- HINT:
- Refer to the Techstream operator's manual for further details.
Check that there is no fuel leakage anywhere on the fuel system after doing maintenance.
| 12. CHECK FOR ENGINE OIL LEAKAGE |
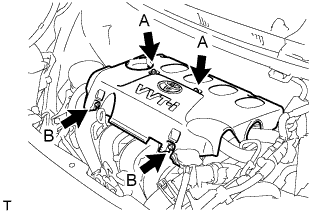
| 13. INSTALL CYLINDER HEAD COVER NO. 2 |
Tighten the 2 A nuts, then the 2 B nuts.
- Torque:
- 7.0 N*m{71 kgf*cm, 62 in.*lbf}