INSTALL CLUTCH PEDAL STOPPER BOLT (w/o Cruise Control System)
INSTALL NO. 2 CLUTCH START SWITCH ASSEMBLY (w/ Cruise Control System)
INSTALL LOWER INSTRUMENT PANEL FINISH PANEL (w/o Knee Airbag)
INSTALL LOWER NO. 1 INSTRUMENT PANEL AIRBAG ASSEMBLY (w/ Knee Airbag)
Clutch Pedal (For Hatchback) -- Installation |
| 1. INSTALL CLUTCH PEDAL PAD |
Install the clutch pedal pad to the clutch pedal sub-assembly.
| 2. INSTALL NO. 1 CLUTCH PEDAL CUSHION |
Install the No. 1 clutch pedal cushion to the clutch pedal sub-assembly.
| 3. INSTALL CLUTCH PEDAL SHAFT COLLAR |
Apply MP grease to both sides of 2 new clutch pedal bushes.
Text in Illustration 
MP grease
 |
Install the 2 clutch pedal bushes and the clutch pedal shaft collar to the clutch pedal sub-assembly.
| 4. INSTALL CLUTCH PEDAL SUB-ASSEMBLY |
Install the clutch pedal sub-assembly to the clutch pedal support sub-assembly with the bolt and the nut.
- Torque:
- 37 N*m{375 kgf*cm, 27 ft.*lbf}
- NOTICE:
- Turn the nut while holding the bolt.
| 5. INSTALL CLUTCH PEDAL SPRING |
Install the clutch pedal spring to the clutch pedal sub-assembly and the clutch pedal support sub-assembly.
| 6. INSTALL CLUTCH PEDAL STOPPER BOLT (w/o Cruise Control System) |
Install the clutch pedal stopper bolt to the clutch pedal support sub-assembly and temporarily tighten the lock nut.
- HINT:
- Tighten the lock nut to the specified torque when adjusting the clutch pedal.
| 7. INSTALL NO. 2 CLUTCH START SWITCH ASSEMBLY (w/ Cruise Control System) |
Install the No. 2 clutch start switch assembly to the clutch pedal support sub-assembly and temporarily tighten the lock nut.
- HINT:
- Tighten the lock nut to the specified torque when adjusting the clutch pedal.
| 8. INSTALL CLUTCH START SWITCH ASSEMBLY |
Install the clutch start switch assembly to the clutch pedal support sub-assembly with the nut.
- Torque:
- 16 N*m{160 kgf*cm, 12 ft.*lbf}
| 9. INSTALL CLUTCH PEDAL SUPPORT SUB-ASSEMBLY |
Apply MP grease to the contact surface of the clutch master cylinder push rod clevis and the clutch pedal sub-assembly.
Text in Illustration MP grease
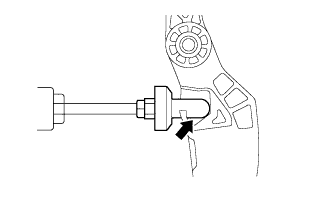 |
Install the clutch master cylinder push rod clevis to the cutout of the clutch pedal sub-assembly from the left side of the vehicle and push it downward.
Install the clutch pedal support sub-assembly to the vehicle with the bolt and the 2 nuts.
- Torque:
- for Bolt:
- 24 N*m{241 kgf*cm, 17 ft.*lbf}
- for Nut:
- 9.0 N*m{92 kgf*cm, 80 in.*lbf}
Connect the connectors and engage the wire harness clamps.
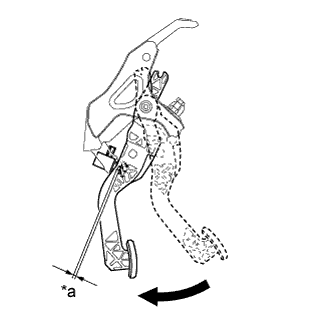
With the clutch pedal fully depressed, check that the clearance shown in the illustration is as specified.
Text in Illustration *a Clearance Fully depressed - Standard clearance:
- 2.1 to 5.1 mm (0.083 to 0.201 in.)
 |
| 10. INSPECT AND ADJUST CLUTCH PEDAL |
| 11. INSTALL COMBINATION METER ASSEMBLY |
| 12. INSTALL LOWER INSTRUMENT PANEL FINISH PANEL (w/o Knee Airbag) |
Engage the 5 claws and 2 clips and install the instrument panel finish panel.
| 13. INSTALL LOWER NO. 1 INSTRUMENT PANEL AIRBAG ASSEMBLY (w/ Knee Airbag) |
| 14. INSTALL LOWER NO. 2 INSTRUMENT PANEL FINISH PANEL |
Engage the 2 claws and 5 clips and install the instrument panel finish panel.
| 15. INSTALL NO. 1 INSTRUMENT PANEL UNDER COVER SUB-ASSEMBLY |
Engage the guide and the claw.
Install the instrument panel under cover with the 2 <A> screws.
| 16. INSPECT CLUTCH START SYSTEM |
Check that the engine does not start when the clutch pedal is released.
Check that the engine starts when the clutch pedal is fully depressed.
If necessary, replace the clutch start switch assembly.