Valve Body Assembly (For Sedan) Installation
INSTALL TRANSMISSION VALVE BODY ASSEMBLY
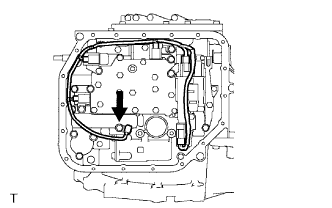
INSTALL VALVE BODY OIL STRAINER ASSEMBLY
INSTALL AUTOMATIC TRANSAXLE OIL PAN SUB-ASSEMBLY
CONNECT CABLE TO NEGATIVE BATTERY TERMINAL
ADD AUTOMATIC TRANSAXLE FLUID
INSPECT AUTOMATIC TRANSAXLE FLUID
CHECK AUTOMATIC TRANSAXLE FLUID LEAKAGE
INSTALL ENGINE UNDER COVER LH
Valve Body Assembly (For Sedan) -- Installation |
| 1. INSTALL TRANSMISSION VALVE BODY ASSEMBLY |
Coat 2 new apply gaskets with Toyota Genuine ATF WS or equivalent and install them into the transaxle case.
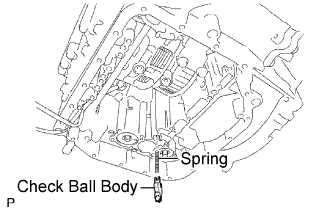
Install the check ball body spring and check ball body.
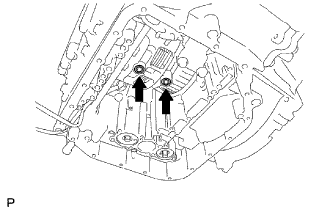
Align the groove of the manual valve with the pin of the manual valve lever.
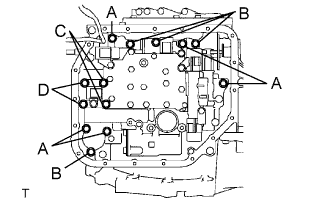
Provisionally install the valve body with the 13 bolts.
- Bolt length:
- Bolt A:
- 32 mm (1.26 in.)
- Bolt B:
- 22 mm (0.87 in.)
- Bolt C:
- 55 mm (2.17 in.)
- Bolt D:
- 45 mm (1.77 in.)
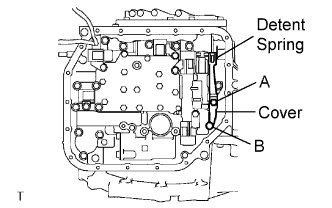
Provisionally install the detent spring and detent spring cover with the 2 bolts.
- Bolt length:
- Bolt A:
- 14 mm (0.55 in.)
- Bolt B:
- 45 mm (1.77 in.)
Check that the manual valve lever comes into contact with the center of the roller at the tip of the detente spring.
Tighten the 15 bolts.
- Torque:
- 11 N*m{110 kgf*cm, 8 ft.*lbf}
Install the ATF temperature sensor with the lock plate and bolt.
- Torque:
- 11 N*m{110 kgf*cm, 8 ft.*lbf}
Connect the 5 shift solenoid valve connectors.
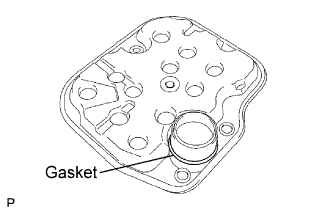
| 2. INSTALL VALVE BODY OIL STRAINER ASSEMBLY |
Coat a new oil strainer gasket with Toyota Genuine ATF WS or equivalent, and install it into the oil strainer.
Install the oil strainer with the 3 bolts.
- Torque:
- 11 N*m{110 kgf*cm, 8 ft.*lbf}
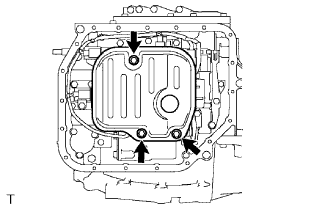
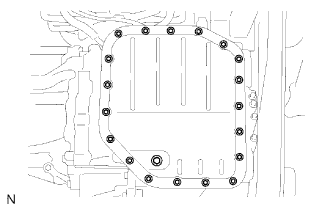
| 3. INSTALL AUTOMATIC TRANSAXLE OIL PAN SUB-ASSEMBLY |
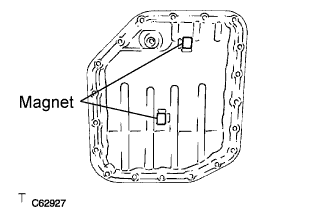
Install the 2 magnets onto the oil pan, as shown in the illustration.
Install the oil pan and a new gasket with the 19 bolts.
- Torque:
- 7.8 N*m{80 kgf*cm, 69 in.*lbf}
| 4. CONNECT CABLE TO NEGATIVE BATTERY TERMINAL |
- Torque:
- 5.4 N*m{55 kgf*cm, 48 in.*lbf}
| 5. ADD AUTOMATIC TRANSAXLE FLUID |
Automatic Transaxle FluidClassification
| Capacity (Reference)
|
Toyota Genuine ATF WS or equivalent
| Dry fill
| 6.4 liters (6.8 US qts, 5.6 Imp. qts)
|
Drain and refill
| 2.5 liters (2.6 US qts, 2.2 Imp. qts)
|
| 6. INSPECT AUTOMATIC TRANSAXLE FLUID |
- HINT:
- Drive the vehicle until the engine and transaxle are at normal operating temperature.
- Fluid temperature:
- 70 to 80 °C (158 to 176 °F)
Park the vehicle on a level surface and engage the parking brake.
With the engine idling and the brake pedal depressed, shift the shift lever into all positions from P to L, and then return it to the P position.
Pull out the oil level gauge and wipe it clean.
Push it fully back into the pipe.
Pull it out and check that the fluid level is within the HOT range.
If there is any leakage, repair or replace O-rings, FIPGs, oil seals, plugs or other parts.
| 7. CHECK AUTOMATIC TRANSAXLE FLUID LEAKAGE |
| 8. INSTALL ENGINE UNDER COVER LH |