Hood Lock Control Cable Assembly (For Hatchback) -- Installation |
| 1. INSTALL HOOD LOCK CONTROL CABLE ASSEMBLY |
Pass the hood lock control cable into the engine compartment.
Connect the clamps as shown in the illustration.
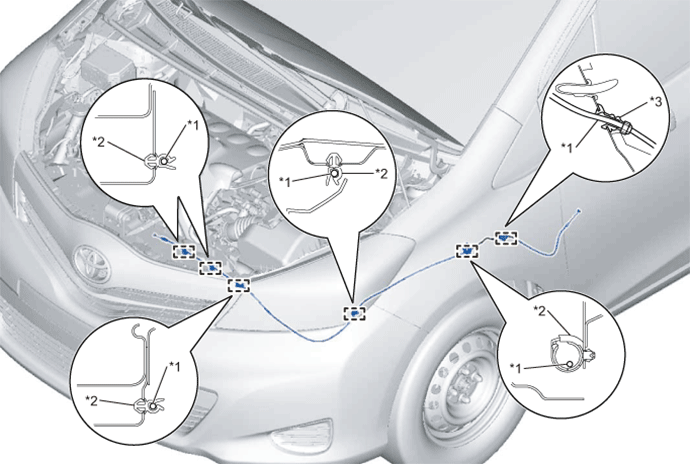
Text in Illustration *1 Hood Lock Control Cable *2 Clamp *3 Grommet - -
| 2. INSTALL HOOD LOCK CONTROL LEVER SUB-ASSEMBLY |
Connect the hood lock control cable to the hood lock control lever.
Engage the 3 claws and install the hood lock control lever.
| 3. INSTALL HOOD LOCK ASSEMBLY |
Apply MP grease to the sliding areas of the hood lock.
 |
Connect the hood lock control cable.
Install the hood lock with the 3 bolts.
- Torque:
- 7.5 N*m{76 kgf*cm, 66 in.*lbf}
Connect the connector.
- HINT:
- If the hood lock assembly is equipped with engine hood courtesy switch, connect the connector.
| 4. INSPECT HOOD SUB-ASSEMBLY |
Check that the clearance measurements are within the standard ranges.
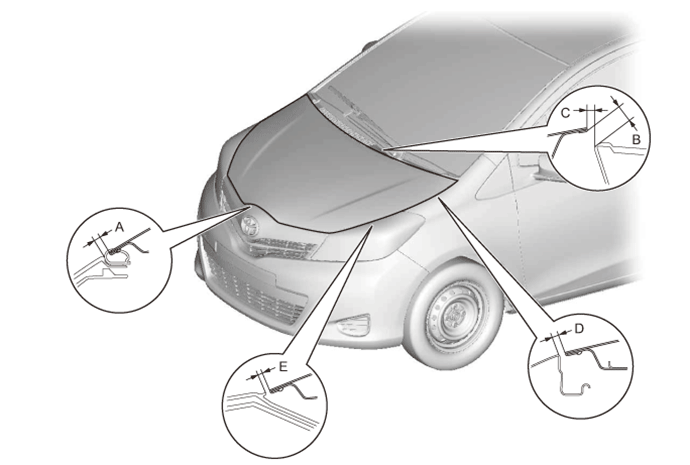
- Standard:
Area Measurement Area Measurement A 2.0 to 6.0 mm
(0.0787 to 0.236 in.)D 2.3 to 5.3 mm
(0.0905 to 0.208 in.)B 11.0 mm
(0.433 in.)E 1.2 to 5.2 mm
(0.0472 to 0.204 in.)C 5.0 mm
(0.196 in.)- -
| 5. ADJUST HOOD SUB-ASSEMBLY |
Loosen the 4 hood side hinge bolts.
 |
Move the hood to adjust the clearance to within the standard range (YARIS_NCP93 RM000000XB705BX.html).
Tighten the 4 hood side hinge bolts after the adjustment.
- Torque:
- 13 N*m{133 kgf*cm, 10 ft.*lbf}
Adjust the height of the hood front end by turning the 2 center hood cushions (YARIS_NCP93 RM000000XB705BX.html).
- HINT:
- The center hood cushion can be raised and lowered by turning it.
 |
Adjust the hood lock.
Loosen the 3 bolts.
Adjust the hood lock position so that the striker can enter it smoothly (YARIS_NCP93 RM000000XB705BX.html).
Tighten the 3 bolts after the adjustment.
- Torque:
- 7.5 N*m{76 kgf*cm, 66 in.*lbf}

| 6. INSTALL FRONT FENDER LINER LH |
Install the front fender liner with 7 clips, 2 screws and 4 new grommets.