REMOVE REAR SEAT ASSEMBLY (for 60/40 Split Seat Type LH Side)
REMOVE REAR SEAT ASSEMBLY (for 60/40 Split Seat Type RH Side)
Quarter Window Glass (For Hatchback) -- Removal |
- HINT:
- Use the same procedure for both the RH and LH sides.
- The procedure described below is for the LH side.
| 1. REMOVE DECK BOARD ASSEMBLY |
Remove the deck board.
 |
| 2. REMOVE REAR SEAT ASSEMBLY (for 60/40 Split Seat Type LH Side) |
| 3. REMOVE REAR SEAT ASSEMBLY (for 60/40 Split Seat Type RH Side) |
| 4. REMOVE REAR SEAT ASSEMBLY (for Fold Down Seat Type) |
| 5. REMOVE FRONT DOOR SCUFF PLATE |
- HINT:
- Use the same procedure as for the RH side (YARIS_NCP93 RM0000036M5010X_01_0005.html).
| 6. SEPARATE FRONT DOOR OPENING TRIM WEATHERSTRIP |
- HINT:
- Use the same procedure as for the RH side (YARIS_NCP93 RM0000036M5010X_01_0011.html).
| 7. SEPARATE FRONT SEAT OUTER BELT ASSEMBLY |
- HINT:
- Use the same procedure as for the RH side (YARIS_NCP93 RM0000036M5010X_01_0152.html).
| 8. REMOVE FRONT QUARTER TRIM PANEL ASSEMBLY |
- HINT:
- Use the same procedure as for the RH side (YARIS_NCP93 RM0000036M5010X_01_0028.html).
| 9. REMOVE CENTER PILLAR UPPER GARNISH |
- HINT:
- Use the same procedure as for the RH side (YARIS_NCP93 RM0000036M5010X_01_0030.html).
| 10. REMOVE NO. 2 ROOM LIGHT ASSEMBLY |
Using a screwdriver with its tip wrapped in protective tape, disengage the claw.
Text in Illustration *1 Protective Tape
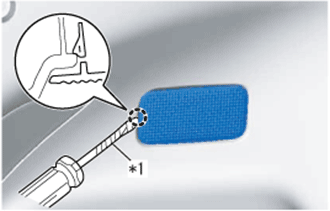 |
Disconnect the connector and remove the No. 2 room light assembly.
| 11. REMOVE JACK HANDLE (for RH Side) |
| 12. REMOVE REAR FLOOR FINISH PLATE |
Disengage the 4 claws and 4 guides and remove the rear floor finish plate.
 |
| 13. SEPARATE REAR SEAT 3 POINT TYPE OUTER BELT ASSEMBLY |
- HINT:
- Use the same procedure as for the RH side (YARIS_NCP93 RM0000036M5010X_01_0019.html).
| 14. REMOVE DECK TRIM SIDE PANEL ASSEMBLY |
- HINT:
- Use the same procedure as for the RH side (YARIS_NCP93 RM0000036M5010X_01_0021.html).
| 15. REMOVE ROOF SIDE INNER GARNISH |
- HINT:
- Use the same procedure as for the RH side (YARIS_NCP93 RM0000036M5010X_01_0023.html).
| 16. REMOVE REAR ROOF SIDE RAIL GARNISH |
- HINT:
- Use the same procedure as for the RH side (YARIS_NCP93 RM0000036M5010X_01_0140.html).
| 17. REMOVE QUARTER WINDOW MOULDING |
Using a knife, cut off the quarter window moulding, as shown in the illustration.
Text in Illustration *a Cut - NOTICE:
- Do not damage the vehicle body with the knife.
- HINT:
- Make a partial cut in the quarter window moulding. Then pull and remove it by hand.
 |
| 18. REMOVE QUARTER WINDOW GLASS |
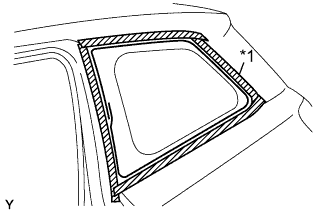
Apply protective tape to the installation area on the quarter window glass on the vehicle body.
Text in Illustration *1 Protective Tape
 |
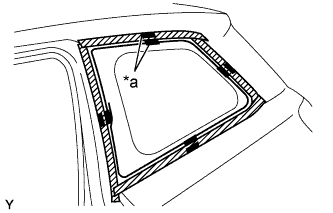
Place matchmarks on the quarter window glass and vehicle body on the locations indicated in the illustration.
Text in Illustration *a Mark - HINT:
- Matchmarks do not need to be placed if the quarter window glass is not going to be reused.
 |
Pass a piano wire between the vehicle body and glass from the interior.
Text in Illustration *1 Piano Wire
 |
Tie both wire ends to wooden blocks or similar objects.
Cut through the adhesive by pulling the piano wire around the quarter window glass.
- NOTICE:
- When separating the quarter window glass, take care not to damage the paint or the interior and exterior ornaments.
Using suction cups, disengage the 3 clips and remove the quarter window glass.
 |
| 19. REMOVE QUARTER WINDOW CLIP |
Using a scraper, remove the 3 quarter window clips.
- NOTICE:
- Be sure to replace the quarter window clip with a new one.
| 20. REMOVE QUARTER WINDOW GLASS SPACER |
Using a scraper, remove the 2 quarter window glass spacers.
- NOTICE:
- Be sure to replace the quarter window glass spacer with a new one.