Windshield Glass (For Sedan) Removal
DISCONNECT CABLE FROM NEGATIVE BATTERY TERMINAL
REMOVE FRONT WIPER ARM HEAD CAP
REMOVE FRONT WIPER ARM AND BLADE ASSEMBLY LH
REMOVE FRONT WIPER ARM AND BLADE ASSEMBLY RH
REMOVE COWL SIDE VENTILATOR SUB-ASSEMBLY LH
REMOVE COWL SIDE VENTILATOR SUB-ASSEMBLY RH
REMOVE COWL TOP VENTILATOR LOUVER SUB-ASSEMBLY
REMOVE FRONT DOOR SCUFF PLATE RH
REMOVE FRONT DOOR SCUFF PLATE LH
REMOVE INSTRUMENT PANEL UNDER COVER SUB-ASSEMBLY RH
REMOVE INSTRUMENT PANEL UNDER COVER SUB-ASSEMBLY LH
REMOVE COWL SIDE TRIM BOARD RH
REMOVE COWL SIDE TRIM BOARD LH
REMOVE FRONT DOOR OPENING TRIM WEATHERSTRIP RH
REMOVE FRONT DOOR OPENING TRIM WEATHERSTRIP LH
REMOVE FRONT PILLAR GARNISH RH
REMOVE FRONT PILLAR GARNISH LH
REMOVE ASSIST GRIP COVER
REMOVE ASSIST GRIP SUB-ASSEMBLY
REMOVE VISOR ASSEMBLY RH
REMOVE VISOR ASSEMBLY LH
REMOVE VISOR HOLDER RH
REMOVE VISOR HOLDER LH
REMOVE ROOM LIGHT ASSEMBLY
REMOVE MAP LIGHT ASSEMBLY
REMOVE INNER REAR VIEW MIRROR
REMOVE ROOF HEADLINING ASSEMBLY
REMOVE WINDSHIELD OUTSIDE MOULDING
REMOVE WINDSHIELD GLASS
Windshield Glass (For Sedan) -- Removal |
- CAUTION:
- Some of these service operations affect the SRS airbag system. Read the precautionary notices concerning the SRS airbag system before servicing (YARIS_NCP93 RM000000KT10D1X.html).
| 1. DISCONNECT CABLE FROM NEGATIVE BATTERY TERMINAL |
Wait for at least 90 seconds after disconnecting the cable to prevent the airbag from working.
| 2. REMOVE FRONT WIPER ARM HEAD CAP |
Using a screwdriver with its tip wrapped in protective tape, disengage the claw and remove the 2 front wiper arm head caps.
| 3. REMOVE FRONT WIPER ARM AND BLADE ASSEMBLY LH |
Operate the wiper, then stop the windshield wiper motor in the automatic stop position.
Remove the nut and front wiper arm.
| 4. REMOVE FRONT WIPER ARM AND BLADE ASSEMBLY RH |
- HINT:
- Use the same procedure as for the LH side.
| 5. REMOVE COWL SIDE VENTILATOR SUB-ASSEMBLY LH |
Using a screwdriver with its tip wrapped in protective tape, disengage the 3 claws and remove the cowl side ventilator sub-assembly LH.
| 6. REMOVE COWL SIDE VENTILATOR SUB-ASSEMBLY RH |
- HINT:
- Use the same procedure as for the LH side.
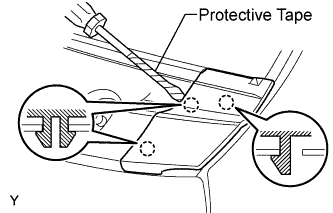
| 7. REMOVE COWL TOP VENTILATOR LOUVER SUB-ASSEMBLY |
Disengage the 3 clips, the 4 claws and the 8 hooks.
Remove the cowl top ventilator louver sub-assembly.
Disconnect the washer hoses.
Disengage the 5 hooks.
| 8. REMOVE FRONT DOOR SCUFF PLATE RH |
Disengage the 11 claws and remove the front door scuff plate.
| 9. REMOVE FRONT DOOR SCUFF PLATE LH |
- HINT:
- Use the same procedure as for the RH side.
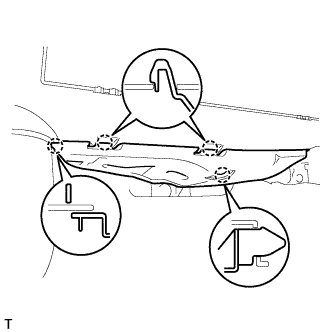
| 10. REMOVE INSTRUMENT PANEL UNDER COVER SUB-ASSEMBLY RH |
Disengage the 4 claws and remove the instrument panel under cover.
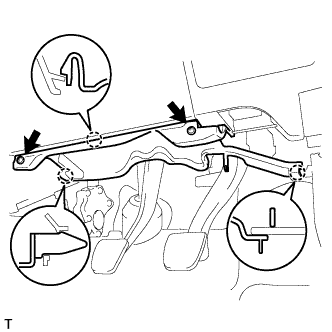
| 11. REMOVE INSTRUMENT PANEL UNDER COVER SUB-ASSEMBLY LH |
Remove the 2 screws.
Disengage the 3 claws and remove the instrument panel under cover.
| 12. REMOVE COWL SIDE TRIM BOARD RH |
Disengage the claw and the stud bolt and remove the cowl side trim board.
| 13. REMOVE COWL SIDE TRIM BOARD LH |
- HINT:
- Use the same procedure as for the RH side.
| 14. REMOVE FRONT DOOR OPENING TRIM WEATHERSTRIP RH |
Remove the front door opening trim weatherstrip.
| 15. REMOVE FRONT DOOR OPENING TRIM WEATHERSTRIP LH |
- HINT:
- Use the same procedure as for the RH side.
| 16. REMOVE FRONT PILLAR GARNISH RH |
w/ Curtain Shield Airbag:
- NOTICE:
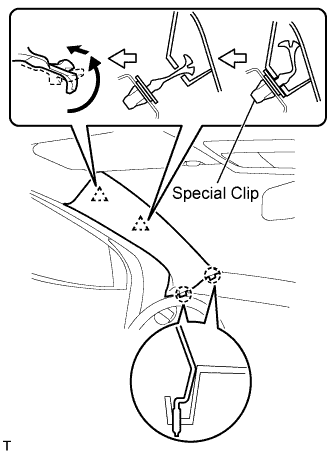
- Install a protective cover onto the curtain shield airbag as soon as the front pillar garnish is removed.
- Replace the special clip with a new one when the front pillar garnish is removed.
Disengage the 2 clips and the 2 claws and remove the front pillar garnish.
w/o Curtain Shield Airbag:
Disengage the 2 clips and the 2 claws and remove the front pillar garnish.
Disconnect the antenna connector.
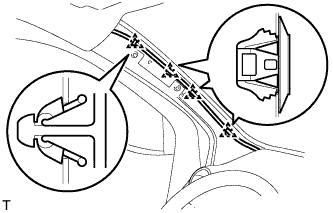
Using a clip remover, remove the 3 clamps.
w/ Curtain Shield Airbag:
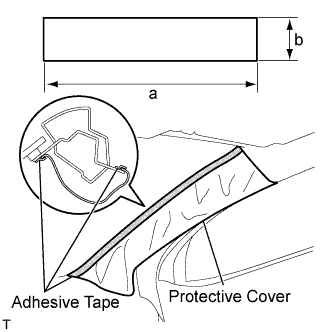
Completely cover the curtain shield airbag with a piece of cloth or nylon and fix the ends of the fabric with adhesive tape, as shown in the illustration.
- Protective cover size:
Area
| Measurement
|
a
| 700 mm (27.56 in.)
|
b
| 120 mm (4.72 in.)
|
| 17. REMOVE FRONT PILLAR GARNISH LH |
w/ Curtain Shield Airbag:
- NOTICE:
- Install a protective cover onto the curtain shield airbag as soon as the front pillar garnish is removed.
- Replace the special clip with a new one when the front pillar garnish is removed.
Disengage the 2 clips and the 2 claws and remove the front pillar garnish.
w/o Curtain Shield Airbag:
Disengage the 2 clips and the 2 claws and remove the front pillar garnish.
Using a clip remover, remove the 4 clamps.
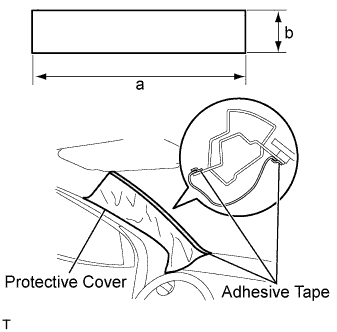
w/ Curtain Shield Airbag:
Completely cover the curtain shield airbag with a piece of cloth or nylon and fix the ends of the fabric with adhesive tape, as shown in the illustration.
- Protective cover size:
Area
| Measurement
|
a
| 700 mm (27.56 in.)
|
b
| 120 mm (4.72 in.)
|
| 18. REMOVE ASSIST GRIP COVER |
- HINT:
- Use the same procedure to remove all the assist grip covers.
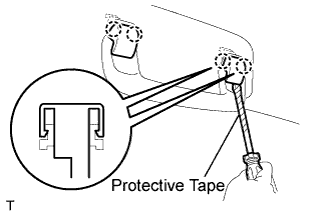
Using a screwdriver with its tip wrapped in protective tape, disengage the 2 claws and remove the assist grip cover.
| 19. REMOVE ASSIST GRIP SUB-ASSEMBLY |
- HINT:
- Use the same procedure to remove all the assist grips.
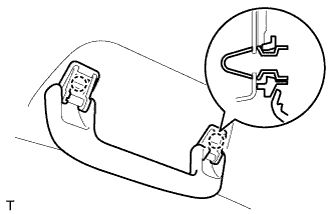
Disengage the 2 springs and remove the assist grip.
| 20. REMOVE VISOR ASSEMBLY RH |
Using a screwdriver with its tip wrapped in protective tape, disengage the 4 claws and remove the visor bracket cover.
- NOTICE:
- Visor bracket cover cannot be reused.
Remove the visor shaft from the visor holder.
Disengage the 2 springs and remove the visor.
| 21. REMOVE VISOR ASSEMBLY LH |
- HINT:
- Use the same procedure as for the RH side.
| 22. REMOVE VISOR HOLDER RH |
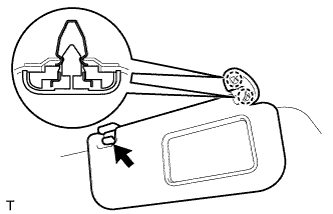
Disengage the 2 claws by turning the visor counterclockwise between 60 to 120° and remove the visor holder.
- HINT:
- The claw may be damaged during removal. However, it is reusable because this does not effect its function.
| 23. REMOVE VISOR HOLDER LH |
- HINT:
- Use the same procedure as for the RH side.
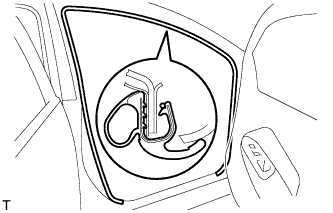
| 24. REMOVE ROOM LIGHT ASSEMBLY |
Using a screwdriver with its tip wrapped in protective tape, disengage the 4 claws and remove the room light lens.
Using a screwdriver with its tip wrapped in protective tape, disengage the 2 claws and remove the cover.
- HINT:
- Use the same procedure for both sides.
Using a screwdriver with its tip wrapped in protective tape, disengage the 4 claws and remove the room light.
Remove the roof wire from the claw of the room light.
Using a screwdriver with its tip wrapped in protective tape, disengage the 4 claws and disconnect the room light switch base.
| 25. REMOVE MAP LIGHT ASSEMBLY |
Using a moulding remover, disengage the 4 claws and remove the map light.
Disconnect the map light connector.
| 26. REMOVE INNER REAR VIEW MIRROR |
Pinch the cover, disengage the 2 claws and remove the cover.
Push the lever, and slide and remove the inner rear view mirror.
| 27. REMOVE ROOF HEADLINING ASSEMBLY |
- HINT:
- It is not necessary to remove the roof headlining completely. Slightly lower the front section of the roof headlining.
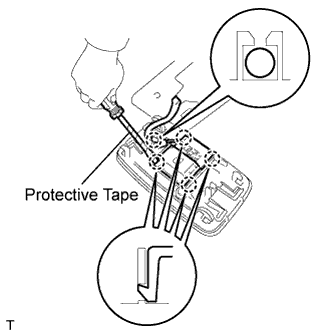
| 28. REMOVE WINDSHIELD OUTSIDE MOULDING |
Using a knife, cut off the windshield outside moulding, as shown in the illustration.
- NOTICE:
- Do not damage the vehicle body with the knife.
Remove the windshield outside moulding.
- HINT:
- Make a partial cut in the windshield outside moulding. Then pull and remove it by hand.
| 29. REMOVE WINDSHIELD GLASS |
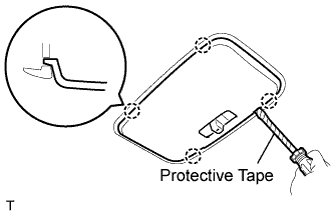
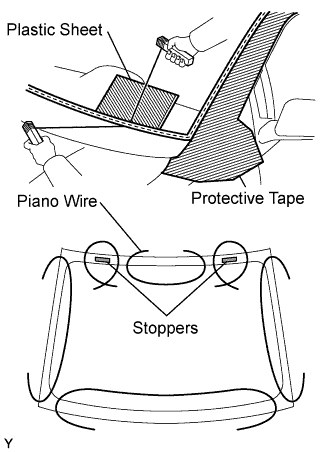
Apply protective tape to the outer circumference of the windshield glass, as shown in the illustration.
From the interior, insert piano wires between the vehicle body and the windshield glass, as shown in the illustration.
Tie objects that can serve as handles (for example, wooden blocks) to all wire ends.
- NOTICE:
- When separating the windshield glass from the vehicle, do not damage the vehicle's paintwork or exterior/interior ornaments.
- To prevent the safety pad from being scratched when removing the windshield glass, place a plastic sheet between the piano wire and safety pad.
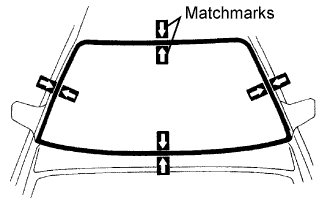
Place matchmarks on the windshield glass and vehicle body in the locations indicated in the illustration.
- HINT:
- Matchmarks do not need to be placed unless the windshield glass is going to be reused.
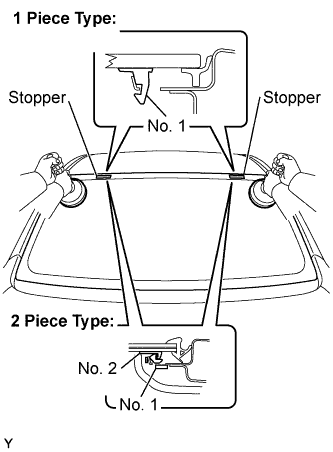
Cut through the adhesive by pulling the piano wire around the windshield glass.
Disengage the 2 stoppers.
Using suction cups, remove the windshield glass.
- NOTICE:
- Leave as much adhesive on the vehicle body as possible when removing the windshield glass.