INSTALL REAR SEAT INNER BELT ASSEMBLY RH (for 60/40 Split Seat Type RH Side)
INSTALL REAR SEAT INNER BELT ASSEMBLY RH (for 60/40 Split Seat Type LH Side)
Rear Seat Inner Belt Assembly -- Installation |
| 1. INSTALL REAR SEAT INNER BELT ASSEMBLY RH (for 60/40 Split Seat Type RH Side) |
 |
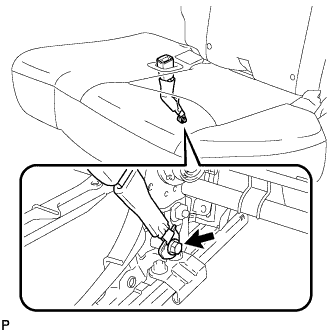
Install the belt with the bolt.
- Torque:
- 42 N*m{428 kgf*cm, 31 ft.*lbf}
| 2. INSTALL REAR NO. 1 SEAT ASSEMBLY RH |
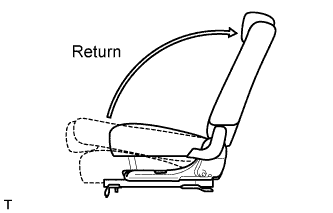
Fully tilt the seatback forward.
Place the seat in the cabin.
- NOTICE:
- Be careful not to damage the vehicle body.
Connection procedures of seat to lock cable when reusing seat:
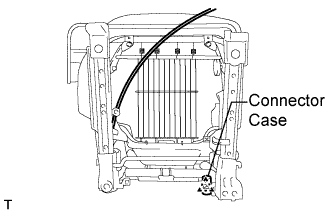
Using a screwdriver, detach the claw and remove the connector case from the seat.
- HINT:
- Tape the screwdriver tip before use.
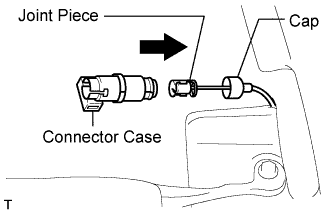
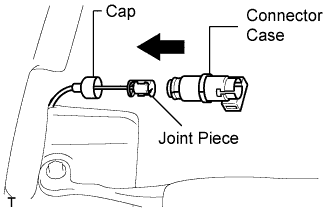
Install the connector case to the body's cap.
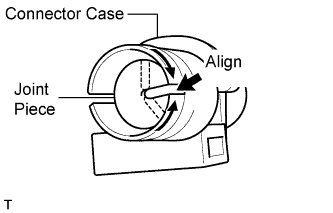
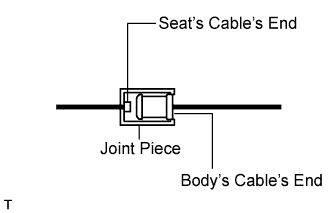
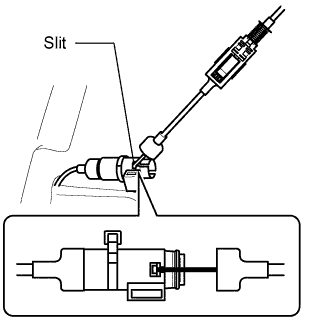
Pull out the joint piece. Align the slits of the joint piece and connector case.
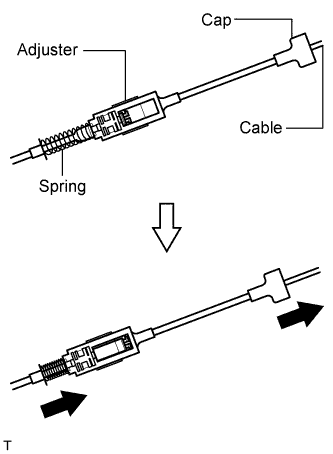
Compress the spring of the adjuster, and pull out the cable from the seat's cap.
- HINT:
- Perform this procedure with the lock of the adjuster released.
Install the seat cable's end part to the connector case's slit.
- HINT:
- Position the joint piece cable's end part as shown in the illustration.
Install the seat's cap to the connector case.
Temporarily place the seat into the vehicle where it will be installed.
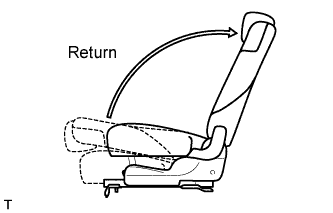
Return the seatback to the upright position.
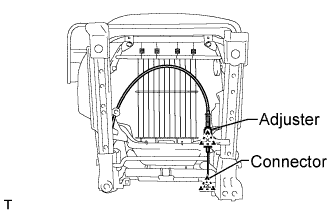
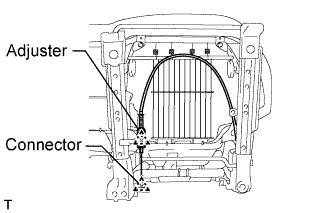
Attach the claws of the connector and adjuster, and install them to the seat.
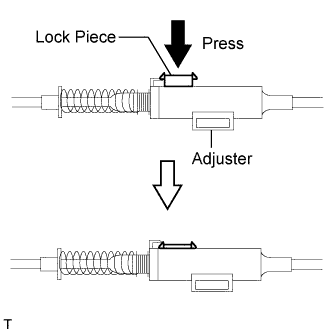
Press the adjuster's lock piece to lock it.
- NOTICE:
- When pressing the lock piece, make sure the adjuster's spring is not compress.


Connection procedures of seat to lock cable when replacing seat:
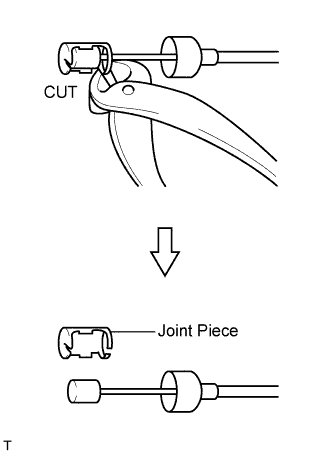
Cut the joint piece on the lock cable, and remove it.
- HINT:
- A joint piece is included with new seats.
- This procedure is not necessary when the lock cable is replaced with a new one.
Temporarily place the seat into the vehicle where it will be installed.
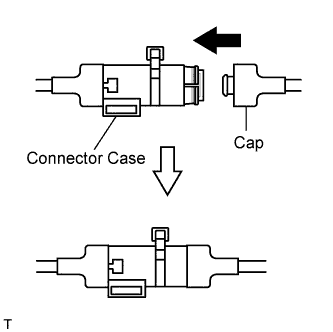
Install the body's cap to the connector case.
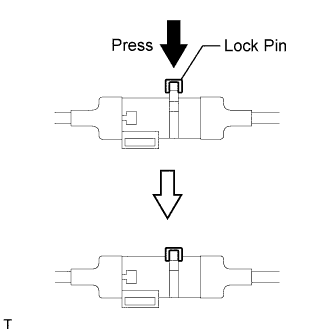
Press the adjuster's lock pin.
Return the seatback to the upright position.
Press the adjuster's lock piece to lock it.
- NOTICE:
- When pressing the lock piece, make sure the adjuster's spring is not compressed.
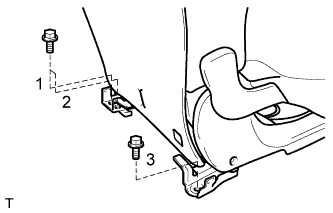
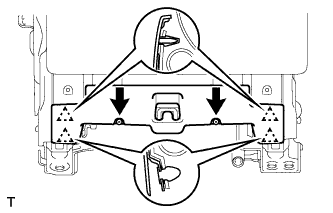
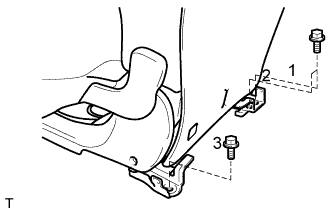
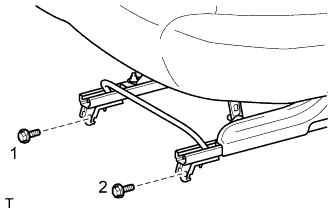
Lift up the seat track adjusting handle and move the seat to the foremost position.
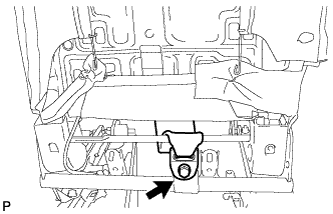
Tighten the 2 bolts on the rear side of the seat.
- Torque:
- 42 N*m{428 kgf*cm, 31 ft.*lbf}
- HINT:
- Tighten the bolts in the order indicated in the illustration.
 |
Lift up the seat track adjusting handle and move the seat to the rearmost position.
Tighten the 2 bolts on the front side of the seat.
- Torque:
- 42 N*m{428 kgf*cm, 31 ft.*lbf}
- HINT:
- Tighten the bolts in the order indicated in the illustration.
 |
| 3. INSTALL REAR SEAT INNER BELT ASSEMBLY RH (for 60/40 Split Seat Type LH Side) |
 |
Install the belt with the bolt.
- Torque:
- 42 N*m{428 kgf*cm, 31 ft.*lbf}
| 4. INSTALL REAR SEAT LAP TYPE BELT ASSEMBLY CENTER LH |
 |
Install the belt with the bolt.
- Torque:
- 42 N*m{428 kgf*cm, 31 ft.*lbf}
| 5. INSTALL REAR SEAT REAR BRACKET COVER LH |
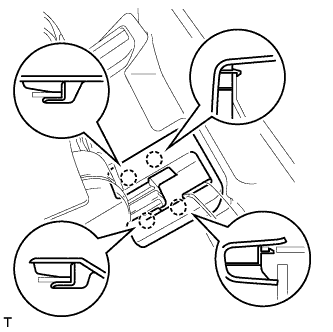
Open the lower part of the seatback cover. Then attach the 4 clips to install the bracket cover.
 |
Install the 2 screws.
| 6. INSTALL REAR NO. 1 SEAT ASSEMBLY LH |
Fully tilt the seatback forward.
Place the seat in the cabin.
- NOTICE:
- Be careful not to damage the vehicle body.
Connection procedures of seat to lock cable when reusing seat:
Using a screwdriver, detach the claw and remove the connector case from the seat.
- HINT:
- Tape the screwdriver tip before use.
Install the connector case to the body's cap.
Pull out the joint piece. Align the slits of the joint piece and connector case.
Compress the spring of the adjuster, and pull out the cable from the seat's cap.
- HINT:
- Perform this procedure with the lock of the adjuster released.
Install the seat cable's end part to the connector case's slit.
- HINT:
- Position the joint piece cable's end part as shown in the illustration.
Install the seat's cap to the connector case.
Temporarily place the seat into the vehicle where it will be installed.
Return the seatback to the upright position.
Attach the claws of the connector and adjuster, and install them to the seat.
Press the adjuster's lock piece to lock it.
- NOTICE:
- When pressing the lock piece, make sure the adjuster's spring is not compress.
 |
Connection procedures of seat to lock cable when replacing seat:
Cut the joint piece on the lock cable, and remove it.
- HINT:
- A joint piece is included with new seats.
- This procedure is not necessary when the lock cable is replaced with a new one.
Temporarily place the seat into the vehicle where it will be installed.
Install the body's cap to the connector case.
Press the adjuster's lock pin.
Return the seatback to the upright position.
Press the adjuster's lock piece to lock it.
- NOTICE:
- When pressing the lock piece, make sure the adjuster's spring is not compress.
|
Lift up the seat track adjusting handle and move the seat to the foremost position.
Tighten the 3 bolts on the rear side of the seat.
- Torque:
- 42 N*m{428 kgf*cm, 31 ft.*lbf}
- HINT:
- Tighten the bolts in the order indicated in the illustration.
 |
Lift up the seat track adjusting handle and move the seat to the rearmost position.
Tighten the 2 bolts on the front side of the seat.
- Torque:
- 42 N*m{428 kgf*cm, 31 ft.*lbf}
- HINT:
- Tighten the bolts in the order indicated in the illustration.
 |
| 7. INSTALL REAR SEAT LAP TYPE BELT ASSEMBLY CENTER RH |
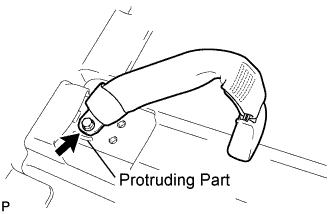 |
Install the belt with the bolt.
- Torque:
- 42 N*m{428 kgf*cm, 31 ft.*lbf}
- NOTICE:
- The anchor part of the seat belt must not overlap the protruding part.
| 8. INSTALL REAR NO. 5 SEAT LEG SIDE COVER |
| 9. INSTALL REAR NO. 4 SEAT LEG SIDE COVER |
| 10. INSTALL REAR NO. 3 SEAT LEG SIDE COVER |
 |
| 11. INSTALL REAR NO. 2 SEAT LEG SIDE COVER |
| 12. INSTALL REAR SEAT LEG COVER |