DISCHARGE REFRIGERANT FROM REFRIGERATION SYSTEM (w/ Air Conditioning System)
DISCONNECT NO. 1 COOLER REFRIGERANT DISCHARGE HOSE (w/ Air Conditioning System)
DISCONNECT COOLER REFRIGERANT LIQUID PIPE (w/ Air Conditioning System)
Radiator -- Removal |
| 1. DISCHARGE REFRIGERANT FROM REFRIGERATION SYSTEM (w/ Air Conditioning System) |
Start the engine.
Turn the A/C switch on.
Operate the cooler compressor while the engine speed is approximately 1000 rpm for 5 to 6 minutes to circulate the refrigerant and collect the compressor oil remaining in each component into the cooler compressor.
Stop the engine.
Recover the refrigerant from the A/C system using a refrigerant recovery unit.
- SST
- 09985-20010(09985-02130,09985-02150,09985-02090,09985-02110,09985-02010,09985-02050,09985-02060,09985-02070)
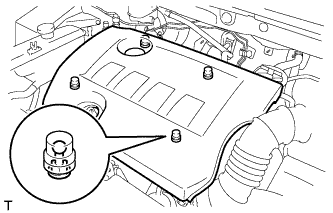
| 2. REMOVE NO. 2 CYLINDER HEAD COVER |
Hold the rear of the cover and raise it to detach the 2 clips on the rear of the cover. Continue to raise the cover to detach the 2 clips on the front of the cover and remove the cover.
- NOTICE:
- Attempting to detach both front and rear clips at the same time may cause the cover to break.
 |
| 3. DISCONNECT CABLE FROM NEGATIVE BATTERY TERMINAL |
- NOTICE:
- w/ Navigation System (for HDD):
- After the ignition switch is turned off, the HDD navigation system requires approximately a minute to record various types of memory and settings. As a result, after turning the ignition switch off, wait a minute or more before disconnecting the cable from the negative (-) battery terminal.
| 4. REMOVE NO. 1 ENGINE UNDER COVER |
Remove the 6 screws, 10 clips and under cover.
 |
| 5. DRAIN ENGINE COOLANT |
Install a vinyl hose to the drain cock plug on the radiator side.
 |
Loosen the radiator drain cock plug.

- HINT:
- Collect the coolant in a container and dispose of it according to the regulations in your area.
Remove the radiator reservoir cap.
- CAUTION:
- Do not remove the radiator reservoir cap while the engine and radiator are still hot. Pressurized, hot engine coolant and steam may be released and cause serious burns.
| 6. REMOVE FRONT BUMPER COVER |
w/ Hood Moulding:
Remove the front bumper cover (RAV4_ACA30 RM000003PKF007X.html).
w/ Under Guard:
Remove the front bumper cover (RAV4_ACA30 RM000003PKF001X.html).
w/o Under Guard:
Remove the front bumper cover (RAV4_ACA30 RM0000015RJ00HX.html).
| 7. REMOVE BATTERY CLAMP |
Remove the bolt and loosen the nut.
 |
Detach the hook of the battery clamp from the front battery bracket, and then remove the battery clamp.
| 8. REMOVE BATTERY |
| 9. REMOVE GENERATOR ASSEMBLY |
Remove the generator (RAV4_ACA30 RM000003X0U000X.html).
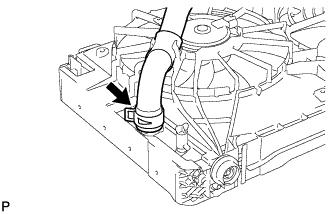
| 10. DISCONNECT NO. 1 RADIATOR HOSE |
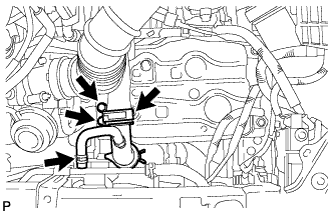 |
Remove the 2 bolts.
Disconnect the 2 radiator hoses.
| 11. DISCONNECT NO. 2 RADIATOR HOSE |
Disconnect the hose from the water inlet housing.
 |
| 12. REMOVE NO. 1 WATER BY-PASS HOSE |
Remove the No. 1 water by-pass hose from the radiator reservoir and No. 1 water by-pass pipe.
| 13. REMOVE NO. 5 WATER BY-PASS HOSE |
Remove the No. 5 water by-pass hose from the radiator and No. 1 water by-pass pipe.
| 14. REMOVE NO. 1 WATER BY-PASS PIPE |
Remove the 2 bolts and pipe.

| 15. DISCONNECT NO. 2 WATER BY-PASS HOSE |
Disconnect the No. 2 water by-pass hose from the radiator reservoir.
 |
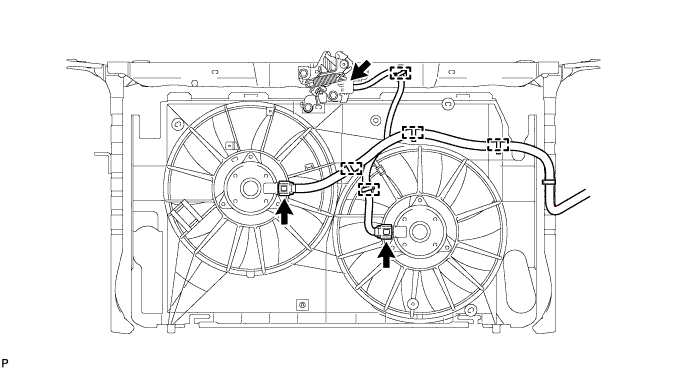
| 16. DISCONNECT WIRE HARNESS |
w/o Hood Courtesy Switch:
Disconnect the 2 fan motor connectors from the 2 fan motors.
Detach the 4 wire harness clamps and disconnect the wire harness.

w/ Hood Courtesy Switch:
Disconnect the hood courtesy switch connector.
Disconnect the 2 fan motor connectors from the 2 fan motors.
Detach the 5 wire harness clamps and disconnect the wire harness.
| 17. DISCONNECT HORN CONNECTOR |
Disconnect the 2 horn connectors.
 |
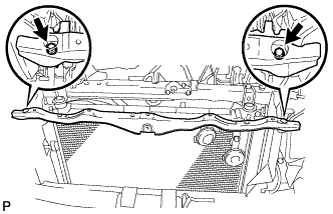
| 18. REMOVE FRONT BUMPER CENTER STAY SUB-ASSEMBLY |
Remove the 2 bolts and stay.
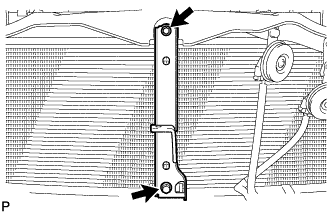 |
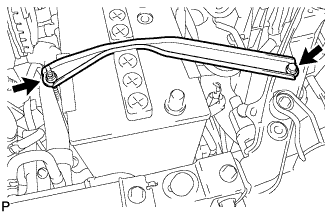
| 19. REMOVE FRONT BUMPER UPPER REINFORCEMENT SUB-ASSEMBLY |
Remove the 2 bolts and reinforcement.
 |
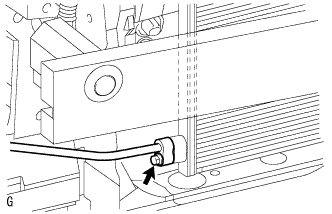
| 20. DISCONNECT NO. 1 COOLER REFRIGERANT DISCHARGE HOSE (w/ Air Conditioning System) |
Remove the bolt and disconnect the cooler refrigerant discharge hose from the cooler condenser.
 |
Remove the O-ring from the cooler refrigerant discharge hose.
- NOTICE:
- Seal the openings of the disconnected parts using vinyl tape to prevent moisture and foreign matter from entering them.
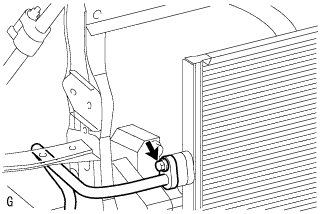
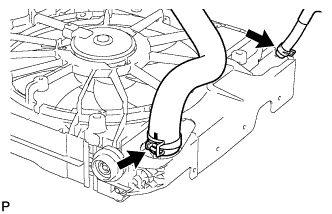
| 21. DISCONNECT COOLER REFRIGERANT LIQUID PIPE (w/ Air Conditioning System) |
Remove the bolt and disconnect the liquid pipe sub-assembly from the cooler condenser.
 |
Remove the O-ring from the liquid pipe sub-assembly.
- NOTICE:
- Seal the openings of the disconnected parts using vinyl tape to prevent moisture and foreign matter from entering them.
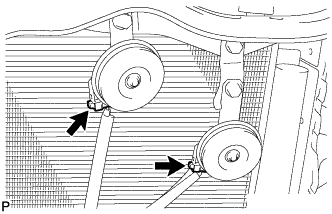
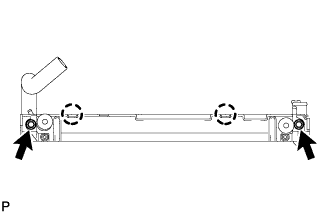
| 22. REMOVE UPPER RADIATOR SUPPORT BRACKET |
Remove the 2 bolts and 2 upper radiator support brackets.
 |
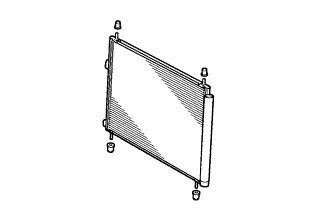
| 23. REMOVE RADIATOR ASSEMBLY |
Remove the radiator together with the 2 lower radiator supports.
- HINT:
- After removing the radiator, make sure that both lower radiator supports are attached to the fan shroud.
 |
Remove the 2 bolts.
 |
Detach the 2 claws and remove the No. 2 fan shroud.
w/ Air Conditioning System:
Remove the cooler condenser from the fan shroud with cooling fan.- HINT:
- After removing the condenser, make sure that all 4 cooler condenser cushions are attached to the condenser.
 |
Remove the No. 2 water by-pass hose and No. 2 radiator hose from the radiator.
 |
Remove the No. 1 radiator hose from the radiator.
 |
Remove the 2 bolts and radiator from the fan shroud with cooling fan.
 |