Rear Wiper Motor Installation
INSTALL REAR WIPER MOTOR ASSEMBLY
INSTALL REAR WIPER MOTOR GROMMET
INSTALL REAR WIPER ARM AND BLADE ASSEMBLY
INSTALL BACK DOOR TRIM BOARD ASSEMBLY
INSTALL BACK DOOR SIDE GARNISH RH
INSTALL BACK DOOR SIDE GARNISH LH
INSTALL BACK DOOR CENTER GARNISH
CONNECT CABLE TO NEGATIVE BATTERY TERMINAL
Rear Wiper Motor -- Installation |
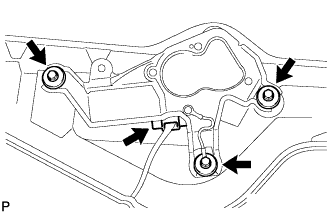
| 1. INSTALL REAR WIPER MOTOR ASSEMBLY |
Install the wiper motor with the 3 bolts.
- Torque:
- 5.5 N*m{56 kgf*cm, 49 in.*lbf}
Connect the connector.
| 2. INSTALL REAR WIPER MOTOR GROMMET |
| 3. INSTALL REAR WIPER ARM AND BLADE ASSEMBLY |
Stop the wiper motor at the automatic stop position.
Clean the wiper arm serration with a round file or equivalent.
Clean the wiper pivot serration with a wire brush.
Install the arm and blade with the nut. Make sure that the arm and blade comes to the position shown in the illustration.
- Torque:
- 5.5 N*m{56 kgf*cm, 49 in.*lbf}
- HINT:
- Hold down the arm hinge by hand while tightening the nut.
- Install the arm and blade so that the rear wiper blade is aligned with the defogger line.
Install the cap.
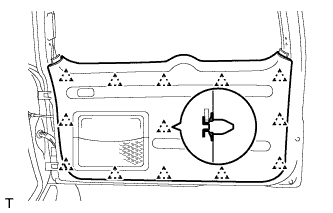
| 4. INSTALL BACK DOOR TRIM BOARD ASSEMBLY |
Install the back door trim pocket with the 5 screws.
Attach the 13 clips to install the trim board.
| 5. INSTALL BACK DOOR SIDE GARNISH RH |
- HINT:
- Use the same procedure described for the LH side.
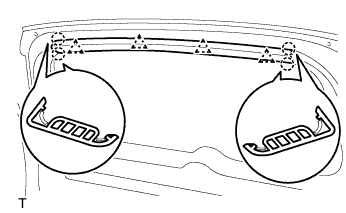
| 6. INSTALL BACK DOOR SIDE GARNISH LH |
Attach the 2 claws and 2 clips to install the garnish.
| 7. INSTALL BACK DOOR CENTER GARNISH |
Attach the 4 claws and 4 clips to install the garnish.
| 8. CONNECT CABLE TO NEGATIVE BATTERY TERMINAL |