Starter (For 1.0 Kw Type) Installation
Engine. Toyota Rav4. Aca30, 33, 38 Gsa33 Zsa30, 35
INSTALL FLYWHEEL HOUSING SIDE COVER
INSTALL STARTER ASSEMBLY
INSTALL NO. 1 TRANSMISSION CONTROL CABLE BRACKET (for CVT)
CONNECT TRANSMISSION CONTROL CABLE ASSEMBLY (for CVT)
INSTALL BATTERY BRACKET REINFORCEMENT
INSTALL FRONT BATTERY BRACKET
CONNECT RADIATOR HOSE SUB-ASSEMBLY
INSTALL BATTERY TRAY
INSTALL BATTERY
INSTALL BATTERY CLAMP
INSTALL AIR CLEANER CAP SUB-ASSEMBLY
INSTALL RADIATOR SUPPORT OPENING COVER
CONNECT CABLE TO POSITIVE BATTERY TERMINAL
CONNECT CABLE TO NEGATIVE BATTERY TERMINAL
INSTALL NO. 2 CYLINDER HEAD COVER
INSTALL NO. 1 ENGINE UNDER COVER
Starter (For 1.0 Kw Type) -- Installation |
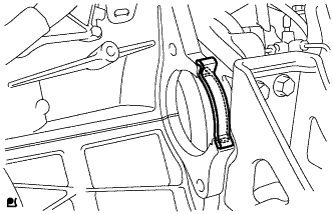
| 1. INSTALL FLYWHEEL HOUSING SIDE COVER |
Install the flywheel housing side cover to the cylinder block.
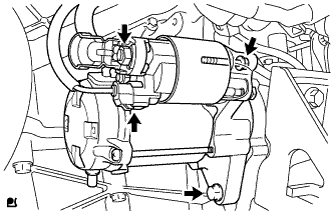
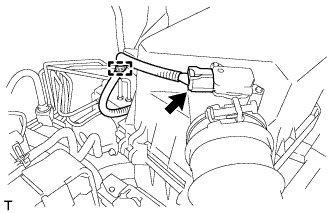
| 2. INSTALL STARTER ASSEMBLY |
Install the starter with the 2 bolts.
- Torque:
- 37 N*m{380 kgf*cm, 27 ft.*lbf}
Connect the starter connector.
Connect starter wire with the nut.
- Torque:
- 9.8 N*m{100 kgf*cm, 87 in.*lbf}
Connect the terminal cap.
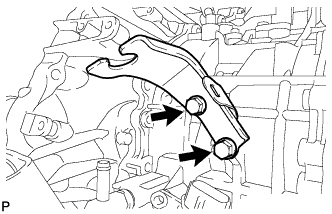
| 3. INSTALL NO. 1 TRANSMISSION CONTROL CABLE BRACKET (for CVT) |
Install the No. 1 transmission control cable bracket to the continuously variable transaxle with the 2 bolts.
- Torque:
- 12 N*m{122 kgf*cm, 9 ft.*lbf}
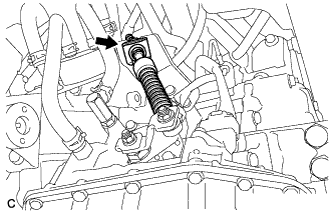
| 4. CONNECT TRANSMISSION CONTROL CABLE ASSEMBLY (for CVT) |
Install the transmission control cable to the bracket with a new clip.
| 5. INSTALL BATTERY BRACKET REINFORCEMENT |
Install the battery bracket reinforcement with the 2 bolts.
- Torque:
- 20 N*m{204 kgf*cm, 15 ft.*lbf}
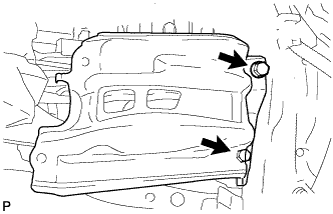
| 6. INSTALL FRONT BATTERY BRACKET |
Install the front battery bracket with the 3 bolts.
- Torque:
- 20 N*m{204 kgf*cm, 15 ft.*lbf}
Connect the No. 3 engine wire with the bolt.
- Torque:
- 20 N*m{204 kgf*cm, 15 ft.*lbf}
Attach the 3 wire harness clamps.
| 7. CONNECT RADIATOR HOSE SUB-ASSEMBLY |
Connect the radiator hose to the front battery bracket with the 2 bolts.
- Torque:
- 20 N*m{204 kgf*cm, 15 ft.*lbf}
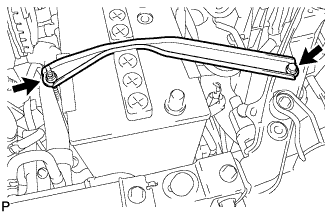
| 10. INSTALL BATTERY CLAMP |
Attach the hook of the battery clamp to the front battery bracket.
Partially tighten the nut and temporarily install the bolt.
Adjust the battery clamp position.
Tighten the nut and bolt.
- Torque:
- for bolt:
- 17 N*m{168 kgf*cm, 12 ft.*lbf}
- for nut:
- 4.9 N*m{50 kgf*cm, 43 in.*lbf}
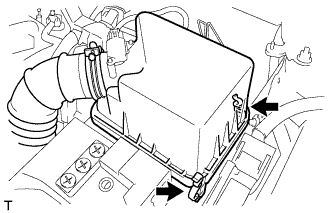
| 11. INSTALL AIR CLEANER CAP SUB-ASSEMBLY |
Insert the hinge part of the air cleaner cap and hose into the air cleaner case, and then fasten the 2 hook clamps.
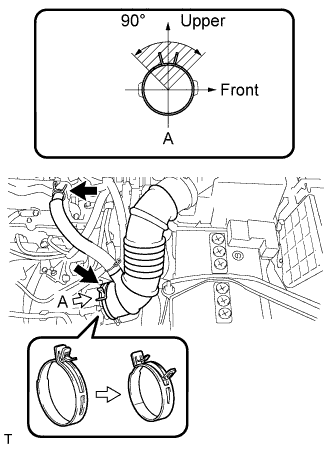
Connect the No. 1 air cleaner hose to the throttle body and push apart the tabs of the No. 1 air cleaner hose clamp.
- HINT:
- The direction of the hose clamp is indicated in the illustration.
Connect the No. 2 ventilation hose to the cylinder head cover.
Attach the clamp.
Connect the mass air flow meter connector.
| 12. INSTALL RADIATOR SUPPORT OPENING COVER |
Install the radiator support opening cover with the 9 clips.
| 13. CONNECT CABLE TO POSITIVE BATTERY TERMINAL |
| 14. CONNECT CABLE TO NEGATIVE BATTERY TERMINAL |
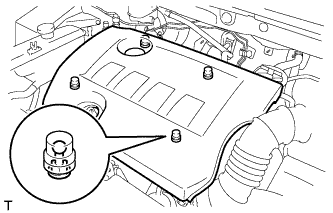
| 15. INSTALL NO. 2 CYLINDER HEAD COVER |
Attach the 4 clips to install the cover.
- NOTICE:
- Be sure to attach the clips securely.
- Do not apply excessive force or do not hit the cover to attach the clips. This may cause the cover to break.
| 16. INSTALL NO. 1 ENGINE UNDER COVER |
Install the under cover with the 6 screws and 10 clips.