Oil Pump -- Installation |
| 1. INSTALL TIMING CHAIN COVER SUB-ASSEMBLY |
Install a new gasket.
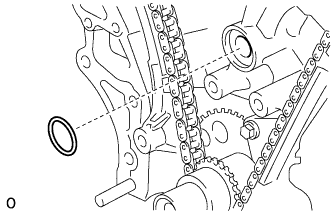 |
Align the oil pump's drive rotor spline and the crankshaft as shown in the illustration.
 |
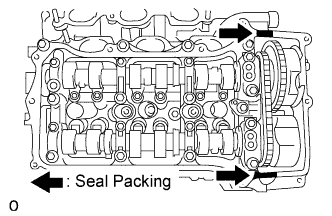
Apply seal packing in a continuous bead to the engine unit as shown in the illustration.

- Seal packing:
- Toyota Genuine Seal Packing Block, Three Bond 1207B or equivalent
- Standard seal diameter:
- 3.0 mm (0.118 in.) or more
- Standard length:
- 10 mm (0.394 in.)
- NOTICE:
- Be sure to clean and degrease the contact surfaces, especially the hatched areas in the illustration.
- When the contact surfaces are wet, wipe them off with an oil-free cloth before applying seal packing.
- Install the timing chain cover within 3 minutes and tighten the bolts within 15 minutes after applying seal packing.
- Do not start the engine for at least 2 hours after installing the timing chain cover.
Apply seal packing in a continuous line to the timing chain cover as shown in the illustration.

- Seal packing:
- For oil related part:
Toyota Genuine Seal Packing Black, Three Bond 1207B or equivalent - For water related part:
Toyota Genuine Seal Packing 1282B, Three Bond 1282B or equivalent
- Standard seal diameter:
Position Specified Condition A - A 6.0 mm (0.236 in.) B - B 6.5 mm (0.256 in.) Continuous line area 4.5 mm (0.177 in.) or more Dashed line area 3.5 mm (0.138 in.) or more Alternate long and short dashed line area 3.5 mm (0.138 in.) or more
- NOTICE:
- When the contact surfaces are wet, wipe them off with an oil-free cloth before applying seal packing.
- Install the timing chain cover within 3 minutes and tighten the bolts within 15 minutes after applying seal packing.
- Do not start the engine for at least 2 hours after installing the timing chain cover.
Temporarily install the timing chain cover with the 23 bolts and 2 nuts.

- NOTICE:
- Make sure that there is no oil on the bolts. If there is oil on the bolts, clean them before installing them.
- HINT:
- Bolt length:
- 40 mm (1.57 in.) for bolt A
- 55 mm (2.17 in.) for bolt B
- 25 mm (0.98 in.) for bolt C
Tighten the bolts in this order: Area 1, Area 2, Area 3, Area 4.
- Torque:
- 21 N*m{214 kgf*cm, 15 ft.*lbf}for bolts in Area 1 and 2
- 21 N*m{214 kgf*cm, 15 ft.*lbf}for bolts and nuts in Area 3
- 43 N*m{438 kgf*cm, 32 ft.*lbf}for bolt A in Area 4
- 21 N*m{214 kgf*cm, 15 ft.*lbf}for bolts except A in Area 4
| 2. INSTALL CRANKSHAFT PULLEY |
Align the pulley set key with the key groove of the pulley, and slide on the pulley.
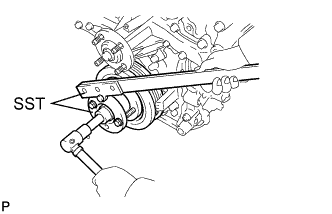 |
Using SST, install the pulley bolt.
- SST
- 09213-70011(09213-70020)
09330-00021
- Torque:
- 250 N*m{2549 kgf*cm, 184 ft.*lbf}
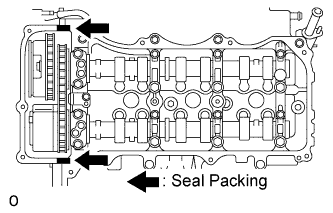
| 3. INSTALL CYLINDER HEAD COVER SUB-ASSEMBLY (for Bank 2) |
Apply seal packing as shown in the illustration.
- Seal packing:
- Toyota Genuine Seal Packing Black, Three Bond 1207B or equivalent
- NOTICE:
- Remove any oil from the contact surface.
- Install the crankcase within 3 minutes after applying seal packing.
- Do not start the engine for at least 2 hours after the installation.
 |
Install a new gasket to the head cover.
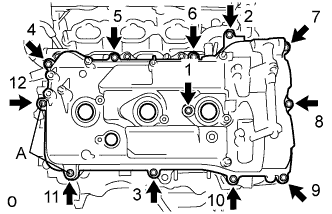
Install the head cover with the 12 bolts in the order in the illustration.
- Torque:
- 21 N*m{214 kgf*cm, 15 ft.*lbf}for bolt A
- 10 N*m{102 kgf*cm, 7 ft.*lbf}for except bolt A
- HINT:
- Make sure the tightening torque of bolts 1 and 10 is correct.
 |
| 4. INSTALL NO. 1 OIL PIPE |
Make sure that there is no foreign matter on the mesh of the oil control valve filter.
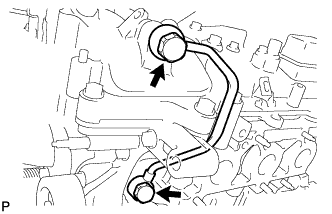 |
Install the oil control valve filter to the oil pipe union. Install 2 new gaskets and temporarily install the oil pipe (on the head cover side) with the oil pipe union.
Install a new gasket and temporarily install the oil pipe (on the cylinder head side) with the oil pipe union.
- NOTICE:
- Remove any oil from the contract surface.
Tighten the 2 oil pipe union bolts.
- Torque:
- 65 N*m{663 kgf*cm, 48 ft.*lbf}
| 5. INSTALL CYLINDER HEAD COVER SUB-ASSEMBLY (for Bank 1) |
Apply seal packing as shown in the illustration.
- Seal packing:
- Toyota Genuine Seal Packing Black, Three Bond 1207B or equivalent
- NOTICE:
- Remove any oil from the contact surface.
- Install the crankcase within 3 minutes after applying seal packing.
- Do not start the engine for at least 2 hours after the installation.
 |
Install a new gasket to the head cover.
Install the head cover with the 12 bolts in the order shown in the illustration.
- Torque:
- for Bolt A:
- 21 N*m{214 kgf*cm, 15 ft.*lbf}
- for except Bolt A:
- 10 N*m{102 kgf*cm, 7 ft.*lbf}
- HINT:
- Make sure the tightening torque of bolts 1 and 11 is correct.
 |
| 6. INSTALL OIL PIPE |
Make sure that there is no foreign matter on the mesh of the oil control valve filter.
 |
Install the oil control valve filter to the oil pipe union. Install 2 new gaskets and temporarily install the oil pipe (on the head cover side) with the oil pipe union.
- NOTICE:
- Remove any oil from the contact surface.
Install a new gasket and temporarily install the oil pipe (on the cylinder head side) with the oil pipe union.
- NOTICE:
- Remove any oil from the contact surface.
Install bolt A to the cylinder head.
- Torque:
- 10 N*m{102 kgf*cm, 7 ft.*lbf}
Tighten the 2 oil pipe union bolts.
- Torque:
- 65 N*m{663 kgf*cm, 48 ft.*lbf}
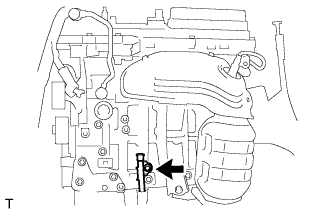
| 7. INSTALL WATER INLET HOUSING |
Install the water inlet with the 2 nuts.
- Torque:
- 10 N*m{102 kgf*cm, 7 ft.*lbf}
 |
| 8. INSTALL OIL PAN SUB-ASSEMBLY |
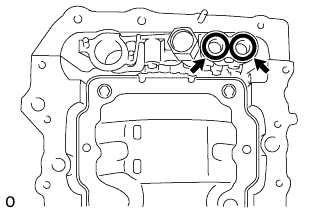
Install 2 new O-rings to the timing chain cover.
 |
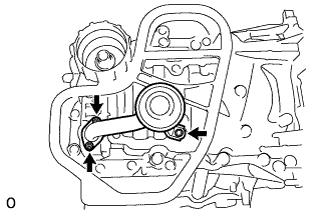
Apply seal packing in a continuous line as shown in the illustration.
- Seal packing:
- Toyota Genuine Seal Packing Black, Three Bond 1207B or equivalent
- Standard seal diameter:
- 3.0 to 4.0 mm (0.118 to 0.156 in.)
- NOTICE:
- Remove any oil from the contact surface.
- Install the oil pan within 3 minutes and tighten the bolts within 15 minutes after applying seal packing.
- Do not start the engine for at least 2 hours after installing the oil pan.
 |
Install the oil pan with the 16 bolts and 2 nuts.
- Torque:
- 10 N*m{102 kgf*cm, 7 ft.*lbf}for bolt A
- 21 N*m{214 kgf*cm, 15 ft.*lbf}for bolts except A and nuts
 |
| 9. INSTALL OIL STRAINER SUB-ASSEMBLY |
Install a new gasket and the oil strainer with the bolt and 2 nuts.
- Torque:
- 10 N*m{102 kgf*cm, 7 ft.*lbf}
 |
| 10. INSTALL NO. 2 OIL PAN SUB-ASSEMBLY |
Apply seal packing in a continuous line as shown in the illustration.
- Seal packing:
- Toyota Genuine Seal Packing Black, Three Bond 1207B or equivalent
- Standard seal diameter:
- 3.0 to 4.0 mm (0.118 to 0.156 in.)
- NOTICE:
- Remove any oil from the contact surface.
- Install the oil pan within 3 minutes and tighten the bolts within 10 minutes after applying seal packing.
- Do not start the engine for at least 2 hours after installing the oil pan.
 |
Install the oil pan with the 16 bolts and 2 nuts.
- Torque:
- 10 N*m{102 kgf*cm, 7 ft.*lbf}
 |
Install a new gasket and the drain plug.
- Torque:
- 40 N*m{408 kgf*cm, 30 ft.*lbf}
| 11. INSTALL OIL FILTER ELEMENT |
Clean the oil filter cap threads and O-ring groove.
Apply a small amount of engine oil to a new O-ring and install it to the oil filter cap.
 |
Set a new oil filter element in the oil filter cap.
| 12. INSTALL OIL FILTER CAP ASSEMBLY |
Remove any dirt or foreign matter from the installation surface and inside of the engine.
Apply a small amount of engine oil to the O-ring again and install the oil filter cap.
- NOTICE:
- Make sure that the O-ring does not get caught between the parts.
Using SST, tighten the oil filter cap.
- SST
- 09228-06501
- Torque:
- 25 N*m{255 kgf*cm, 18 ft.*lbf}
- NOTICE:
- Make sure that the oil filter is installed securely as shown in the illustration.
- Make sure that the O-ring does not get caught between the parts.
 |
Apply a small amount of engine oil to a new drain plug O-ring, and install it to the oil filter cap.
- NOTICE:
- Before installing the O-ring, remove any dirt or foreign matter from the installation surface of the oil filter cap.
 |
Install the oil filter drain plug to the filter cap.
- Torque:
- 12.5 N*m{127 kgf*cm, 9 ft.*lbf}
- NOTICE:
- Make sure that the O-ring does not get caught between the parts.
| 13. INSTALL OIL DIPSTICK GUIDE |
Install a new O-ring to the dipstick guide.
Install the dipstick guide with the bolt.
- Torque:
- 21 N*m{214 kgf*cm, 15 ft.*lbf}
 |
| 14. INSTALL NO. 2 OIL DIPSTICK GUIDE |
Install a new O-ring to the dipstick guide.
Install the dipstick guide with the bolt.
- Torque:
- 21 N*m{214 kgf*cm, 15 ft.*lbf}
 |
Install the oil dipstick.
| 15. REMOVE ENGINE FROM STAND |
Install a sling device and chain block to the engine.
Remove the engine from the engine stand.
| 16. INSTALL ENGINE ASSEMBLY |
Install the engine to the vehicle (RAV4_ACA30 RM0000019Y7025X.html).
| 17. CONNECT CABLE TO NEGATIVE BATTERY TERMINAL |