REMOVE NO.1 INSTRUMENT PANEL UNDER COVER SUB-ASSEMBLY (for LHD)
REMOVE LOWER INSTRUMENT PANEL FINISH PANEL SUB-ASSEMBLY (for LHD)
REMOVE MAIN BODY ECU (COWL SIDE JUNCTION BLOCK LH) (for LHD)
REMOVE NO. 1 INSTRUMENT PANEL UNDER COVER SUB-ASSEMBLY (for RHD)
REMOVE LOWER INSTRUMENT PANEL FINISH PANEL SUB-ASSEMBLY (for RHD)
Clutch Switch -- Removal |
| 1. REMOVE FRONT DOOR SCUFF PLATE LH (for LHD) |
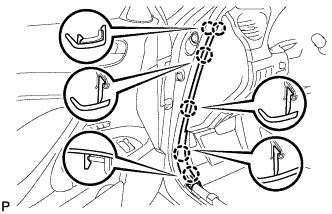
| 2. REMOVE FRONT DOOR OPENING TRIM COVER LH (for LHD) |
Disengage the 6 claws and remove the front door opening trim cover LH.
 |
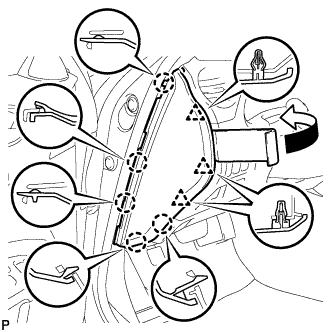
| 3. REMOVE SIDE INSTRUMENT PANEL LH (for LHD) |
Using a moulding remover, disengage the 5 claws and 3 clips, and then remove the side instrument panel LH.
 |
| 4. REMOVE NO.1 INSTRUMENT PANEL UNDER COVER SUB-ASSEMBLY (for LHD) |
Remove the 2 screws <E>.
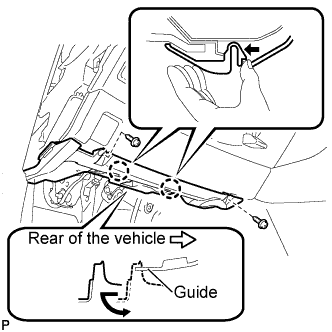 |
Push the 2 claws in the direction indicated by the arrow to disengage them.
Remove the No. 1 instrument panel under cover sub-assembly from the guide as shown in the illustration and pull the cover toward the rear of the vehicle.
Disconnect the connectors and remove the No. 1 instrument panel under cover sub-assembly.
| 5. REMOVE LOWER INSTRUMENT PANEL FINISH PANEL SUB-ASSEMBLY (for LHD) |
Disengage the 7 clips.
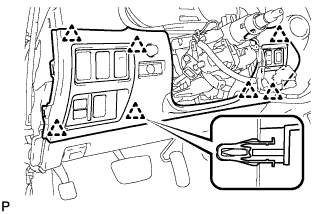 |
Disconnect the connectors and remove the lower instrument panel finish panel sub-assembly.
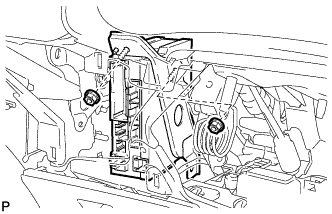
| 6. REMOVE MAIN BODY ECU (COWL SIDE JUNCTION BLOCK LH) (for LHD) |
Disconnect all connectors.
Remove the 2 nuts and the main body ECU (cowl side junction block LH).
 |
| 7. REMOVE NO. 1 INSTRUMENT PANEL UNDER COVER SUB-ASSEMBLY (for RHD) |
Remove the 2 screws <E>.
|
Push the 2 claws in the direction indicated by the arrow to disengage them.
Remove the No. 1 instrument panel under cover sub-assembly from the guide as shown in the illustration and pull the cover toward the rear of the vehicle.
Disconnect the connectors and remove the No. 1 instrument panel under cover sub-assembly.
| 8. REMOVE LOWER INSTRUMENT PANEL FINISH PANEL SUB-ASSEMBLY (for RHD) |
Disengage the 7 clips.
|
Disconnect the connectors and remove the lower instrument panel finish panel sub-assembly.
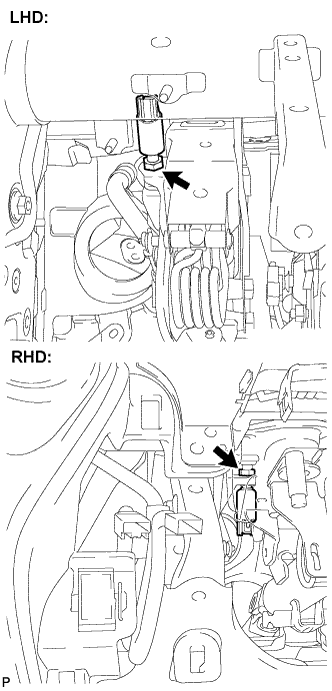
| 9. REMOVE CLUTCH SWITCH ASSEMBLY |
Disconnect the connector.
Loosen the nut and remove the clutch switch assembly.
 |