Clutch Master Cylinder (For 2Ad-Fhv) Removal
Clutch. Lexus Is250, Is220D. Gse20 Ale20
PRECAUTION
DISCONNECT NEGATIVE BATTERY TERMINAL
DRAIN BRAKE FLUID
REMOVE FRONT DOOR SCUFF PLATE (w/o Illumination)
REMOVE FRONT DOOR SCUFF PLATE (w/ Illumination)
REMOVE FRONT DOOR OPENING TRIM COVER
REMOVE SIDE INSTRUMENT PANEL
REMOVE NO. 1 INSTRUMENT PANEL UNDER COVER SUB-ASSEMBLY
REMOVE LOWER INSTRUMENT PANEL FINISH PANEL SUB-ASSEMBLY
REMOVE DRIVER SIDE KNEE AIRBAG ASSEMBLY
DISCONNECT WIRE HARNESS (for LHD)
DISCONNECT WIRE HARNESS (for RHD)
DISCONNECT CLUTCH RESERVOIR TUBE (for LHD)
DISCONNECT CLUTCH RESERVOIR TUBE (for RHD)
DISCONNECT CLUTCH LINE
REMOVE CLUTCH PEDAL SUPPORT SUB-ASSEMBLY (for LHD)
REMOVE CLUTCH PEDAL SUPPORT SUB-ASSEMBLY (for RHD)
REMOVE PEDAL WITH HOOK SPRING
REMOVE CLUTCH START SWITCH ASSEMBLY
REMOVE CLUTCH MASTER CYLINDER PUSH ROD CLEVIS PIN
REMOVE CLUTCH MASTER CYLINDER ASSEMBLY (for LHD)
REMOVE CLUTCH MASTER CYLINDER ASSEMBLY (for RHD)
Clutch Master Cylinder (For 2Ad-Fhv) -- Removal |
- HINT:
- Use the same procedures for the RHD and LHD.
- The procedures listed below are for the LHD.
(Click here)
| 2. DISCONNECT NEGATIVE BATTERY TERMINAL |
- CAUTION:
- Wait for 90 seconds after disconnecting the cable to prevent airbag deployment (Click here).
- NOTICE:
- If brake fluid leaks onto any painted surface, wash off or remove the brake fluid completely.
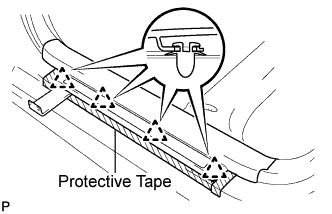
| 4. REMOVE FRONT DOOR SCUFF PLATE (w/o Illumination) |
Put protective tape around the front door scuff plate.
Using a moulding remover, disengage the 4 clips.
Disengage the 7 claws and remove the front door scuff plate LH.
| 5. REMOVE FRONT DOOR SCUFF PLATE (w/ Illumination) |
Put protective tape around the front door scuff plate.
Using a moulding remover, disengage the 4 clips.
Disengage the 7 claws and remove the front door scuff plate LH.
Disconnect the connector.
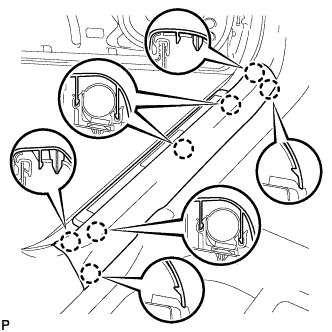
| 6. REMOVE FRONT DOOR OPENING TRIM COVER |
Disengage the 6 claws and remove the front door opening trim cover LH.
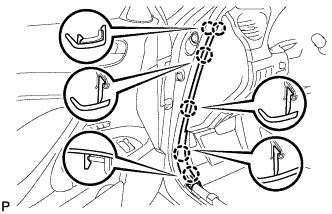
| 7. REMOVE SIDE INSTRUMENT PANEL |
Using a moulding remover, disengage the 5 claws and 3 clips, and then remove the side instrument panel LH.
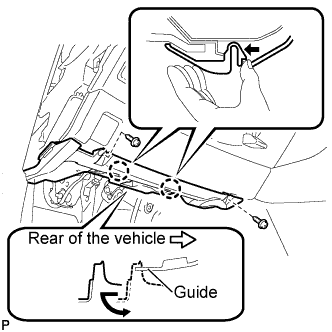
| 8. REMOVE NO. 1 INSTRUMENT PANEL UNDER COVER SUB-ASSEMBLY |
Remove the 2 screws <E>.
Push the 2 claws in the direction indicated by the arrow to disengage them.
Remove the No. 1 instrument panel under cover sub-assembly from the guide as shown in the illustration and pull the cover toward the rear of the vehicle.
Disconnect the connectors and remove the No. 1 instrument panel under cover sub-assembly.
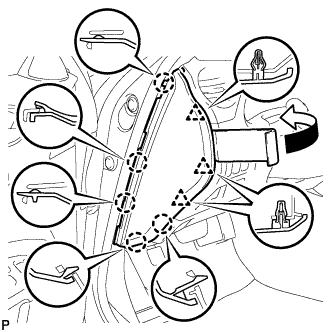
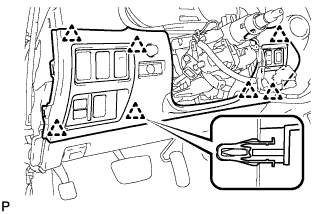
| 9. REMOVE LOWER INSTRUMENT PANEL FINISH PANEL SUB-ASSEMBLY |
Disengage the 7 clips.
Disconnect the connectors and remove the lower instrument panel finish panel sub-assembly.
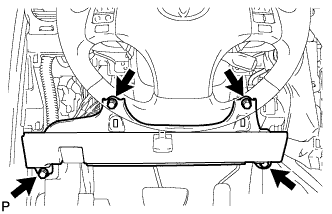
| 10. REMOVE DRIVER SIDE KNEE AIRBAG ASSEMBLY |
Remove the 4 bolts and driver side knee airbag assembly.
Disconnect the connector.
- NOTICE:
- When handling the airbag connector, take care not to damage the airbag wire harness.
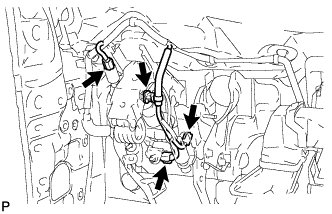
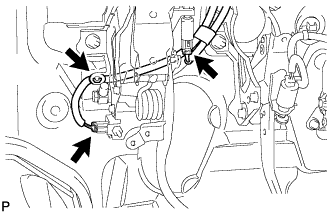
| 11. DISCONNECT WIRE HARNESS (for LHD) |
Disconnect the 3 connectors and clamp.
| 12. DISCONNECT WIRE HARNESS (for RHD) |
Disconnect the 2 connectors and clamp.
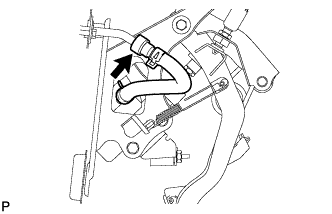
| 13. DISCONNECT CLUTCH RESERVOIR TUBE (for LHD) |
Disconnect the clutch reservoir tube.
- HINT:
- Use a container to catch the fluid.
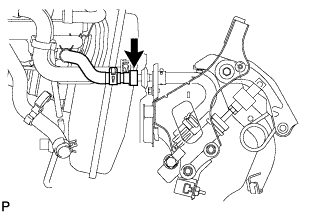
| 14. DISCONNECT CLUTCH RESERVOIR TUBE (for RHD) |
Disconnect the clutch reservoir tube.
- HINT:
- Use a container to catch the fluid.
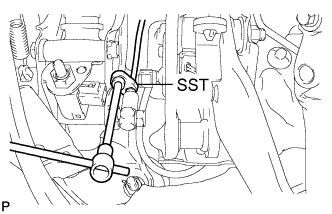
| 15. DISCONNECT CLUTCH LINE |
Using SST, disconnect the clutch line from the clutch master cylinder.
- SST
- 09023-00101
- HINT:
- Use a container to catch the fluid.
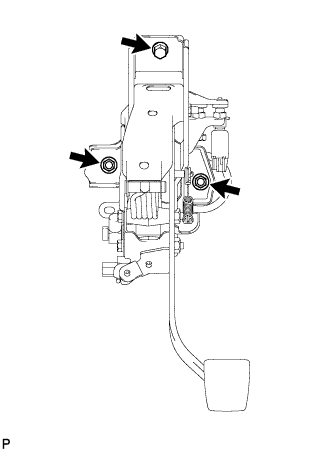
| 16. REMOVE CLUTCH PEDAL SUPPORT SUB-ASSEMBLY (for LHD) |
Remove the 2 nuts, bolt and clutch pedal support.
| 17. REMOVE CLUTCH PEDAL SUPPORT SUB-ASSEMBLY (for RHD) |
Remove the 2 nuts, bolt and clutch pedal support.
| 18. REMOVE PEDAL WITH HOOK SPRING |
Remove the pedal with hook spring.
| 19. REMOVE CLUTCH START SWITCH ASSEMBLY |
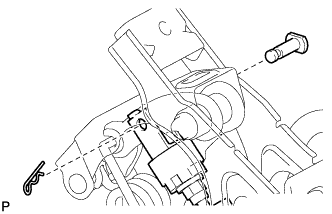
| 20. REMOVE CLUTCH MASTER CYLINDER PUSH ROD CLEVIS PIN |
Remove the clip and pin.
| 21. REMOVE CLUTCH MASTER CYLINDER ASSEMBLY (for LHD) |
Remove the clutch reservoir tube.
Remove the 2 bolts and clutch master cylinder assembly.
| 22. REMOVE CLUTCH MASTER CYLINDER ASSEMBLY (for RHD) |
Remove the clutch reservoir tube.
Remove the 2 bolts and clutch master cylinder assembly.