Brake Master Cylinder Removal
Brake. Lexus Is250, Is220D. Gse20 Ale20
Brake. Lexus Is250, Is220D. Gse20 Ale20
PRECAUTION
REMOVE COOL AIR INTAKE DUCT SEAL
REMOVE ENGINE ROOM SIDE COVER LH
REMOVE ENGINE ROOM SIDE COVER RH
REMOVE FRONT UPPER FENDER PROTECTOR LH
REMOVE FRONT UPPER FENDER PROTECTOR RH
REMOVE ROOF DRIP SIDE FINISH MOULDING LH
REMOVE ROOF DRIP SIDE FINISH MOULDING RH
REMOVE FRONT WIPER ARM HEAD CAP
REMOVE WINDSHIELD WIPER ARM AND BLADE ASSEMBLY LH
REMOVE WINDSHIELD WIPER ARM AND BLADE ASSEMBLY RH
REMOVE COWL TOP VENTILATOR LOUVER SUB-ASSEMBLY
DRAIN BRAKE FLUID
REMOVE NO. 3 ENGINE ROOM RELAY BLOCK
SEPARATE CLUTCH RESERVOIR HOSE (for Manual Transmission)
REMOVE BRAKE MASTER CYLINDER SUB-ASSEMBLY
Brake Master Cylinder -- Removal |
- HINT:
- (Click here)
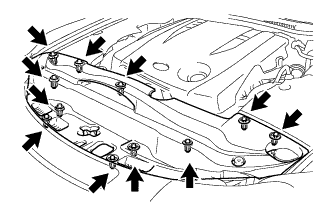
| 2. REMOVE COOL AIR INTAKE DUCT SEAL |
Remove the 11 clips and intake duct seal.
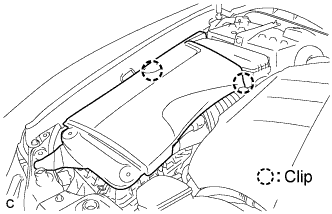
| 3. REMOVE ENGINE ROOM SIDE COVER LH |
Remove the 2 clips and side cover.
| 4. REMOVE ENGINE ROOM SIDE COVER RH |
Remove the 2 clips and side cover.
| 5. REMOVE FRONT UPPER FENDER PROTECTOR LH |
Using a clip remover, separate the clip on the rubber portion of the cowl top ventilator louver sub-assembly from the front upper fender protector LH.
Disengage the 3 clips and the claw to remove the front fender protector upper LH.
| 6. REMOVE FRONT UPPER FENDER PROTECTOR RH |
- HINT:
- Use the same procedures for the RH side and the LH side.
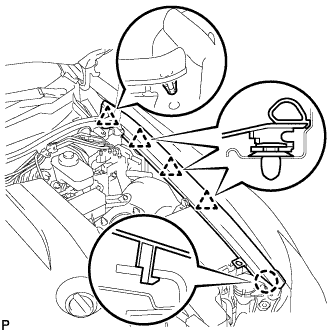
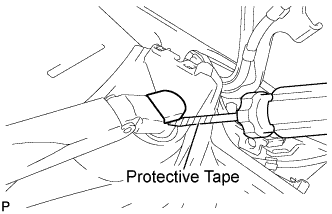
| 7. REMOVE ROOF DRIP SIDE FINISH MOULDING LH |
Put protective tape around the roof drip side finish moulding.
Using a moulding remover, disengage the 6 clips and remove the roof drip side finish moulding.
- NOTICE:
- Do not remove the clips.
- If the clips are damaged or fall off, replace them with new clips.
| 8. REMOVE ROOF DRIP SIDE FINISH MOULDING RH |
- HINT:
- Use the same procedures for the RH side and the LH side.
| 9. REMOVE FRONT WIPER ARM HEAD CAP |
Using a screwdriver, remove the front wiper arm head cap.
- HINT:
- Use the same procedures for the RH side and the LH side.
- Tape the screwdriver tip before use.
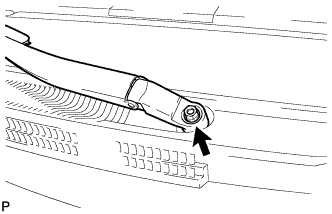
| 10. REMOVE WINDSHIELD WIPER ARM AND BLADE ASSEMBLY LH |
Remove the nut and the front wiper arm and blade assembly LH.
| 11. REMOVE WINDSHIELD WIPER ARM AND BLADE ASSEMBLY RH |
Remove the nut and the front wiper arm and blade assembly RH.
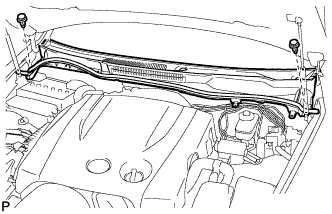
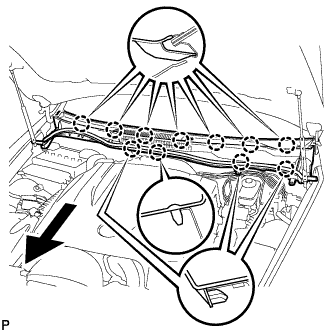
| 12. REMOVE COWL TOP VENTILATOR LOUVER SUB-ASSEMBLY |
Remove the 2 clips.
Disengage the 11 claws, and pull out the cowl top ventilator louver sub-assembly.
- NOTICE:
- If brake fluid leaks onto any painted surface, wash off or remove the brake fluid completely.
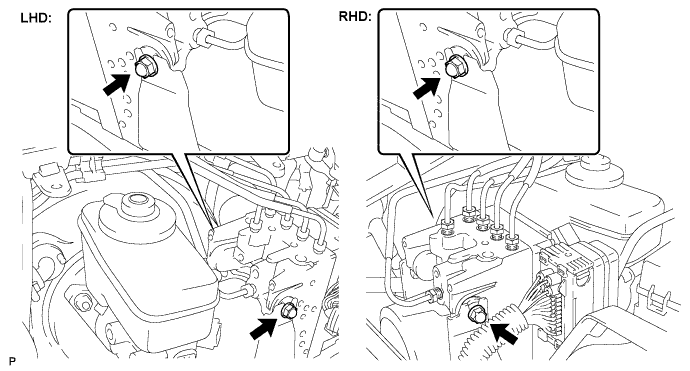
| 14. REMOVE NO. 3 ENGINE ROOM RELAY BLOCK |
Remove the bolt, nut and No. 3 engine room relay block.
- NOTICE:
- Cover the No. 3 engine room relay block with a shop rag or a piece of cloth to prevent brake fluid from getting on it.
| 15. SEPARATE CLUTCH RESERVOIR HOSE (for Manual Transmission) |
Remove the clip and separate the clutch reservoir hose.
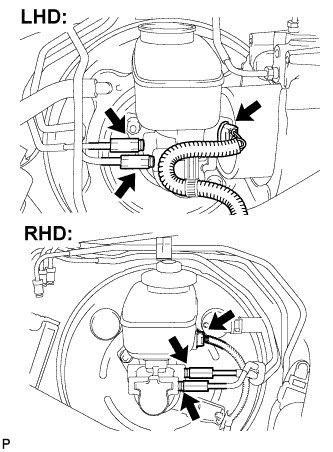
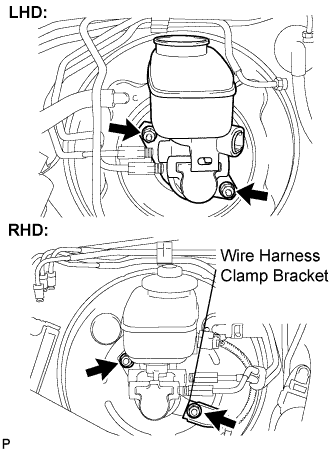
| 16. REMOVE BRAKE MASTER CYLINDER SUB-ASSEMBLY |
Disengage the clamp and disconnect the warning switch connector.
Using SST, disconnect the 2 brake lines from the brake master cylinder sub-assembly.
- SST
- 09023-00101
Remove the 2 nuts and separate the brake actuator assembly.
Remove the 2 nuts and brake master cylinder sub-assembly from the brake booster assembly.
Remove the O-ring from the brake master cylinder sub-assembly.