Shift Solenoid Valve Installation
INSTALL TRANSMISSION VALVE BODY ASSEMBLY
CONNECT TRANSMISSION WIRE
INSTALL VALVE BODY OIL STRAINER ASSEMBLY
INSTALL AUTOMATIC TRANSMISSION OIL PAN SUB-ASSEMBLY
INSTALL NO. 1 EXHAUST PIPE SUPPORT BRACKET SUB-ASSEMBLY
CONNECT CABLE TO NEGATIVE BATTERY TERMINAL
ADD AUTOMATIC TRANSMISSION FLUID
RESET MEMORY
PERFORM INITIALIZATION
Shift Solenoid Valve -- Installation |
| 1. INSTALL TRANSMISSION VALVE BODY ASSEMBLY |
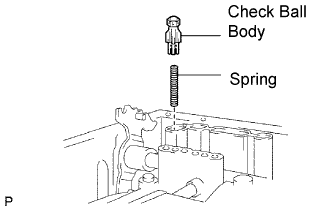
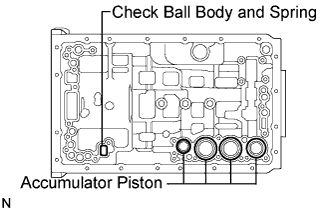
Install the check ball body and spring.
Check the accumulator pistons, check ball body and spring as shown in the illustration.
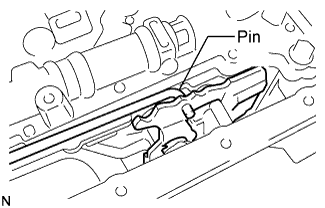
Align the groove of the manual valve with the pin of the lever.
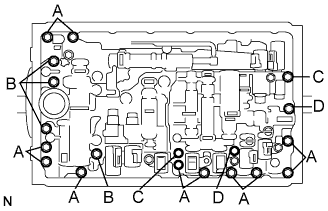
Install the 19 bolts.
- Torque:
- 11 N*m{112 kgf*cm, 8 ft.*lbf}
- Bolt length:
- Bolt A:
- 25 mm (0.98 in.)
- Bolt B:
- 36 mm (1.42 in.)
- Bolt C:
- 45 mm (1.77 in.)
- Bolt D:
- 50 mm (1.97 in.)
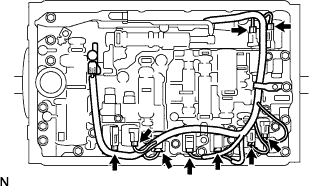
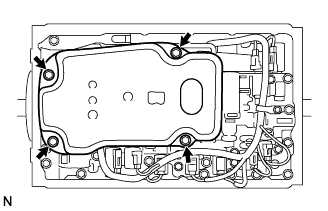
| 2. CONNECT TRANSMISSION WIRE |
Connect the 9 connectors to the solenoid valves.
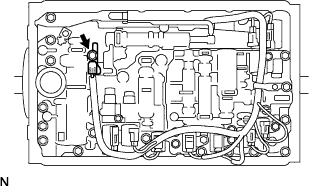
Install the ATF temperature sensor with the bolt.
- Torque:
- 10 N*m{102 kgf*cm, 7 ft.*lbf}
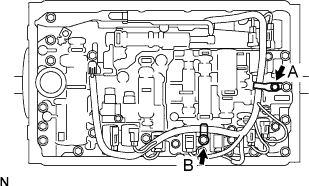
Install the 2 clamps with the 2 bolts.
- Torque:
- Bolt A:
- 6.4 N*m{65 kgf*cm, 57 in.*lbf}
- Bolt B:
- 10 N*m{102 kgf*cm, 7 ft.*lbf}
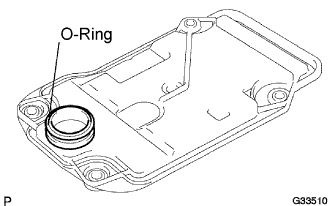
| 3. INSTALL VALVE BODY OIL STRAINER ASSEMBLY |
Coat a new O-ring with ATF.
Install the O-ring.
Install the oil strainer with the 4 bolts.
- Torque:
- 10 N*m{102 kgf*cm, 7 ft.*lbf}
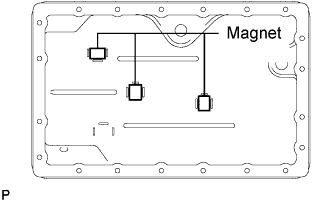
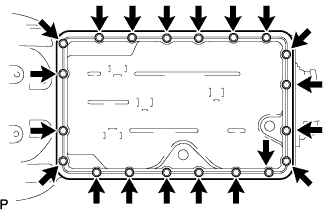
| 4. INSTALL AUTOMATIC TRANSMISSION OIL PAN SUB-ASSEMBLY |
Install the 3 magnets in the oil pan.
Install a new gasket and the oil pan to the transmission case with the 20 bolts.
- Torque:
- 4.4 N*m{45 kgf*cm, 39 in.*lbf}
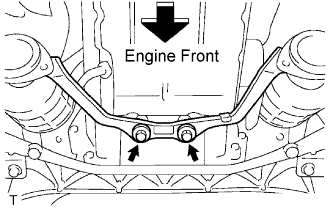
| 5. INSTALL NO. 1 EXHAUST PIPE SUPPORT BRACKET SUB-ASSEMBLY |
Install the No. 1 exhaust pipe support bracket sub-assembly to the automatic transmission assembly with the 2 bolts.
- Torque:
- 43 N*m{438 kgf*cm, 32 ft.*lbf}
| 6. CONNECT CABLE TO NEGATIVE BATTERY TERMINAL |
| 7. ADD AUTOMATIC TRANSMISSION FLUID |
(Click here)
(Click here)
| 9. PERFORM INITIALIZATION |
Some systems need initialization after reconnecting the cable to the negative battery terminal.(Click here)