Water Hose Joint (For 3Gr-Fse) -- Installation |
| 1. INSTALL WATER HOSE JOINT |
Connect the hose joint with the bolt.
- Torque:
- 10 N*m{102 kgf*cm, 7 ft.*lbf}
 |
| 2. CONNECT NO. 8 WATER BY-PASS HOSE |
Connect the water hose.
 |
Attach the clamp on the clamp track portion of the hose.
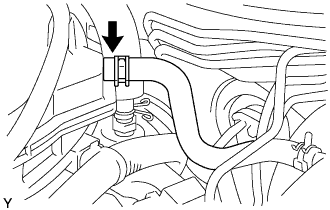
| 3. CONNECT NO. 7 WATER BY-PASS HOSE |
Install the water hose.
 |
Attach the clamp on the clamp track portion of the hose.
| 4. INSTALL HEATER BLOWER WIRE |
When replacing the engine block heater bracket:
Connect the bracket to the heater blower wire connector.
 |
Install the wire with the 2 bolts and connect the connector.
- Torque:
- 10 N*m{102 kgf*cm, 7 ft.*lbf}
- NOTICE:
- When the bracket is tightened by the bolt, make sure there is a safe amount of clearance between the bracket end and the water hose joint surface.
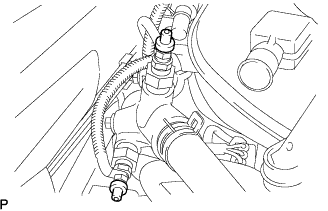
| 5. INSTALL WATER BY-PASS GLOW PLUG |
Install the 2 glow plugs.
- Torque:
- 15.4 N*m{157 kgf*cm, 11 ft.*lbf}
 |
Install the 2 wave washers.
| 6. CONNECT HEATER BLOWER WIRE |
Connect the 2 wires.
- HINT:
- Set the terminal directions (angles) of the 2 wires to the positions they were in before disconnection.
 |
Install the 2 plate washers.
Install the 2 nuts while using your hands to make sure the terminal directions (angles) of the 2 wires do not change.
- Torque:
- 2.7 N*m{28 kgf*cm, 24 in.*lbf}
Install the 2 grommets.
- HINT:
- Tighten the grommets until a click is felt.
 |
| 7. INSTALL ENGINE REAR COVER |
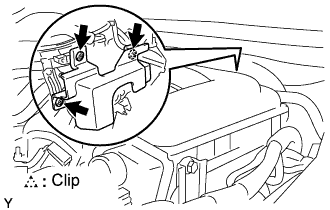 |
Install the engine rear cover with the 3 clips.
| 8. REMOVE UNION TO CHECK VALVE HOSE (for RHD) |
 |
Connect the hose to the surge tank.
| 9. INSTALL V-BANK COVER SUB-ASSEMBLY |
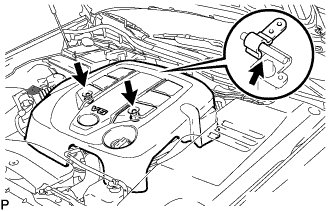 |
Install the V-bank cover with the 2 nuts.
- Torque:
- 5.0 N*m{51 kgf*cm, 44 in.*lbf}
| 10. CONNECT CABLE TO NEGATIVE BATTERY TERMINAL |
| 11. ADD ENGINE COOLANT |
- NOTICE:
- Before adding engine coolant, turn the A/C switch OFF.
Tighten all the plugs and fill the radiator with TOYOTA Super Long Life Coolant (SLLC).
- Torque:
- 12.7 N*m{130 kgf*cm, 9 ft.*lbf} for cylinder block drain cock plug
Add engine coolant.
- Specified capacity:
- 9.1 liters (9.6 US qts, 8.0 lmp. qts)
- NOTICE:
- When pressing the radiator hose:
- Wear protective gloves.
- Be careful as the radiator hose is hot.
- Keep your hands away from the radiator fan.
- HINT:
- TOYOTA vehicles are filled with TOYOTA SLLC at the factory. In order to avoid damage to the engine cooling system and other technical problems, only use TOYOTA SLLC or similar high quality ethylene glycol based non-silicate, non-amine, non-nitrite, non-borate coolant with long-life hybrid organic acid technology (coolant with long-life hybrid organic acid technology consists of a combination of low phosphates and organic acids).
- Please contact your TOYOTA dealer for further details.
- The thermostat open timing can be confirmed by pressing the inlet radiator hose by hand, and checking when the engine coolant starts to flow inside the hose.
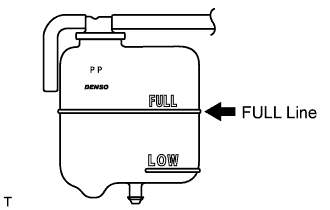
Slowly pour coolant into the radiator reservoir until it reaches the FULL line.
Press the inlet and outlet radiator hoses several times by hand, and then check the level of the coolant.
If the coolant level is low, add coolant.
Install the radiator cap and reservoir cap.
Bleed air from the cooling system.
- NOTICE:
- Before starting the engine to warm up the engine, turn the A/C switch OFF.
Warm up the engine until the thermostat opens. While the thermostat is open, circulate the coolant for several minutes.
- HINT:
- The thermostat open timing can be confirmed by pressing the inlet radiator hose by hand, and checking when the engine coolant starts to flow inside the hose.
- NOTICE:
- When pressing the radiator hoses:
- Wear protective gloves.
- Be careful as the radiator hoses are hot.
- Keep your hands away from the radiator fan.
Maintain the engine speed at 2,000 to 2,500 rpm.
Press the inlet and outlet radiator hoses several times by hand to bleed air.
- NOTICE:
- When pressing the radiator hoses:
- Wear protective gloves.
- Be careful as the radiator hoses are hot.
- Keep your hands away from the radiator fan.
Stop the engine, and wait until the engine coolant cools down to ambient temperature.
- CAUTION:
- Do not remove the radiator cap while the engine and radiator are still hot. Pressurized, hot engine coolant and steam may be released and cause serious burns.
Check the coolant level in the radiator reservoir.
If the coolant level is low, add SLLC to the radiator reservoir FULL line.
 |
| 12. WARM UP ENGINE |
Warm up the engine at less than 1,850 rpm for 2 minutes or more after charging the refrigerant.
- NOTICE:
- Be sure to warm up the compressor when turning the A/C switch ON after removing and installing the cooler refrigerant lines (including the compressor), to prevent damage to the compressor.
| 13. CHECK FOR ENGINE COOLANT LEAKS |
Check for engine coolant leaks (Click here).
| 14. PERFORM INITIALIZATION |
Perform initialization (Click here).
- NOTICE:
- Certain systems need to be initialized after disconnecting and reconnecting the cable from the negative (-) battery terminal.