Headlight Swivel Ecu Installation
Lighting. Lexus Gs430, Gs300. Uzs190 Grs190
INSTALL HEADLIGHT SWIVEL ECU ASSEMBLY
INSTALL FRONT DOOR SCUFF PLATE
CONNECT CABLE TO NEGATIVE BATTERY TERMINAL
PERFORM INITIALIZATION
ADJUST HEADLIGHT AIMING
Headlight Swivel Ecu -- Installation |
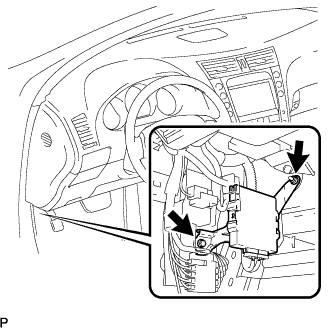
| 1. INSTALL HEADLIGHT SWIVEL ECU ASSEMBLY |
Connect the connector.
Install the ECU with the bolt and nut.
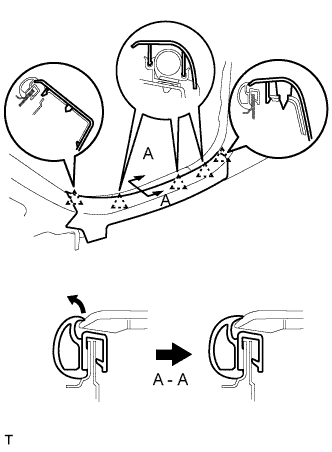
| 2. INSTALL FRONT DOOR SCUFF PLATE |
Attach the 5 claws to install the scuff plate.
Pull out the folded lip of the weatherstrip.
| 3. CONNECT CABLE TO NEGATIVE BATTERY TERMINAL |
| 4. PERFORM INITIALIZATION |
Perform initialization (Click here).
- NOTICE:
- Certain systems need to be initialized after disconnecting and reconnecting the cable from the negative (-) battery terminal.
| 5. ADJUST HEADLIGHT AIMING |
Adjust the aim vertically:
Adjust the headlight aim into the specified range by turning aiming screw A with a screwdriver.
- NOTICE:
- The final turn of the aiming screw should be made in the clockwise direction. If the screw is tightened excessively, loosen and then retighten it so that the final turn of the screw is in the clockwise direction.
- HINT:
- Perform the low-beam aim adjustment.
- The headlight aim moves up when turning the aiming screw clockwise, and moves down when turning the aiming screw counterclockwise.
Adjust the aim horizontally:
Adjust the headlight aim into the specified range by turning aiming screw B with a screwdriver.
- NOTICE:
- The final turn of the aiming screw should be made in the clockwise direction. If the screw is tightened excessively, loosen and then retighten it, so that the final turn of the screw is in the clockwise direction.
- HINT:
- Perform the low-beam aim adjustment.