Headlight Assembly Removal
Lighting. Lexus Gs430, Gs300. Uzs190 Grs190
DISCONNECT CABLE FROM NEGATIVE BATTERY TERMINAL
REMOVE COOL AIR INTAKE DUCT SEAL
REMOVE FRONT BUMPER COVER
REMOVE ENGINE ROOM SIDE COVER
REMOVE HEADLIGHT ASSEMBLY
REMOVE FRONT BUMPER SIDE SUPPORT
REMOVE NO. 1 HEADLIGHT BACK COVER
REMOVE HIGH-INTENSITY DISCHARGE HEADLIGHT BULB
REMOVE NO. 2 HEADLIGHT BULB
REMOVE FRONT TURN SIGNAL LIGHT BULB
REMOVE FRONT TURN SIGNAL LIGHT SOCKET
REMOVE CLEARANCE LIGHT BULB
REMOVE CLEARANCE LIGHT BULB SOCKET
REMOVE FRONT SIDE MARKER LIGHT BULB
REMOVE FRONT SIDE MARKER LIGHT BULB SOCKET
REMOVE LIGHT CONTROL ECU
Headlight Assembly -- Removal |
- HINT:
- Use the same procedures for the RH side and LH side.
- The procedures listed below are for the LH side.
| 1. DISCONNECT CABLE FROM NEGATIVE BATTERY TERMINAL |
- CAUTION:
- Wait at least 90 seconds after disconnecting the cable from the negative (-) battery terminal to prevent airbag and seat belt pretensioner activation.
| 2. REMOVE COOL AIR INTAKE DUCT SEAL |
Using a clip remover, remove the 7 clips and duct seal.
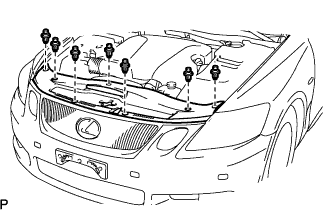
| 3. REMOVE FRONT BUMPER COVER |
Using a clip remover, remove the 2 clips.
- HINT:
- Put protective tape under the front fender.
Remove the 6 screws and 5 bolts.
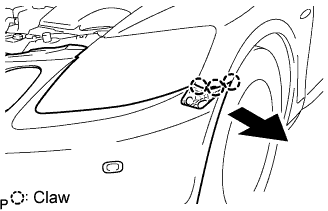
Pull the bumper cover to detach the 3 claws on the LH side.
Pull the bumper cover to detach the 3 claws on the RH side and remove the bumper cover.
w/ Clearance sonar system:
Disconnect the ultrasonic sensor connector.
| 4. REMOVE ENGINE ROOM SIDE COVER |
Remove the 3 clips and side cover.
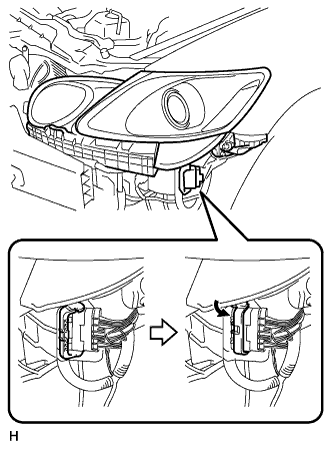
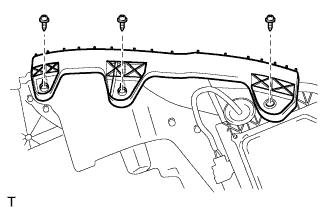
| 5. REMOVE HEADLIGHT ASSEMBLY |
Disconnect the connector as shown in the illustration.
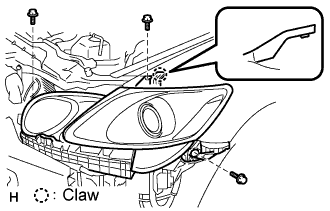
Remove the 3 bolts.
w/ Headlight cleaner:
Disconnect the headlight cleaner hose.
Detach the claw and remove the headlight.
| 6. REMOVE FRONT BUMPER SIDE SUPPORT |
Remove the 3 screws and side support.
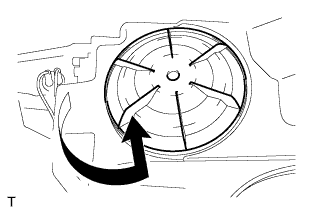
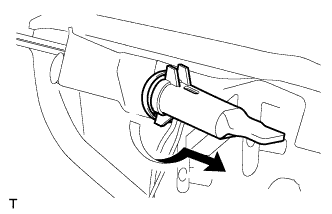
| 7. REMOVE NO. 1 HEADLIGHT BACK COVER |
Turn the back cover in the direction indicated by the arrow and remove it.
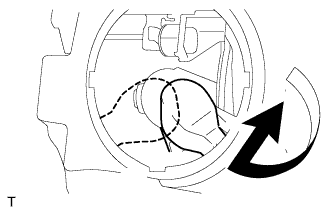
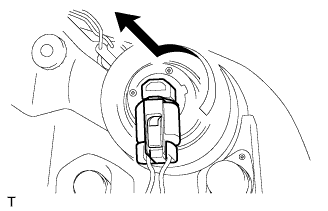
| 8. REMOVE HIGH-INTENSITY DISCHARGE HEADLIGHT BULB |
Turn the bulb in the direction indicated by the arrow and remove the bulb socket.
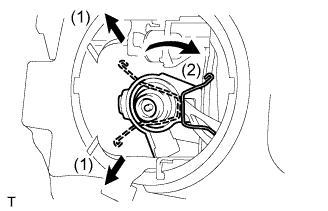
Release the set spring lock as shown in the illustration and remove the bulb.
| 9. REMOVE NO. 2 HEADLIGHT BULB |
Turn the bulb in the direction indicated by the arrow and remove it.
| 10. REMOVE FRONT TURN SIGNAL LIGHT BULB |
Turn the socket and bulb in the direction indicated by the arrow and remove them as a unit.
| 11. REMOVE FRONT TURN SIGNAL LIGHT SOCKET |
Remove the bulb from the light socket.
| 12. REMOVE CLEARANCE LIGHT BULB |
Turn the socket and bulb in the direction indicated by the arrow and remove them as a unit.
| 13. REMOVE CLEARANCE LIGHT BULB SOCKET |
Remove the bulb from the socket.
| 14. REMOVE FRONT SIDE MARKER LIGHT BULB |
Turn the socket and bulb in the direction indicated by the arrow and remove them as a unit.
| 15. REMOVE FRONT SIDE MARKER LIGHT BULB SOCKET |
Remove the bulb from the socket.
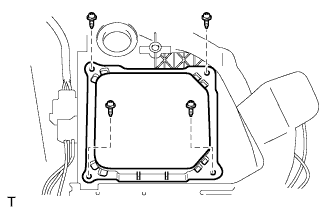
| 16. REMOVE LIGHT CONTROL ECU |
Remove the 4 screws and ECU cover.
Remove the headlight gasket.
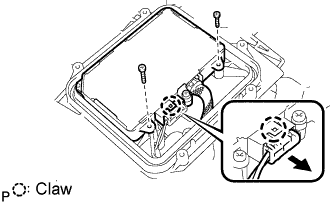
Remove the 2 screws.
Disconnect the connector and remove the ECU.