Starter -- Installation |
| 1. INSTALL STARTER ASSEMBLY |
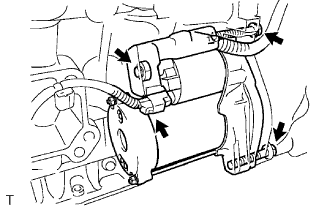 |
Install the starter with the 2 bolts.
- Torque:
- 58 N*m{591 kgf*cm, 43 ft.*lbf}
Install the starter cable with the nut, and then attach the terminal cap.
- Torque:
- 4.0 N*m{41 kgf*cm, 35 in.*lbf}
Connect the starter connector.
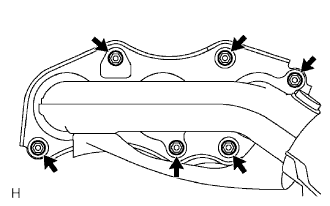
| 2. INSTALL EXHAUST MANIFOLD SUB-ASSEMBLY LH |
Install a new gasket and the manifold with 6 new nuts.
- Torque:
- 21 N*m{214 kgf*cm, 15 ft.*lbf}
 |
Connect the A/F sensor connector (bank 1 sensor 1).
 |
Install the engine wire bracket.
 |
Install the ground cable with the 2 bolts.
| 3. INSTALL FRONT EXHAUST PIPE ASSEMBLY |
Install the front exhaust pipe (Click here).
Connect the heated oxygen sensor (Click here).
Install the front floor brace center (Click here).
| 4. CONNECT CABLE TO NEGATIVE BATTERY TERMINAL |
| 5. CHECK FOR EXHAUST LEAKS |
| 6. INSTALL ENGINE UNDER COVER |
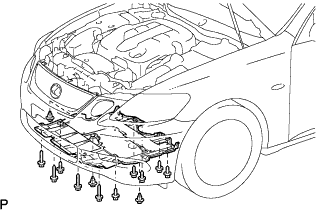 |
Install the under cover with the 3 clips and 10 screws.
| 7. INSTALL ENGINE ROOM SIDE COVER LH |
 |
Install the side cover with the 3 clips.
| 8. INSTALL COOL AIR INTAKE DUCT SEAL |
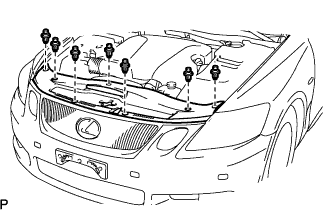 |
Install the duct seal with the 7 clips.
| 9. INSTALL V-BANK COVER SUB-ASSEMBLY |
Install the cover with the 2 nuts.
- Torque:
- 5.0 N*m{51 kgf*cm, 44 in.*lbf}
| 10. INSTALL FRONT SEAT ASSEMBLY LH |
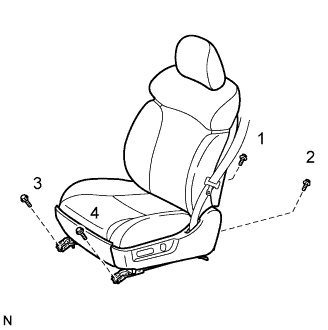 |
Place the seat in the cabin.
Connect the connectors under the seat.
Connect the cable to the negative (-) battery terminal.
Operate the power seat switch knob and move the seat to the foremost position.
Tighten the 2 bolts on the rear side of the seat.
- Torque:
- 36.8 N*m{375 kgf*cm, 27 ft.*lbf}
- HINT:
- Tighten the 2 bolts in the order indicated in the illustration.
Operate the power seat switch knob and move the seat to the rearmost position.
Tighten the 2 bolts on the rear side of the seat.
- Torque:
- 36.8 N*m{375 kgf*cm, 27 ft.*lbf}
- HINT:
- Tighten the 2 bolts in the order indicated in the illustration.
| 11. INSTALL CONSOLE BOX |
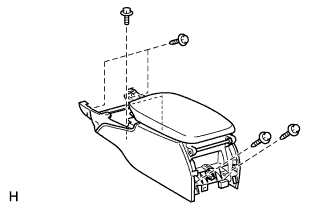 |
Connect the connector.
Install the console box with the 4 bolts and 2 screws.
| 12. INSTALL CONSOLE BOX REGISTER ASSEMBLY |
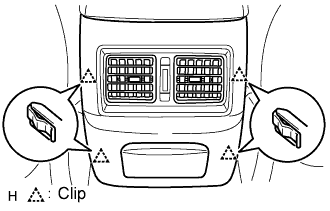 |
Attach the 4 clips to install the register.
| 13. INSTALL CONSOLE BOX PLATE |
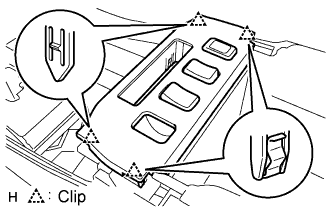 |
Connect the connector.
Attach the 4 clips to install the console box.
| 14. INSTALL INSTRUMENT PANEL FINISH PANEL END LH |
 |
Attach the 4 clips and 3 claws to install the finish panel end.
Install the screw.
| 15. INSTALL INSTRUMENT PANEL FINISH PANEL END RH |
 |
Attach the 3 clips and 3 claws to install the finish panel end.
Install the screw.
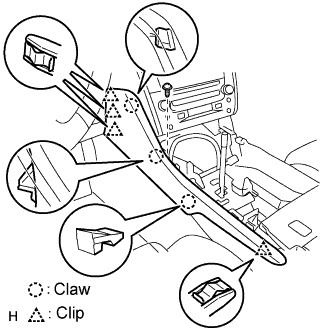
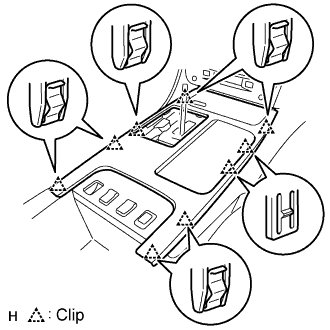
| 16. INSTALL CONSOLE UPPER PANEL ASSEMBLY |
 |
Connect the connector.
Attach the 9 clips to install the ash receptacle.
Install the shift lever knob and twist it in the direction indicated by the arrow.
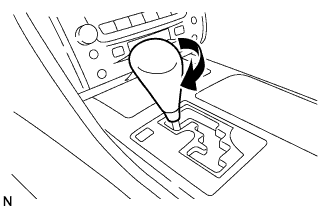 |
| 17. INSTALL FRONT CONSOLE UPPER PANEL GARNISH |
Attach the claws to install the garnish.
| 18. PERFORM INITIALIZATION |
Perform initialization (Click here).
- NOTICE:
- Certain systems need to be initialized after disconnecting and reconnecting the cable from the negative (-) battery terminal.