Front Lower Ball Joint Removal
REMOVE FRONT WHEEL
SEPARATE SPEED SENSOR FRONT
SEPARATE FRONT SUSPENSION UPPER ARM
REMOVE TIE ROD ASSEMBLY
REMOVE HEIGHT CONTROL SENSOR LINK SUB-ASSEMBLY FRONT
REMOVE FRONT SHOCK ABSORBER WITH COIL SPRING
REMOVE FRONT STABILIZER LINK ASSEMBLY
REMOVE ENGINE UNDER COVER
REMOVE FRONT SUSPENSION LOWER ARM
REMOVE FRONT LOWER BALL JOINT
Front Lower Ball Joint -- Removal |
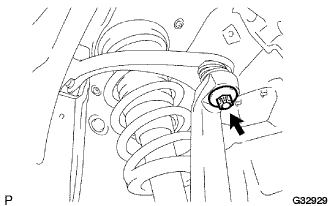
| 2. SEPARATE SPEED SENSOR FRONT |
Remove the bolt and separate the speed sensor front from the front shock absorber with coil spring.
- HINT:
- Be careful not to deform the bracket of the front shock absorber with coil spring when removing the bolt.
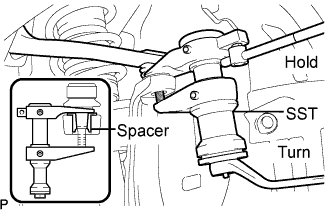
| 3. SEPARATE FRONT SUSPENSION UPPER ARM |
Remove the clip and nut.
Using SST, remove the upper ball joint from the steering knuckle.
- SST
- 09628-00011
- NOTICE:
- Use wire or something similar to suspend the steering knuckle and prevent it from hanging down by the flexible hose.
- Do not damage the ball joint dust cover or steering knuckle.
- Securely set the SST on the spacer of the steering knuckle.
- If the spacer of the steering knuckle comes off, replace the steering knuckle with a new one.
| 4. REMOVE TIE ROD ASSEMBLY |
Remove the clip and the castle nut.
Using SST, separate the tie rod end LH from the steering knuckle.
- SST
- 09628-00011
- NOTICE:
- Hang SST with a string, etc. to prevent it from falling.
- Do not damage the front disc brake dust cover.
- Do not damage the ball joint dust cover.
- Do not damage the steering knuckle.
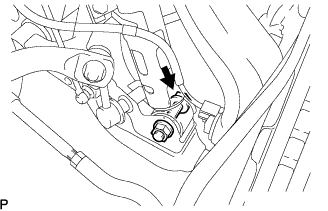
| 5. REMOVE HEIGHT CONTROL SENSOR LINK SUB-ASSEMBLY FRONT |
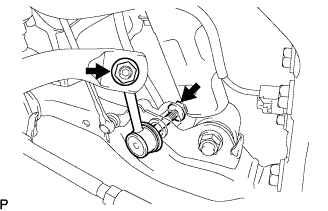
Remove the nut and separate the front suspension lower arm from the height control sensor link sub-assembly front.
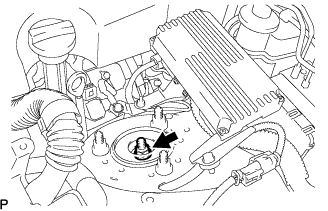
| 6. REMOVE FRONT SHOCK ABSORBER WITH COIL SPRING |
Support the front suspension lower arm with a jack. Be sure to place a wooden block between the jack and the front suspension lower arm to avoid damage.
Loosen the bolt while holding the nut. Separate the lower part of the front shock absorber from the front suspension lower arm.
- NOTICE:
- Do not remove the nut.
Loosen the lock nut of the front shock absorber.
- NOTICE:
- Do not remove the lock nut.
- Loosen the lock nut only when disassembling the front shock absorber with coil spring.
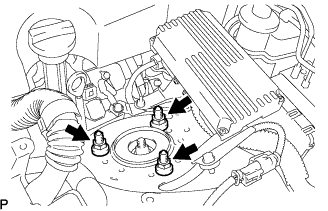
Remove the 3 nuts from the upper side of the front suspension support.
Slowly lower the jack. Remove the bolt and nut from the lower side to remove the front shock absorber with coil spring.
| 7. REMOVE FRONT STABILIZER LINK ASSEMBLY |
Remove the 2 nuts and the front stabilizer link assembly LH.
- HINT:
- If the ball joint turns together with the nut, use a hexagon (6 mm) wrench to hold the stud.
| 8. REMOVE ENGINE UNDER COVER |
| 9. REMOVE FRONT SUSPENSION LOWER ARM |
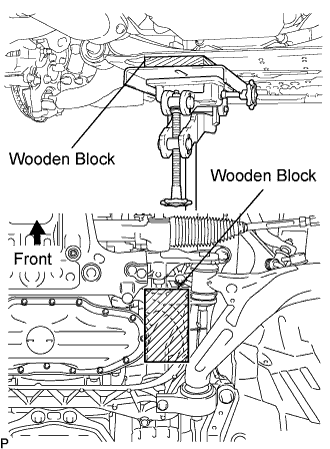
Support the front suspension crossmember with a transmission jack.
- NOTICE:
- Be sure to place a wooden block between the front suspension crossmember and transmission jack.
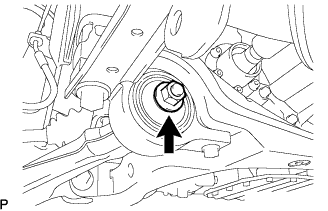
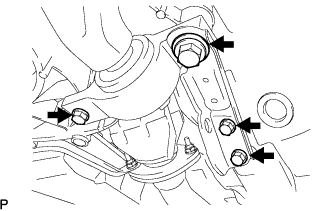
Remove the 2 bolts from the front lower ball joint.
Loosen the installation nut of the lower arm No.2 bracket sub-assembly.
- NOTICE:
- Do not remove the nut.
Remove the bolt, washer and nut on the front of the front suspension lower arm.
Remove the 4 bolts, side rail plate and front suspension lower arm with the lower arm No.2 bracket sub-assembly.
| 10. REMOVE FRONT LOWER BALL JOINT |
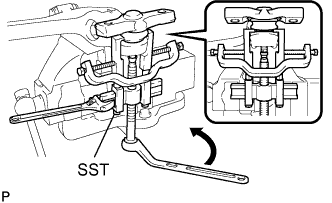
Fix the front suspension lower arm in the vise using aluminium plates.
Remove the clip and castle nut.
Use SST to remove the front lower ball joint from the front suspension lower arm.
- SST
- 09950-40011(09951-04010,09952-04010,09953-04020,09954-04010,09955-04051,09957-04010,09958-04011)
- NOTICE:
- Do not damage the front suspension lower arm.
- Do not damage the lower ball joint dust boots.