Oil Pump -- Installation |
| 1. INSTALL OIL PUMP ASSEMBLY |
Apply seal packing to the oil pump as shown in the illustration.
- Seal packing:
- Part No. 08826-00080 or equivalent
- Seal diameter:
- 2 to 3 mm (0.08 to 0.12 in.)
- NOTICE:
- Wipe off any oil from the contact surface.
- Install the oil pump within 3 minutes after applying seal packing.
- Do not expose the seal to engine oil for at least 2 hours after installing it.
 |
Apply engine oil to a new O-ring.
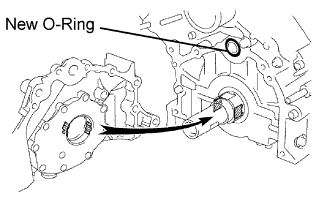 |
Install the O-ring to the cylinder block.
Align the spline teeth of the oil pump drive gear with the large teeth of the crankshaft, and slide the oil pump onto the crankshaft.
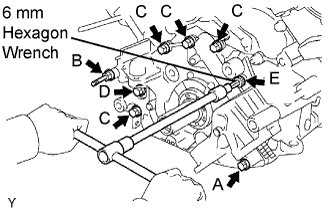
Install the oil pump with a new stud bolt and the 7 bolts. Uniformly tighten the bolts in several passes.
- Torque:
- 15.5 N*m{153 kgf*cm, 11 ft.*lbf} for bolt A, B, C and E
- 30.5 N*m{311 kgf*cm, 22 ft.*lbf} for bolt D
- HINT:
- Use a 6 mm hexagon wrench for the hexagon head bolt.
- Each bolt length is as shown in the table.
- Bolt length:
Bolt Bolt Head Size Length A 12 mm bolt 50 mm (1.97 in.) B 12 mm stud bolt 106 mm (4.17 in.) C 12 mm 30 mm (1.18 in.) D 14 mm 44 mm (1.73 in.) E 6 mm hexagon bolt 28 mm (1.10 in.)
- NOTICE:
- Do not reuse the stud bolt B.
 |
| 2. INSTALL OIL STRAINER SUB-ASSEMBLY |
Install a new gasket and the oil strainer with the 2 bolts and 2 nuts.
- Torque:
- 7.5 N*m{76 kgf*cm, 66 in.*lbf}
- HINT:
- The bolt length is 12 mm (0.47 in.).
 |
| 3. INSTALL OIL PAN SUB-ASSEMBLY |
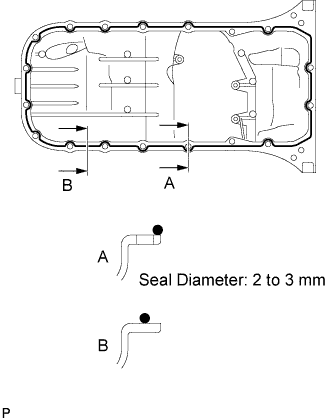
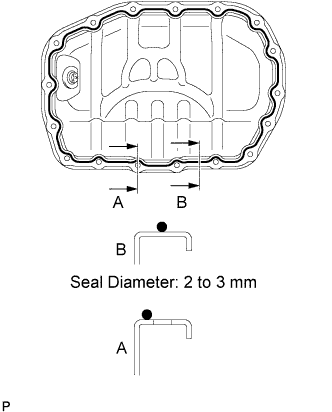
Apply the seal packing as shown in the illustration.
- Seal packing:
- Part No. 08826-00080 or equivalent
- Seal diameter:
- 2 to 3 mm (0.08 to 0.12 in.)
- NOTICE:
- Wipe off any oil from the contact surface.
- Install the oil pump within 3 minutes after applying seal packing.
- Do not expose the seal to engine oil for at least 2 hours after installing it.
 |
Temporarily install the oil pan with the 18 bolts, stud bolt and 2 nuts.
- HINT:
- Each bolt length is as shown in the table.
- Bolt length:
Bolt Bolt Head Size Length A 10 mm 22 mm (0.87 in.) B 12 mm 25 mm (0.99 in.) C 12 mm 60 mm (2.38 in.) D 10 mm 35 mm (1.38 in.)
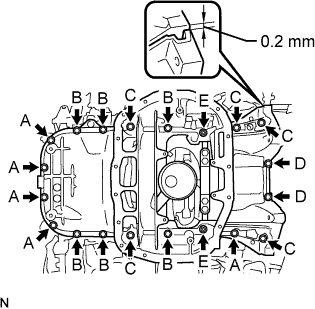 |
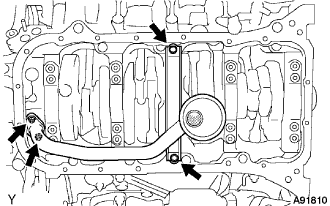
Set the oil pan as shown in the illustration.
- NOTICE:
- Make sure the clearance between the rear end of the oil pan and cylinder block is 0.2 mm (0.008 in.) or less. If the clearance is more than 0.2 mm (0.008 in.), the oil pan will deform when tightening the bolts and nuts.
Uniformly tighten the bolts and nuts in several passes.
- Torque:
- 7.5 N*m{76 kgf*cm, 66 in.*lbf} for bolt A, D
- 28 N*m{286 kgf*cm, 21 ft.*lbf} for bolt B, C
- 28 N*m{286 kgf*cm, 21 ft.*lbf} for nut E
| 4. INSTALL OIL PAN BAFFLE PLATE |
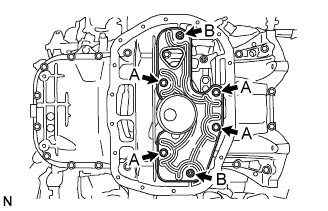
Install the baffle plate with the 4 bolts and 2 nuts.
- Torque:
- 7.5 N*m{76 kgf*cm, 66 in.*lbf}
 |
| 5. INSTALL NO. 2 OIL PAN SUB-ASSEMBLY |
Apply seal packing as shown in the illustration.
- Seal packing:
- Part No. 08826-00080 or equivalent
- Seal diameter:
- 3 to 4 mm (0.12 to 0.16 in)
- NOTICE:
- Wipe off any oil from the contact surface.
- Install the oil pan within 3 minutes after applying seal packing.
- Do not expose the seal to engine oil for at least 2 hours after installing it.
 |
Install the oil pan with the 15 bolts and 2 nuts. Uniformly tighten the bolts and nuts in several passes.
- Torque:
- 6.9 N*m{70 kgf*cm, 61 in.*lbf}
- HINT:
- The bolt length is 14 mm (0.55 in.).
| 6. INSTALL ENGINE OIL LEVEL SENSOR |
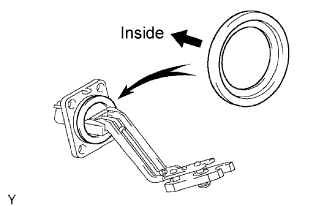
Install a new gasket to the sensor as shown in the illustration.
 |
Install the oil level sensor with the 4 bolts.
- Torque:
- 5.4 N*m{55 kgf*cm, 48 in.*lbf}
- HINT:
- The bolt length is 16 mm (0.63 in.).
| 7. INSTALL CRANKSHAFT POSITION SENSOR |
Install the sensor with the bolt.
- Torque:
- 6.5 N*m{66 kgf*cm, 58 in.*lbf}
| 8. INSTALL OIL FILTER BRACKET SUB-ASSEMBLY |
Install a new O-ring and the oil filter bracket with the stud bolt and nut.
- Torque:
- 18 N*m{184 kgf*cm, 13 ft.*lbf}
Connect the oil pressure switch connector.
| 9. INSTALL OIL FILTER SUB-ASSEMBLY |
| 10. INSTALL OIL DIPSTICK GUIDE |
Install a new O-ring to the oil dipstick guide.
 |
Install the guide with the bolt.
- Torque:
- 15 N*m{153 kgf*cm, 11 ft.*lbf}
Install the oil dipstick.
| 11. INSTALL CRANKSHAFT TIMING PULLEY |
Align the timing pulley set key with the key groove of the pulley.
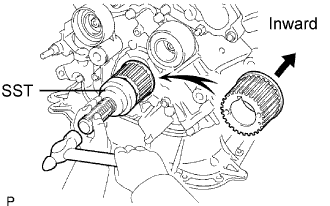 |
Using SST and a hammer, tap in the timing pulley, facing the flange side inward.
- SST
- 09223-46011
| 12. INSTALL TIMING BELT |
Install the timing belt (Click here).
| 13. INSTALL ENGINE AND TRANSMISSION ASSEMBLY |
Install the engine and transmission (Click here).