Meter / Gauge System Operating Light Control Rheostat Does Not Change Light Brightness
DESCRIPTION
WIRING DIAGRAM
INSPECTION PROCEDURE
INSPECT LIGHT CONTROL RHEOSTAT
CHECK HARNESS AND CONNECTOR (COMBINATION METER ASSEMBLY - LIGHT CONTROL RHEOSTAT)
METER / GAUGE SYSTEM - Operating Light Control Rheostat does not Change Light Brightness |
DESCRIPTION
When the light control rheostat knob is turned right, the combination meter and vehicle interior illumination will become brighter. When the light control rheostat knob is turned left, the combination meter and vehicle illumination will dim.
WIRING DIAGRAM
INSPECTION PROCEDURE
| 1.INSPECT LIGHT CONTROL RHEOSTAT |
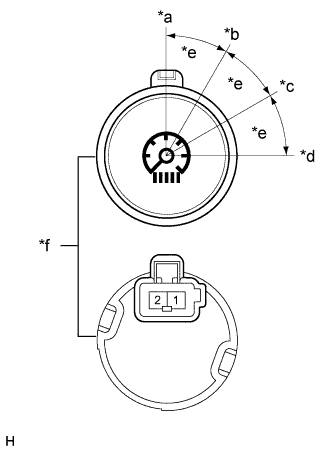
Remove the light control rheostat (HILUX_TGN26 RM0000024HT00EX.html).
Measure the resistance according to the table below.
- Standard Resistance:
Tester Connection
| Switch Condition
| Specified Condition
|
1 - 2
| Position A
| 666.9 to 737.1 Ω
|
1 - 2
| Position B
| 220.4 to 243.6 Ω
|
1 - 2
| Position C
| 77.9 to 86.1 Ω
|
1 - 2
| Position D
| Below 1 Ω
|
Text in Illustration*a
| Position A
|
*b
| Position B
|
*c
| Position C
|
*d
| Position D
|
*e
| 30°
|
*f
| Component without harness connected
(Light Control Rheostat)
|
| 2.CHECK HARNESS AND CONNECTOR (COMBINATION METER ASSEMBLY - LIGHT CONTROL RHEOSTAT) |
Disconnect the G19 combination meter assembly connector.
Disconnect the G31 light control rheostat connector.
Measure the resistance according to the value(s) in the table below.
- Standard Resistance:
Tester Connection
| Condition
| Specified Condition
|
G19-9 (TR) - G31-1 (T)
| Always
| Below 1 Ω
|
G19-9 (TR) - Body ground
| Always
| 10 kΩ or higher
|
G31-2 (E) - Body ground
| Always
| Below 1 Ω
|
| | REPAIR OR REPLACE HARNESS OR CONNECTOR |
|
|

