Outer Rear View Mirror -- Installation |
- HINT:
- Use the same procedure for the RH and LH sides.
- The procedure listed below is for the LH side.
| 1. INSTALL OUTER REAR VIEW MIRROR ASSEMBLY LH |
 |
Attach the claw and install the outer rear view mirror assembly LH with the 3 nuts.
- Torque:
- 8.0 N*m{82 kgf*cm, 71 ft.*lbf}
w/ Power Mirror Control System:
Connect the connector.
| 2. INSTALL FRONT DOOR TRIM BOARD SUB-ASSEMBLY LH |
for Double Cab:
Attach the 8 clips to install the front door trim board sub-assembly LH.
Install the screw and clip.
for Single Cab:
Attach the 9 clips to install the front door trim board sub-assembly LH.
Install the screw and clip.
| 3. INSTALL DOOR PULL HANDLE |
Install the door pull handle with the screw.
| 4. INSTALL FRONT DOOR LOWER FRAME BRACKET GARNISH LH |
Attach the 2 clips to install the front door lower frame bracket garnish LH.
| 5. INSTALL POWER WINDOW REGULATOR SWITCH ASSEMBLY WITH FRONT DOOR ARMREST BASE PANEL RH (w/ Power Window, for Front Passenger Side) |
 |
Connect the connector.
Attach the 4 claws and 2 clips to install the power window regulator switch assembly with front door armrest base panel RH.
| 6. INSTALL POWER WINDOW REGULATOR MASTER SWITCH ASSEMBLY WITH FRONT DOOR ARMREST BASE PANEL LH (w/ Power Window) |
Connect the connector.
Attach the 4 claws and 2 clips to install the power window regulator master switch assembly with front door armrest base panel.
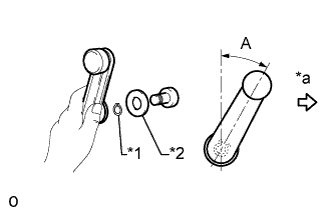
| 7. INSTALL FRONT DOOR WINDOW REGULATOR HANDLE ASSEMBLY (w/o Power Window) |
Temporarily install the front door window regulator handle, fully close the window, and then remove the front door window regulator handle.
Install the plate and snap ring to the front door window regulator handle.
Install the front door window regulator handle to the front door window regulator as shown in the illustration.
- Standard:
Area Specified Condition A 18 to 42°
Text in Illustration *1 Snap Ring *2 Plate *a Front Side
 |