Rear Door Speaker -- Installation |
- HINT:
- Use the same procedure for the RH and LH sides.
- The procedure listed below is for the LH side.
| 1. INSTALL REAR SPEAKER ASSEMBLY |
Install a nose piece to an air riveter or hand riveter. Then insert the mandrel part of a new φ4 mm waterproof rivet into the nose piece.
Using an air riveter or hand riveter, install the rear speaker assembly with 3 new rivets.
- NOTICE:
Do not pry the rivet with the riveter, as this will cause damage to the riveter and mandrel.
Text in Illustration *a INCORRECT *b CORRECT *1 Mandrel *2 Riveter
Confirm that the rivets are seated properly against the speaker.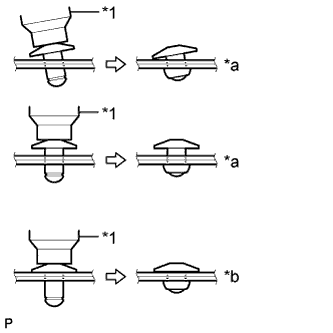
Text in Illustration *a INCORRECT *b CORRECT *1 Riveter - Do not tilt the riveter when installing the rivet to the speaker.
- Do not leave any space between the rivet head and speaker.
Do not leave any space between the speaker and door. Firmly hold together the 2 items while installing the rivet.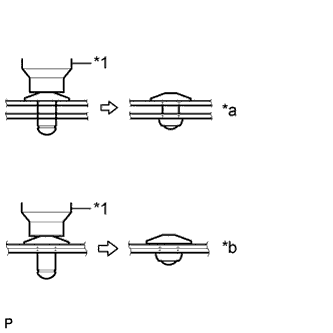
Text in Illustration *a INCORRECT *b CORRECT *1 Riveter
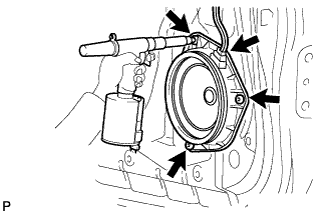 |
Connect the connector.
| 2. INSTALL REAR DOOR TRIM BOARD SUB-ASSEMBLY LH |
for Double Cab:
Attach the 8 clips to install the front door trim board.
Install the screw and clip.
for Single Cab:
Attach the 9 clips to install the front door trim board.
Install the screw and clip.
| 3. INSTALL REAR DOOR WINDOW REGULATOR HANDLE ASSEMBLY (w/o Power Window) |
Temporarily install the rear door window regulator handle, fully close the window, and then remove the rear door window regulator handle.
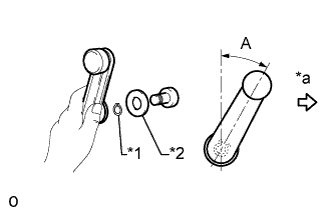
Install the plate and snap ring to the rear door window regulator handle.
Install the rear door window regulator handle to the rear door window regulator as shown in the illustration.
Text in Illustration *1 Snap Ring *2 Plate *a Front Side - Standard:
Area Specified Condition A 18 to 42°
 |
| 4. INSTALL REAR POWER WINDOW REGULATOR SWITCH ASSEMBLY WITH REAR DOOR ARMREST BASE PANEL (w/ Power Window) |
Connect the connector.
Attach the 2 claws and 2 clips to install the rear power window regulator switch assembly with rear door armrest base panel.
| 5. INSTALL DOOR PULL HANDLE |
Install the door pull handle with the screw.
| 6. CONNECT CABLE TO NEGATIVE BATTERY TERMINAL |
- NOTICE:
- When disconnecting the cable, some systems need to be initialized after the cable is reconnected (HILUX_TGN26 RM000004QR3003X.html).