Engine Hybrid System. Hilux. Tgn26, 36 Kun25, 26, 35, 36 Ggn25
1Kd-Ftv Emission Control. Hilux. Tgn26, 36 Kun25, 26, 35, 36 Ggn25
Emission Control System (For I-Art) -- On-Vehicle Inspection |
| 1. CHECK SEATING OF EGR VALVE |
Check that the engine starts and idles.
Stop the engine.
| 2. CHECK EGR VALVE OPERATION |
Connect the GTS to the DLC3.
Turn the ignition switch to ON and turn the GTS on.
Enter the following menus: Powertrain / Engine / Active Test / Control the EGR Step Position.
Check the values of Target EGR Position and Actual EGR valve pos in the Data List.
- OK:
Control Range Condition Specified Condition Active Test performed (Set EGR position to 0% → 30% → 60% → 90% → 60% → 30% → 0%) Actual EGR valve opening percentage changes according to Active Test operation
| 3. VISUALLY INSPECT HOSES, CONNECTIONS AND GASKETS |
Visually check that the hoses, connections and gaskets have no cracks, leaks or damage.
- NOTICE:
- Detachment or other problems with the engine oil dipstick, filler cap, PCV hose and other components may cause the engine to run improperly.
- Air suction caused by disconnections, looseness or cracks in the parts of the air induction system between the throttle body and cylinder head will cause engine failure or engine malfunctions.
| 4. CHECK VACUUM PUMP ASSEMBLY |
Disconnect the vacuum hose from the vacuum pump.
Connect the hose of a vacuum gauge to the pump.
Text in Illustration *1 Vacuum Gauge *2 Plug
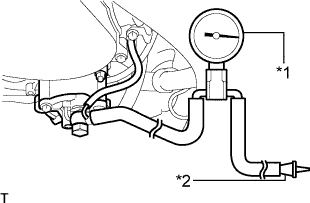 |
Insert a plug into the other hose of the gauge.
Start the engine and warm it up for more than 2 minutes.
With the engine idling, check the negative pressure of the pump.
- Standard negative pressure:
- More than 86.7 kPa (650 mmHg, 26 in.Hg)
- HINT:
- The vacuum pump assembly is listed as one of the 200000 km (124000 mile) maintenance parts. Make sure to disassemble and inspect it every 200000 km (124000 miles) and replace parts as necessary.
Remove the gauge from the pump.
Connect the hose to the pump with the clip.