Parking Brake Cable (For 4Wd And Pre-Runner) -- Installation |
| 1. INSTALL NO. 3 PARKING BRAKE CABLE ASSEMBLY |
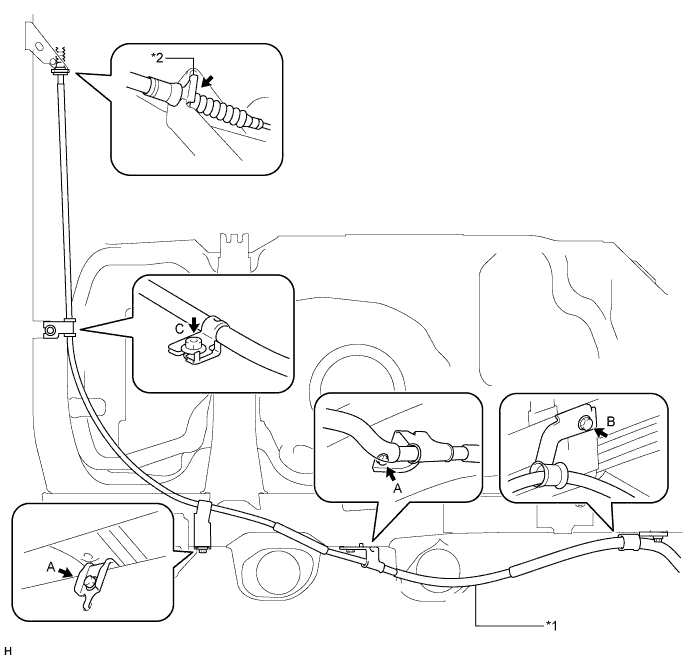
| *1 | No. 3 Parking Brake Cable | *2 | No. 3 Clip |
Install the No. 3 parking brake cable with the 3 bolts and nut.
- Torque:
- for Bolt A, Nut C:
- 26 N*m{260 kgf*cm, 19 ft.*lbf}
- for Bolt B:
- 14 N*m{143 kgf*cm, 10 ft.*lbf}
Install the No. 3 clip.
Connect the No. 3 parking brake cable to the parking brake shoe lever LH and backing plate LH.
Connect the No. 3 parking brake cable to the backing plate with the 2 bolts.
- Torque:
- 9.0 N*m{92 kgf*cm, 80 in.*lbf}
Connect the No. 3 parking brake cable to the parking brake shoe lever (HILUX_TGN26 RM0000010QS00YX.html).
| 2. INSTALL NO. 2 PARKING BRAKE CABLE ASSEMBLY |
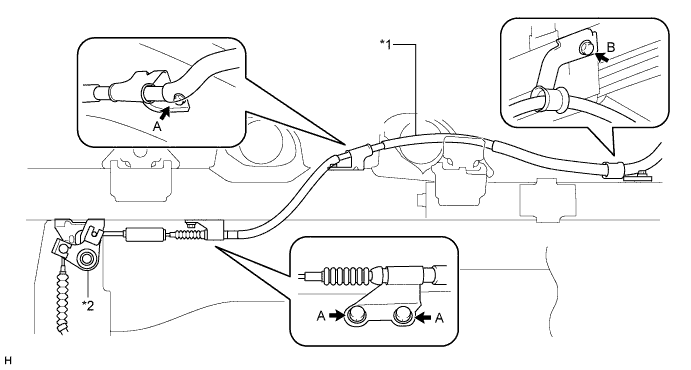
| *1 | No. 2 Parking Brake Cable | *2 | Parking Brake Equalizer |
Install the No. 2 parking brake cable with the 4 bolts.
- Torque:
- for Bolt A:
- 26 N*m{260 kgf*cm, 19 ft.*lbf}
- for Bolt B:
- 14 N*m{143 kgf*cm, 10 ft.*lbf}
Connect the No. 2 parking brake cable to the parking brake equalizer and apply MP grease to the connecting portion.
Connect the No. 2 parking brake cable to the parking brake shoe lever RH and backing plate RH.
Connect the No. 2 parking brake cable to the backing plate with the 2 bolts.
- Torque:
- 9.0 N*m{92 kgf*cm, 80 in.*lbf}
Connect the No. 2 parking brake cable to the parking brake shoe lever (HILUX_TGN26 RM0000010QS00YX.html).
- HINT:
- Use the same procedure described for the LH side.
| 3. INSTALL NO. 1 PARKING BRAKE CABLE ASSEMBLY |
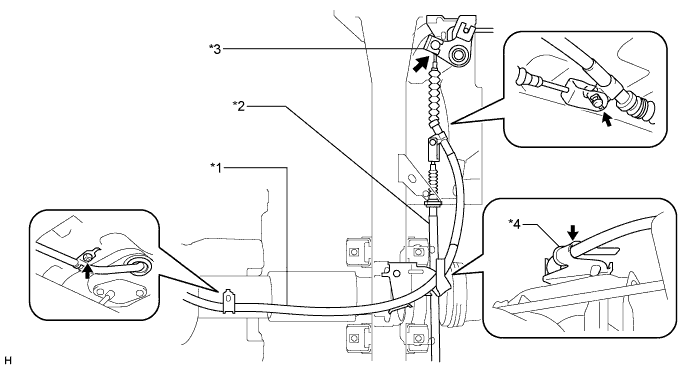
| *1 | No. 1 Parking Brake Cable | *2 | No. 3 Parking Brake Cable |
| *3 | Parking Brake Equalizer | *4 | Cable Support Bracket |
Connect the No. 1 parking brake cable to the parking brake lever (HILUX_TGN26 RM0000010M3015X.html).
Install the No. 1 parking brake cable clamp to the No. 1 parking brake cable.
Install the No. 1 parking brake cable with the bolt.
- Torque:
- 5.0 N*m{51 kgf*cm, 44 in.*lbf}
Connect the No. 1 parking brake cable to the parking brake equalizer.
Connect the No. 1 parking brake cable to the No. 3 parking brake cable and apply MP grease to the connecting portion.
Install the pin and No. 1 clip.
Attach the No. 1 parking brake cable to the cable support bracket.
Install the No. 1 heat insulator with the 2 bolts.
- Torque:
- 6.0 N*m{61 kgf*cm, 53 in.*lbf}
| 4. CHECK REAR BRAKE DRUM INSTALLATION |
Check that each part is installed properly.
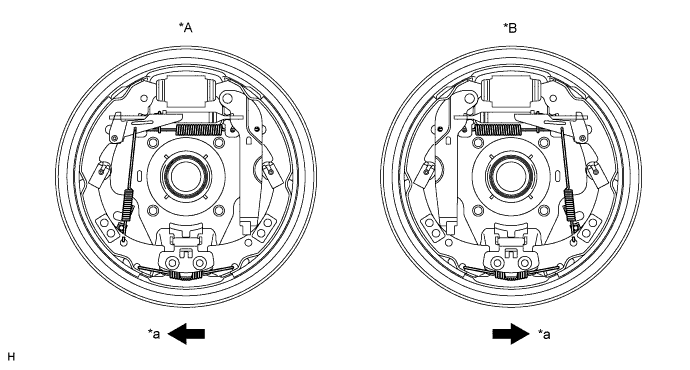
Text in Illustration *A LH Side *B RH side *a Front - -
Measure the brake drum inner diameter and the diameter of the brake shoes. Check that the difference between the diameters is equal to the specified shoe clearance.
- Standard shoe clearance:
- 0.6 mm (0.0236 in.)
- NOTICE:
- There should be no oil or grease on the contact surfaces of the shoe lining and drum.
 |
| 5. INSTALL REAR BRAKE DRUM SUB-ASSEMBLY AND NEW GASKET |
Install a new brake drum gasket and rear brake drum.
| 6. INSTALL REAR WHEEL |
Install the wheel.
- Torque:
- 105 N*m{1070 kgf*cm, 77 ft.*lbf}
| 7. ADJUST PARKING BRAKE |
| 8. INSTALL CONSOLE BOX ASSEMBLY |
w/ Console Box Lid:
(HILUX_TGN26 RM000003NEA00QX.html)
w/o Console Box Lid:
(HILUX_TGN26 RM000004QUK001X.html)
| 9. CONNECT CABLE TO NEGATIVE BATTERY TERMINAL |
- NOTICE:
- When disconnecting the cable, some systems need to be initialized after the cable is reconnected (HILUX_TGN26 RM000004QR3008X.html).