Load Sensing Proportioning Valve (W/ Vsc) -- Installation |
| 1. INSTALL BLEND PROPORTIONING VALVE ASSEMBLY |
Install the 2 valves to the bracket with the 2 bolts and nut.
- Torque:
- 13 N*m{127 kgf*cm, 9 ft.*lbf}
| 2. INSTALL BLEND PROPORTIONING VALVE ASSEMBLY WITH BRACKET |
Install the blend proportioning valve assembly with bracket with the 3 bolts.
- Torque:
- 29 N*m{296 kgf*cm, 21 ft.*lbf}
- NOTICE:
- Tighten the 3 nuts uniformly in alphabetical order.
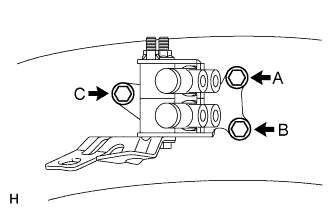 |
Using a union nut wrench, connect the brake lines at the 6 points indicated by the arrows in the illustration.
- Torque:
- 15 N*m{155 kgf*cm, 11 ft.*lbf}
- NOTICE:
- Use the formula to calculate special torque values for situations where a union nut wrench is combined with a torque wrench (HILUX_TGN26 RM000004QR1006X.html).
 |
Install 2 new clips.
| 3. BLEED BRAKE SYSTEM |
Bleed the brake master cylinder.
Remove the brake master cylinder reservoir filler cap assembly.
Add brake fluid to keep the level between the MIN and MAX lines of the reservoir while bleeding the brakes.
- Fluid:
- SAE J1703 or FMVSS No. 116 DOT 3
Using a union nut wrench, disconnect the 2 brake tubes from the brake master cylinder.
Slowly depress and hold the brake pedal.
Block the tube holes with your fingers, and then release the brake pedal.
Remove your fingers, slowly depress and hold the brake pedal, block the tube holes with your fingers again, and then release the brake pedal. Repeat this step 3 or 4 times.
Using a union nut wrench, connect the 2 brake tubes to the brake master cylinder assembly.
- Torque:
- 15 N*m{155 kgf*cm, 11 ft.*lbf}
- NOTICE:
- Use the formula to calculate special torque values for situations where a union nut wrench is combined with a torque wrench (HILUX_TGN26 RM000004QR1006X.html).


Bleed the brake line.
Remove the bleeder plug cap.
Connect a vinyl tube to the bleeder plug.
Depress the brake pedal several times, and then loosen the bleeder plug with the pedal depressed.*1
When fluid stops coming out, tighten the bleeder plug, and then release the brake pedal.*2
Repeat *1 and *2 until all the air in the fluid is completely bled out.
Tighten the bleeder plug completely.
- Torque:
- for Front Brake:
- 11 N*m{110 kgf*cm, 8 ft.*lbf}
- for Rear Brake:
- 10 N*m{102 kgf*cm, 7 ft.*lbf}
Install the bleeder plug cap.
Repeat the above procedure for each wheel to bleed the brake line.
Bleed the brake actuator.
- NOTICE:
- After bleeding the brake system, if the specified height or feel of the brake pedal cannot be obtained, bleed the brake actuator assembly with the intelligent tester by following the procedure below.
Depress the brake pedal more than 20 times with the ignition switch off.
Connect the intelligent tester to the DLC3.
Turn the ignition switch to ON.
- NOTICE:
- Do not start the engine.
Turn the intelligent tester on and enter the following menus: Chassis / ABS/VSC/TRC / Utility / Air Bleeding.
Bleed the brake actuator by following the instructions on the intelligent tester.
After bleeding air, tighten each bleeder plug.
- Torque:
- for Front Brake:
- 11 N*m{110 kgf*cm, 8 ft.*lbf}
- for Rear Brake:
- 10 N*m{102 kgf*cm, 7 ft.*lbf}
Turn the intelligent tester off and disconnect the intelligent tester from the DLC3.
Turn the ignition switch off.
Check for brake fluid leaks.
Check the brake fluid level in the reservoir (HILUX_TGN26 RM0000010K400UX_01_0001.html).
Check and clear DTCs (HILUX_TGN26 RM000000XHV0CGX.html).
| 4. BLEED CLUTCH LINE (for Manual Transmission) |
Remove the bleeder plug cap of the release cylinder.
Connect a vinyl tube to the bleeder plug.
Depress the clutch pedal several times, and then loosen the bleeder plug while the pedal is depressed.
When fluid no longer comes out, tighten the bleeder plug, and then release the clutch pedal.
Repeat the previous 2 steps until all the air in the fluid is completely bled.
Tighten the bleeder plug.
- Torque:
- 11 N*m{110 kgf*cm, 8 ft.*lbf}
Install the bleeder plug cap.
Check that all the air has been bled from the clutch line.