Front Seat Assembly (For Bench Seat Type) -- Reassembly |
- CAUTION:
- Wear protective gloves. Sharp areas on the parts may injure your hands.
| 1. INSTALL SEPARATE TYPE FRONT SEAT CUSHION PAD |
- NOTICE:
- As the separate type front seat cushion pad is affixed to the front seat cushion frame sub-assembly RH, do not remove the separate type front seat cushion pad from the front seat cushion frame sub-assembly RH unless it is necessary to replace the separate type front seat cushion pad. If the separate type front seat cushion pad is removed from the front seat cushion frame sub-assembly RH, make sure to replace the separate type front seat cushion pad.
- Perform the following only when replacing the separate type front seat cushion pad or front seat cushion frame sub-assembly RH.
When reusing the front seat cushion frame sub-assembly RH:
Remove any adhesive remaining in the area shown in the illustration.
Text in Illustration *1 Adhesive Area Install a new separate type front seat cushion pad to the front seat cushion frame sub-assembly RH.

When using a new front seat cushion frame sub-assembly RH:
Install a new separate type front seat cushion pad to a new front seat cushion frame sub-assembly RH.
| 2. INSTALL SEPARATE TYPE FRONT SEAT CUSHION COVER |
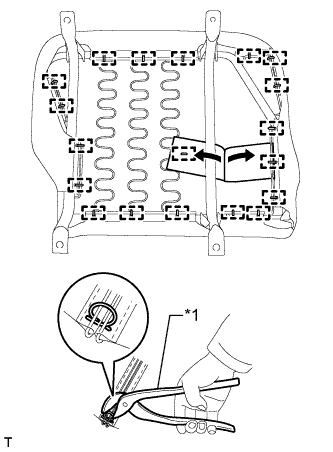
Using hog ring pliers, install the separate type front seat cushion cover to the separate type front seat cushion pad with new hog rings.
- NOTICE:
- Be careful not to damage the cover.
- When installing the hog rings, avoid wrinkling the cover.
Text in Illustration *1 Hog Ring Pliers
 |
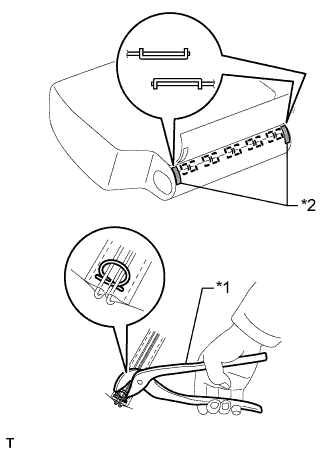
for TASA Made:
Using hog ring pliers, attach the separate type front seat cushion cover to the front seat cushion frame sub-assembly RH with new hog rings.- NOTICE:
- Be careful not to damage the cover.
- When installing the hog rings, avoid wrinkling the cover.
Text in Illustration *1 Hog Ring Pliers
 |
for TMT Made:
Using hog ring pliers, attach the separate type front seat cushion cover to the front seat cushion frame sub-assembly RH with new hog rings.- NOTICE:
- Be careful not to damage the cover.
- When installing the hog rings, avoid wrinkling the cover.
Text in Illustration *1 Hog Ring Pliers *2 Hog Ring *3 Hook
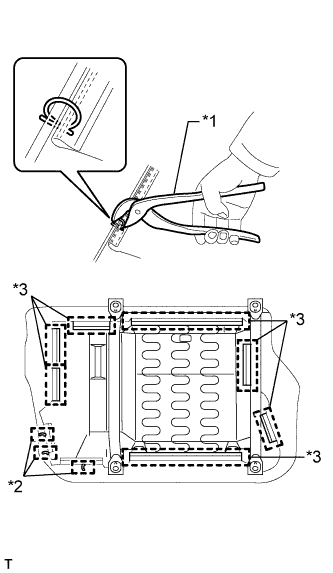 |
Attach the hooks.
| 3. INSTALL SEPARATE TYPE FRONT SEATBACK PAD |
Install the separate type front seatback pad to the separate type front seatback spring assembly.
| 4. INSTALL SEPARATE TYPE FRONT SEATBACK COVER |
Using hog ring pliers, install the separate type front seatback cover to the separate type front seatback pad with new hog rings.
- NOTICE:
- Be careful not to damage the cover.
- When installing the hog rings, avoid wrinkling the cover.
Text in Illustration *1 Hog Ring Pliers
 |
Attach the 4 claws to install the 2 front seat headrest supports.
Using hog ring pliers, install new hog rings.
 |
Attach the 2 pieces of fastening tape.
Text in Illustration *1 Hog Ring Pliers *2 Fastening Tape
Install the front seatback assembly with the 4 bolts.
- Torque:
- 40 N*m{408 kgf*cm, 30 ft.*lbf}
| 5. INSTALL FRONT SEAT INNER CUSHION SHIELD RH |
Attach the guide and 2 hooks to install the front seat inner cushion shield RH.
Install the screw.
| 6. INSTALL FRONT SEAT CUSHION SHIELD RH |
- HINT:
- Use the same procedure described for the front seat inner cushion shield RH.
| 7. INSTALL RECLINING ADJUSTER RELEASE HANDLE RH |
Install the reclining adjuster release handle RH with the screw.