Oil Pump -- Removal |
| 1. REMOVE ENGINE ASSEMBLY |
| 2. INSTALL ENGINE TO ENGINE STAND |
Install the engine to an engine stand with bolts.
- NOTICE:
- Pay attention to the angle of the sling device as the engine assembly or engine hangers may be damaged or deformed if the angle is incorrect.
- With the exception of installing the engine assembly to an engine stand or removing the engine assembly from an engine stand, do not perform any work on the engine while it is suspended, as doing so is dangerous.
Remove the 2 bolts and 2 engine hangers.
| 3. REMOVE IGNITION COIL ASSEMBLY |
 |
Disconnect the 4 ignition coil connectors.
Remove the 4 bolts and pull out the 4 ignition coils.
| 4. REMOVE SPARK PLUG |
Using a 16 mm spark plug wrench, remove the 4 spark plugs.
| 5. REMOVE PCV PIPE |
Disconnect the PCV hose from the PCV valve sub-assembly and intake manifold.
Remove the bolt and PCV pipe.
| 6. REMOVE THROTTLE BODY WITH MOTOR ASSEMBLY |
Disconnect the throttle position sensor and control motor connector.
Disconnect the 2 water by-pass hoses.
Remove the 2 bolts, the 2 nuts and the throttle body with motor assembly.
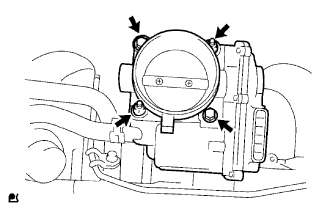 |
Remove the gasket from the intake manifold.
| 7. REMOVE FUEL DELIVERY PIPE SUB-ASSEMBLY |
Disconnect the 4 wire harness clamps.
 |
Disconnect the 4 injector connectors.
Disconnect the purge VSV connector.
Remove the vacuum hose.
 |
Remove the 2 bolts and fuel delivery pipe together with the fuel injectors.
- NOTICE:
- Be careful not to drop the fuel injectors when removing the fuel delivery pipe.
Remove the 2 No. 1 delivery pipe spacers.
 |
Remove the 4 injector vibration insulators.
Using a screwdriver, remove the 4 spacers.
- HINT:
- Tape the screwdriver tip before use.
Remove the O-ring from the spacer.
| 8. REMOVE FUEL INJECTOR ASSEMBLY |
Remove the 4 fuel injectors from the fuel delivery pipe.
Text in Illustration 
Pull Out
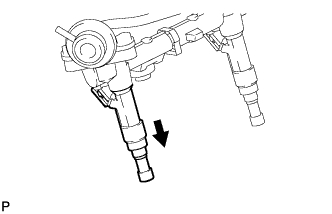 |
| 9. REMOVE INTAKE MANIFOLD |
Detach the 3 wire harness clamps from the 2 wire harness clamp brackets.
 |
Detach the No. 1 fuel hose from the intake manifold.
 |
Detach the No. 2 water by-pass hose.
Text in Illustration *A for Automatic Transmission *B for Manual Transmission
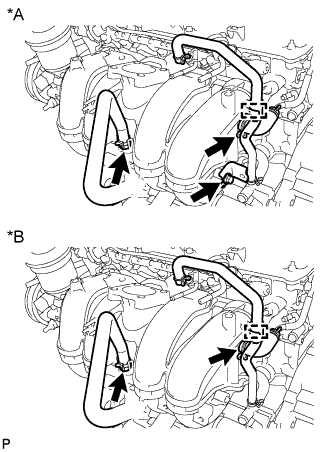 |
Disconnect the No. 3 PCV hose and vacuum hose from the intake manifold.
for Automatic Transmission:
Remove the bolt and oil filler tube bracket.
Remove the 5 bolts, 2 nuts and intake manifold.
 |
Remove the gasket from the intake manifold.
Remove the 2 bolts and 2 wire harness clamp brackets from the intake manifold.
 |
Remove the purge line hose from the intake manifold.
| 10. REMOVE GENERATOR ASSEMBLY |
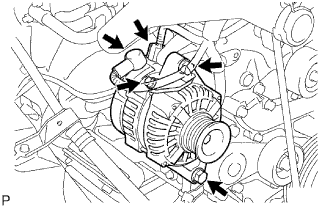 |
Detach the terminal cap.
Disconnect the generator connector.
Remove the nut and bolt and disconnect the generator wire.
Remove the 2 bolts and generator.
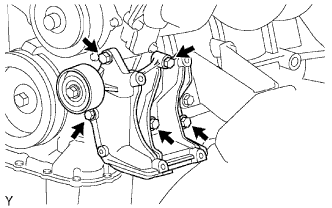
| 11. REMOVE NO. 1 COMPRESSOR MOUNTING BRACKET (w/ Air Conditioning System) |
Remove the 5 bolts and No. 1 compressor mounting bracket.
 |
| 12. REMOVE V-RIBBED BELT TENSIONER ASSEMBLY |
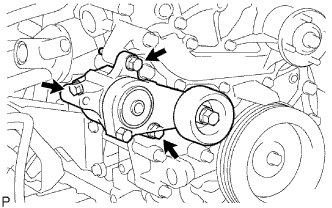 |
Remove the 3 bolts and belt tensioner.
| 13. REMOVE WATER INLET |
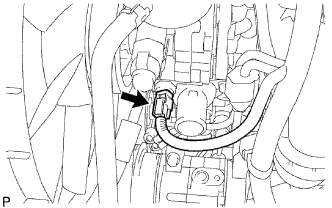 |
Remove the power steering oil pressure switch connector.
Remove the 2 nuts, bolt, water inlet and gasket.
 |
| 14. REMOVE THERMOSTAT |
Remove the thermostat from the timing chain cover.
Remove the gasket.
| 15. REMOVE NO. 1 IDLER PULLEY SUB-ASSEMBLY |
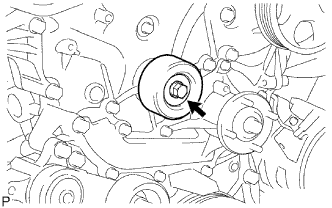 |
Remove the bolt, pulley and spacer.
| 16. REMOVE NO. 1 WATER BY-PASS PIPE |
Remove the 2 nuts, water by-pass pipe and gasket.
 |
| 17. REMOVE OIL FILLER CAP SUB-ASSEMBLY |
Remove the oil filler cap.
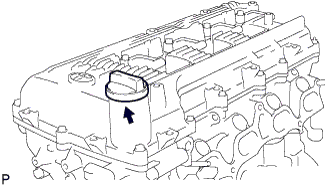 |
Remove the gasket from the oil filler cap.
| 18. REMOVE CYLINDER HEAD COVER SUB-ASSEMBLY |
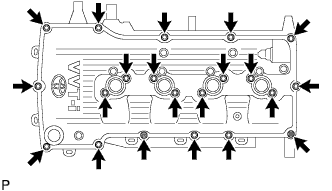
Remove the 19 bolts, 2 nuts, cylinder head cover and 2 gaskets.
 |
| 19. REMOVE CAMSHAFT POSITION SENSOR |
Disconnect the camshaft position sensor connector.
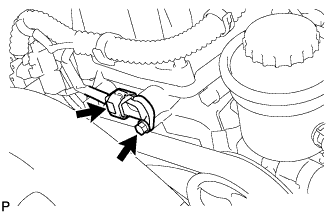 |
Remove the bolt and camshaft position sensor.
| 20. REMOVE CRANKSHAFT PULLEY |
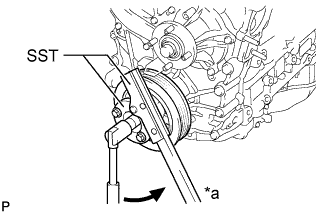
Using SST, hold the crankshaft pulley and loosen the pulley bolt until 2 or 3 threads are screwed into the crankshaft.
- SST
- 09213-54015(91651-60855)
09330-00021
Text in Illustration *a Hold 
Loosen
 |
Using SST and the pulley bolt, remove the crankshaft pulley.
- SST
- 09950-50013(09951-05010,09952-05010,09953-05010,09954-05021)
- HINT:
- Apply lubricant to the threads and end of SST.
 |
| 21. REMOVE NO. 2 OIL PAN SUB-ASSEMBLY |
Remove the drain plug and gasket.
Remove the 20 bolts and 2 nuts.
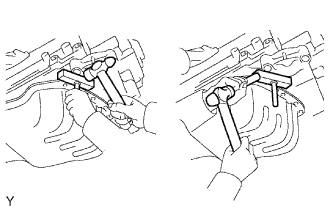
Insert the blade of an oil pan seal cutter between the oil pans. Cut through the applied sealer and remove the No. 2 oil pan.
- NOTICE:
- Be careful not to damage the contact surfaces of the oil pans.
 |
| 22. REMOVE OIL STRAINER SUB-ASSEMBLY |
Remove the bolt, 2 nuts, oil strainer and gasket.
| 23. REMOVE OIL PAN SUB-ASSEMBLY |
Remove the 16 bolts and 2 nuts.
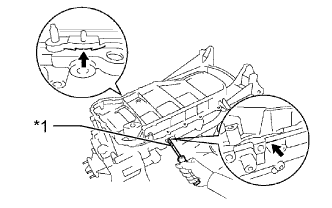
Remove the oil pan by prying between the oil pan and cylinder block with a screwdriver.
Text in Illustration *1 Protective Tape - NOTICE:
- Be careful not to damage the contact surfaces of the cylinder block and oil pan.
- HINT:
- Tape the screwdriver tip before use.
 |
Remove the O-ring.
| 24. REMOVE CRANKSHAFT POSITION SENSOR |
Disconnect the crankshaft position sensor connector.
 |
Disconnect the crankshaft position sensor connector from the connector bracket.
Detach the harness clamp.
Remove the bolt and crankshaft position sensor.
| 25. REMOVE TIMING CHAIN COVER SUB-ASSEMBLY |
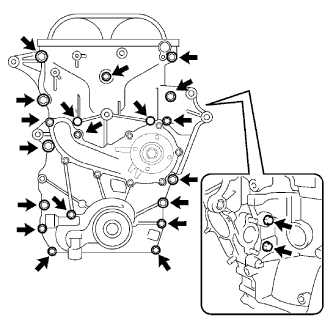
Remove the 19 bolts and 2 nuts shown in the illustration.
 |
Remove the timing chain cover by prying between the timing chain cover and cylinder head or cylinder block with a screwdriver.
Text in Illustration *1 Protective Tape - NOTICE:
- Be careful not to damage the contact surfaces of the cylinder head, cylinder block and timing chain cover.
- HINT:
- Tape the screwdriver tip before use.
 |
Remove the 3 O-rings.
 |
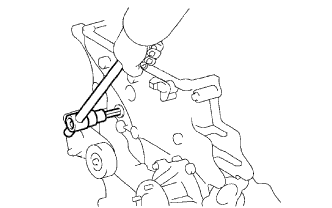
Using a 10 mm socket hexagon wrench, remove the timing chain cover plug.
 |
| 26. REMOVE ENGINE WATER PUMP ASSEMBLY |
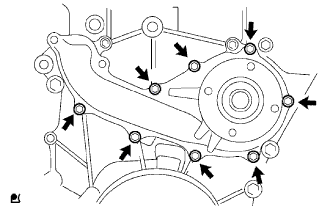
Remove the 8 bolts, engine water pump and gasket.
 |
| 27. REMOVE FRONT CRANKSHAFT OIL SEAL |
Place the timing chain cover on wooden blocks.
Text in Illustration *1 Protective Tape *2 Wooden Block
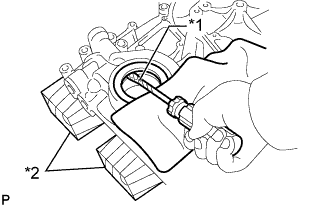 |
Using a screwdriver pry out the front crankshaft oil seal.
- HINT:
- Tape the screwdriver tip before use.